Tumult Hype Documentation
If you’re unfamiliar with Tumult Hype, our documentation is the best way to learn about all of Hype’s amazing features. Get up to speed by reading the other documentation chapters linked on the left side.
Learn your way
- Join our Forums! Over 61 thousand searchable posts on nearly every aspect of Tumult Hype.
- Watch a few tutorial videos and explore other learning resources.
- Visit our YouTube Channel to watch all our videos.
- View the Gallery for downloadable examples
- Download this documentation with example documents (39MB) or as a PDF (14MB).
Previous Versions
You’re currently reading documentation for version 4. You may also visit documentation for 3.6, 2.5, and 1.6.
Overview
Tumult Hype is the HTML5 creation app for macOS. Interactive content and animations made with Tumult Hype work on desktops, smartphones, and iPads.
Wow your web visitors by making beautiful animated content with Tumult Hype!
Tumult Hype is an HTML5 authoring tool. What is commonly referred to as “HTML5” is really a platform of technologies including the latest HTML tags, CSS styles, and improved JavaScript performance. HTML5’s capabilities allow for stunning visual effects and smooth animations, but previously required difficult hand-coding. There were no designer-friendly tools for building animated HTML5 content… until Tumult Hype.
Tumult Hype’s powerful keyframe-based animations bring your content to life and outputs state-of-the-art HTML5 that works on all modern browsers and mobile devices like iPhones and iPads. No coding required.
Tumult Hype Professional
Tumult Hype Professional is available as an in-app purchase and adds many powerful features to Hype 4:
- Responsive Layouts
- Symbols for creating reusable elements
- Persistent Symbols for master content
- Viewport enter/exit actions (aka Waypoints)
- Physics
- Sprite Sheet/Image Sequence import
- Advanced Export for choosing slices to export specific scenes/layouts/resources
- Official CDN to host runtime files
- Export Scripts to extend Hype and improve ad-tech workflows
- Poster/fallback images for ads
- Grid system
- External editor support for resources/javascript/head html
- Rearrangeable interface
- Editable timing functions
- JavaScript math equation timing functions
- Ability to make template files
- Custom HTML attributes (like
data-*) - Behaviors
- Editable additional HTML attributes (like data-*)
- Exports ProRes video, APNG, and OAM widgets
- Video export bitrate option
- Vector shape morph algorithm option
- Hype Reflect gains a responsive preview
Tumult Hype Professional Interface

This user guide walks you through the entire product and gives in-depth details on the workings of both Tumult Hype and Tumult Hype Professional. To help distinguish between Standard and Professional features, all documentation chapters or sections covering Professional features begin with the following label:
Any chapters or sections without this label cover features available in both Tumult Hype and Tumult Hype Professional.
The Tumult Hype Interface
Tumult Hype also provides numerous inspectors for manipulating the document, scenes and elements. These are discussed in depth in the Inspectors chapter.
Tumult Hype Professional Interface Customizability
One features unlocked by the Tumult Hype Professional in-app purchase is a customizable user interface. Click and drag the customizable view handles on the Inspector, Scene and Layouts selector, or the Timeline to arrange Tumult Hype’s as you see fit.

The Customizable View Handle
As you drag a view around, Tumult Hype highlights nearby drop regions.
Key Terms
There are seven basic key terms to learn for using Tumult Hype: Scenes, Elements, Properties, Keyframes, Animations, Timelines, and Actions. The remainder of the user guide will reference these terms, and by sticking with them you’ll be fluent when conversing with other Tumult Hype users.
Scenes
Each Tumult Hype document is composed of one or more scenes. Scenes are analogous to slides in a Keynote or PowerPoint presentation, or to cards in HyperCard. Scenes contain elements and timelines. Actions are used to transition between different scenes.
Elements
Elements are the manipulatable objects in a scene. They can be shapes, text, buttons, textured buttons, images, video, HTML widgets.
Properties
Properties are the attributes which define an element’s style, positioning, and auxiliary information. Most properties are animatable. Properties are defined or changed by manipulating elements in Tumult Hype’s scene editor or by changing values in an inspector. Properties define, among many things, an element’s location, size, color, borders, or the effects applied to the element.
Keyframes
Keyframes define a property’s value at a specific time on a timeline.
Animations
Animations change a property’s value over a period of time; they are defined by two keyframes that set the starting and ending values of the property’s animation. Tumult Hype automatically creates animations between any keyframes which have different values. Animations also have different easing effects, different rates of change, such as ease-in, ease-out, ease-in-out, instant, bounce, and linear. Furthermore, by using motion paths, elements can be animated along arbitrary complex curves.
Timelines
Timelines contain animations. Each scene has a Main Timeline, which is automatically started when the scene is shown. Scenes can have many timelines which can play in parallel, and actions are used to control timeline playback.
Actions
Actions make your document interactive. Among other things, actions are used to change scenes, control timeline playback, start or stop sounds, or run custom JavaScript functions. Actions are triggered in response to user events, such as mouse clicks or tap gestures, and scene events, such as scene loading or timeline playback completion. Actions can also be placed on a timeline, to be triggered at a specific time.
Symbols
Symbols are a powerful tool which let you easily reuse elements, timelines, and animations. Think of symbols as scenes within scenes: symbols contain their own elements, timelines, actions, and behaviors that can be triggered independently from the scene’s. Because editing one instance of a symbol changes all instances, symbols are also useful for sharing identical elements across multiple scenes or at different positions in the same scene.
Behaviors
Custom behaviors allow you to create your own action handlers that can be triggered like Hype’s built-in action handlers. Just like Hype’s built-in action handlers, your own behaviors can trigger a series of actions. Behaviors ensure you don’t repeat any work when creating and using complex actions.
Scenes
Scenes are a useful way to separate and organize content. They are similar to slides in a Keynote or PowerPoint presentation. Scenes contain elements and timelines. Actions are used to transition between different scenes. Each scene contains a unique set of elements and timelines; modifying an element or timeline on one scene will not affect elements or timelines on other scenes. A scene may have multiple layouts for use on device sizes. The responsive layouts chapter explains this feature.
Managing Scenes
Every Tumult Hype document starts with one scene by default. The Scenes menu offers a few commands for managing scenes:
- New Scene — Creates a new scene and selects the new scene for editing.
- Duplicate Scene — Creates an identical copy of the current scene, copying all of the current scene’s elements, timelines, and animations. To duplicate a scene using a keyboard shortcut, select option + drag on the scene.
- Duplicate Scene (Without Animations) — Creates an identical copy of the current scene, copying all of the current scene’s elements, but omitting the current scene’s timelines and animations. This command is useful for composing complex animations that need to span multiple scenes.
- Delete Scene — Deletes the current scene, removing all associated elements, timelines, and animations.
- Go To Scene — Offers a submenu listing all of the document’s scenes, and choosing one of the scenes makes that the current scene for editing.
- Go to Layout - Offers a submenu listing all layouts in the currently selected scene. HYPE PRO ONLY
Tumult Hype’s Scene Selector – toggled by the Show Scenes toolbar button – offers additional control over scenes. Create new scenes using the Add Scene plus button, rearrange scenes using drag-and-drop, and rename them by double-clicking their name. Finally, scenes can be copied and pasted by selecting a scene in the Scene Selector and choosing Edit > Copy and then choosing Edit > Paste.

Scene Selector
By default, all scenes in a document have the same size, and choosing a different default size or changing the Width or Height values affects all scenes. To change the size of just the current scene, disable “Apply changes to all scenes” in the Scene inspector.

Scene Size Controls (Scene Inspector)
The active scene’s background color is set by the Background color well found in the Color section in the Scene inspector. To make the current document transparent and prevent all scenes from drawing their background colors, open the Document inspector and deselect the Make Background Transparent checkbox in the Options section.
Changing Scenes
Actions are used to transition between different scenes. Tumult Hype affords ways to trigger actions in response to mouse events such as clicks, scene events such as timeline completion, and at specific times. All of those triggers can invoke the Jump to Scene action with one of seven different scene transitions. The Actions chapter has more information about all of Tumult Hype’s action triggers and different actions, including the Jump to Scene action.
Rulers
Show the scene ruler by selecting View > Show Ruler, and hide it with the corresponding View > Hide Ruler command. Tumult Hype indicates the bounds of the currently-selected elements within the ruler.
Guides
Alignment guides appear and disappear as elements are moved on the scene. Guides assist in arranging elements relative to each other and the scene. By default, elements snap to nearby guides; this behavior can be disabled by disabling the Snap to Guides command in the Arrange menu.
The scene and all elements automatically define their own alignment guides. The scene’s automatic guides define its center and edges. Likewise, every element generates automatic guides for its center and edges.
Manual guides can be added to the scene by choosing View > Guides > Add Horizontal Guides or Add Vertical Guides. Manually-created guides can by dragged anywhere on the scene; drag them off the scene to delete them. The View > Guides menu features many commands for showing, hiding, locking, copying, and pasting guides.
One very powerful feature in the View > Guides menu is the Add Multiple Guides command. Choosing this command reveals a dialog from which any number of evenly-spaced guides can be created. Specify either the number of columns or rows to be created, or the pixel distance between each guide. Layout Guides make arranging content in columns or rows a snap.

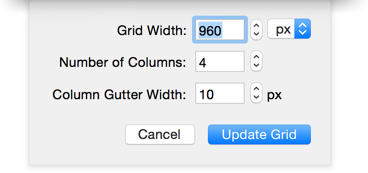
Layout Guides Dialog
Grid System
To help you arrange your content, Hype Pro supports layout grids. Hype Pro’s layout grids follow the spirit of the popular 960 Grid System by letting you easily create columns and gutters to arrange content.
To create a layout grid, choose View > Layout Grid > Create Grid. In the Layout Grid Editor, you’ll find controls to set the width of the layout grid, define the number of columns, and set the gutter width between each column.
Clicking Create Grid adds an overlay to the current scene that defines the grid’s columns and gutters. Elements snap to the grid, making it easy to arrange your content against the grid. As with user guides and smart guides, element snapping can be temporarily disabled by pressing the Command key while dragging. Likewise, snapping can be permanently disabled by disabling the Arrange > Snap Elements menu item. If you want to use a grid to arrange elements but don’t want the overlay, choose Arrange > Layout Grid > Hide Grid; reveal the grid by then choosing Arrange > Layout Grid > Show Grid.
Change the current layout grid’s settings by choosing Arrange > Layout Grid > Edit Grid, and remove the grid by choosing Arrange > Layout Grid > Remove Grid.
Elements
Elements are the objects in a scene. They can be shapes, vector shapes, text, buttons, textured buttons, images, videos, audio, or HTML widgets.
Text
Add text to the current scene by choosing the Insert > Text menu item, by using the Elements toolbar button, or typing t. The Typography inspector allows you to change the selected element’s font, size, style, color, shadow, and spacing.
For even more styling control, you can directly edit the text element’s inner HTML by selecting the element and then choosing Edit > Edit Element’s Inner HTML. In the pop-up window which appears, you can enter any HTML and see the results live.
After inserting a new text element it is selected and editable. When you are done editing press esc or click outside the text element. To edit the text at a later point, simply double-click the element. By default, text fields automatically resize to accommodate text entered as you type. Manually resizing an element fixes the element at the specified size.
For information on selecting fonts or using web fonts, visit the Typography chapter.
Images
Tumult Hype supports importing a wide variety of web image formats, including JPEG, GIF, PNG, and SVG. Create image elements by choosing the Insert > Image menu item, or by via the Elements toolbar button. You can also drag-and-drop images onto the scene, or copy and paste them from other applications. Finally, images can be added by dragging-and-dropping from the Media Browser or from the Resource Library (assuming the image is already stored in the current document’s Resource Library).
Images initially preserve their aspect ratio when resized. You can disable this behavior by deselecting the Constrain Proportions checkbox in the Metrics inspector. If an image’s dimensions have been changed, the image can be restored to its actual dimensions by clicking the Original Size button in the Metrics inspector.
To convert an image to a Vector Shape with adjustable corner points, select the image and click Edit > Convert to Vector Shape. This sets the image as a background for a vector shape.
For tips and tricks regarding SVG files, please visit our forums.

Proportion and Sizing Options (Metrics Inspector)
By default, Tumult Hype documents appear to visitors only after all included images have been downloaded. This ensures that scene transitions and animations appear as intended. To disable preloading for individual images, open the Resource Library and deselect the Preload checkbox for any images which should not be preloaded.
Newly created image elements scale the image as the element is resized. If you need an image to repeat horizontally and/or vertically, you can configure those options from the Element inspector’s Background section.
Retina Support & Image Optimization: Tumult Hype automatically optimizes images during export; images are converted to formats supported on the web and resized for optimum support on “retina” or high DPI screens. For more information, read the Image Optimization section of the Previewing & Exporting chapter.

Background Property (Element Inspector)
Video
Tumult Hype embeds video using HTML’s native <video> tag, whenever possible. If the browser doesn’t support HTML5 video, as is the case with Internet Explorer 6 through 8, Hype falls back to the QuickTime plug-in. For information about playing and controlling video, see the Audio & Video documentation chapter.
Audio
Tumult Hype embeds audio using the web audio api. For information about playing and controlling audio, see the Audio & Video documentation chapter.
Sprite Sheet
Sprite sheets created in Tumult Hype generate a sequence of images to create a frame animation on the timeline. Sprite sheets may be generated from any of the following source images:
- A sequence of numbered images (i.e 001.png, 002.png, 003.png)
- A large image consisting of multiple frames spaced evenly in a large grid
- An animated GIF, from which individual frames are extracted
For more information on creating Sprite Sheets, view the Sprite Sheets chapter.
Vectors
There are three elements that produce vector shapes in Tumult Hype:
Vector Shape
Selecting the Vector Shape tool from the insert menu enables the pen cursor for creating paths which can produce lines, open shapes and closed shapes. The tool can also be enabled by pressing v. For more information about creating, animating, and modifying vector shapes in Tumult Hype, view the Vector Shapes chapter.
Polygons
Polygons are vector shapes with three or more sides. Insert a polygon by selecting Insert > Polygon. Adjust the number of sides by adjusting the value in the Element Inspector. Double click on a polygon to edit individual anchor or control points.
Pencil
The Pencil tool creates a freehand line on the scene when clicking and drawing. Enable the pencil tool by either clicking Elements > Pencil, or pressing p. Each new line is a separate vector shape editable by double clicking. View Creating Pencil Lines for information on using the tool, and the Vector Shapes chapter for information on modifying the generated vectors.
Shapes
You may quickly add a Rectangle, Rounded Rectangle, or an Ellipse from the Elements toolbar item or by using the r, u, or o keyboard shortcuts. The Rectangle element is the most foundational element in Tumult Hype: Rectangle elements can be customized to look and behave like almost all other elements.
Add shapes to your scene by selecting Insert > Shape, or by using the Elements toolbar button.

Default shapes
Converting Shapes to Vector Shapes
Converting rectangles, rounded rectangles, or ellipses into vector shapes gives you control over individual points and curves in your shapes. Convert your shapes into editable vector shapes by first selecting them, and selecting Edit > Convert to Vector Shape. You may also select one or more shapes and choosing Convert to Vector Shape in the context menu.
Buttons
Buttons are elements which present different appearances when the mouse hovers over them, or when they are clicked or tapped. Tumult Hype offers two pre-configured button types, a flat button and a textured button, in its Insert menus. Other element types (Rectangles, Ellipses, Text, and Images) can also be converted to a button by choosing Edit > Show Button Controls. Any button element can be transformed back into a normal element by choosing Edit > Clear All Button States and then choosing Edit > Hide Button Controls.
When button elements are selected, Tumult Hype shows a segmented control above the element to toggle between the button’s normal, hover, and pressed states. When the hover or pressed states are active, any changes made to the button — including position, size, and background images or gradients — will be applied when the element is hovered over or clicked. To clear the changes made in those states, choose Edit > Clear All Button States.

Button Controls
HTML Widgets
An HTML widget is used to display embedded HTML in your scene or to embed an iframe of a different web page. One use for this element is to embed a code snippet that requires its own JavaScript. Insert HTML Widgets using the Insert menu or the Elements toolbar button.
To add a Twitter widget, for example:
- Insert a new HTML Widget
- Open Tumult Hype’s Element inspector
- Click the Edit Code Snippet button
- Paste code obtained from Twitter’s developer site into the Inner HTML popover as shown below.
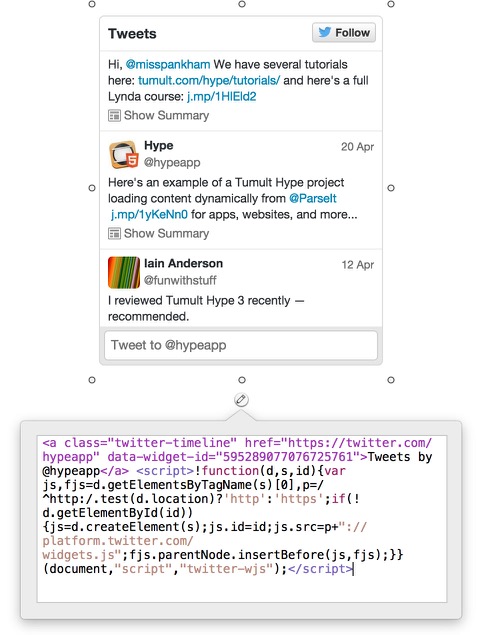
An HTML widget containing Twitter Widget Code
To display a webpage within the HTML widget, select Specified URL and enter the full URL (make sure to include http:// or https:// — https:// is preferred).
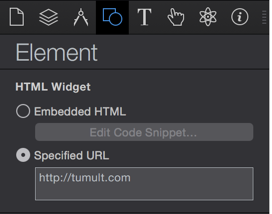
Display a Web Page within an HTML widget
Element Properties
Arrangement, Distribution and Sizing
Elements are rearranged and resized using Tumult Hype’s scene editor. To assist with element arrangement, Tumult Hype’s scene editor provides automatic guides based on the scene’s border and other existing elements. Likewise, it assists with resizing by snapping the element to match the width or height of other elements on the scene. For further control over element positioning, learn more about guides and the grid system.
Rotation
To rotate elements along the Z-axis, select the elements and hold the command key while hovering just outside of the element bounds. The ![]() cursor indicates the selected element can be rotated. The Metrics inspector also has controls for rotating elements along the X-, Y-, and Z-axis.
cursor indicates the selected element can be rotated. The Metrics inspector also has controls for rotating elements along the X-, Y-, and Z-axis.
An element’s anchor point sets the element’s Z-axis rotation origin. To move a selected element’s anchor point, press Command to reveal the anchor point crosshair icon  and then drag the icon to a new location. The Metrics inspector offers control over the anchor point location in the Rotation Origin section.

Element with Z-axis rotation animation and a custom anchor point
Multiple elements can be moved, rotated, or resized by first drag-selecting elements on the scene and then moving or resizing one of the selected elements.
Color
To pick a color for a selected element, click on the color well in the appropriate inspector. Tumult Hype uses the Standard Mac OS color picker, with the addition of an Opacity slider and hexadecimal/RGBa field. When reducing opacity below 100%, the hexadecimal field automatically converts to the RGBa equivalent.

Both the hexadecimal and rgba fields are editable and selectable for copying and pasting from other applications.
Gradients: To use a gradient as an Element background, select the Fill Style dropdown in the Element Inspector and select Gradient. Rotate your element gradient by adjusting the rotation angle value.
Shadows
Shadows may be added to any type of element from the Element Inspector. The three basic types of shadows are Drop Shadow, Box Shadow, and Inset shadow. The image below demonstrates these types:

Drop Shadow, Box Shadow, and Inset shadow on the same shape
When adjusting a shadow, you define the X and Y offset for the shadow’s position, the blur in pixels for the shadow, and the color of the shadow itself.

Drop Shadows provide the most natural shadows for elements, as they not only the outer edges of elements, but also the transparent portions of transparent PNGs and GIFs. Combining multiple shapes into a single group and applying a drop shadow to the group will create a single seamless drop shadow for those elements:

Text Shadows may be added from either the Text Inspector or from the Element Inspector.
Scaling
Scale an element or a group by first making a selection, and holding Command while dragging a corner resize handle. The Scale options in the Metrics inspector provide further control over the scaling ratio, height, and width.
To scale an element in response to the width of a layout, please see the Flexible Layout and Responsive Layouts chapters. Scaling is a great technique to pair with Symbols used across layouts.

Scaling options in the Metrics Inspector
Scaling Techniques
Scaling several objects proportionally based on the Tumult Hype document’s container:
- First, turn on Flexible Layouts in the Element inspector for the document. Set the ‘Scale’ value for Width and Height to be 100%.
- Next, select elements on your scene and add them to a group.
- With your group selected, switch to the Metrics inspector and select the horizontal and vertical scaling arrows. Next, deselect any pins, and set the scaling behavior to ‘Shrink to Fit’ or ‘Expand to Fill’. Also, select ‘Zoom Contents.’
Scale options for scaling
elements proportionally
Skew
To skew an element, slanting its angles either on the X or Y dimension, select it and adjust the desired axis values in the Metrics inspector. Like all properties, skew can be animated.
Positioning & Layer Order
The Arrange menu provides several different commands for arranging, distributing, and resizing elements:
- Bring Forward
- Bring to Front
- Send Backward
- Send to Back
- Distribute > Horizontally
- Distribute > Vertically
- Distribute > Horizontally Within Selection
- Distribute > Vertically Within Selection
- Align > Left
- Align > Center
- Align > Right
- Align > Top
- Align > Middle
- Align > Bottom
- Size > Make Same Width
- Size > Make Same Height
- Size > Make Same Size

Ordering Toolbar Items
CSS Filter Effects
CSS Filter Effects offer control over the following effects: blur, sepia, saturate, hue, brightness, and contrast. All Filter Effects can be animated. Note that foreground effects are only supported in Chrome 18+, Safari 6+, and iOS 6+, and backdrop effects are only supported in iOS 9+ and Safari 9+.
Like every property, both foreground and backdrop filter effects may be animated on the timeline.
Foreground CSS Filter Effects
CSS filter effects apply adjustments to any elements using properties you may be familiar with from image editing software:

Element Inspector: CSS Filter Effects
Below are a few different filter effects applied to the same image:

CSS Filter Effects Example
- Original Image
- Sepia: 56%, Saturation 1.5, Brightness 86%
- Saturation: 0
- Blur 5.2, Saturation 1
Backdrop CSS Filter Effects
When applying Backdrop filter effects to an element, a portion of the element underneath must be visible. To add transparency, use the color picker’s opacity slider:

Backdrop effects are great for blurring background images to ensure foreground content jumps out:

CSS Filter Effects Example (Backdrop)
The text element above has a background color opacity of 49%, and the following backdrop filters applied: Blur 2.5px, Saturation: 2.6, Contrast .7.
Z-Ordering
The stack order of elements can be changed by choosing Bring Forward, Bring to Front, Send Backward, or Send to Back from the Arrange menu, clicking the Front or Back toolbar buttons, or by reordering elements in the Element List. You can also click and drag elements or groups in the element list and move them up or down to adjust their stack order.
Identity
The Identity inspector provides access to element properties such as a modifiable element DOM ID, class name, the display name used within Tumult Hype, accessibility options, and more:

The Identity inspector for a selected button
Inner HTML
Elements are, at their base, HTML divs. Because of this, they can contain arbitrary HTML. Edit any element’s inner HTML of any element by choosing Edit > Edit Element’s Inner HTML. This is useful for pasting your own custom HTML or CSS, or for tweaking text displayed in elements. Keep in mind that if recording is turned on, modifications to an element’s inner HTML will be animated.

Editing the Inner HTML of a Text Box
Managing Elements
Grouping
Elements can be grouped by selecting one or more elements, then clicking the Group toolbar button. Grouped items appear indented under their group’s name in the Element List. Clever uses of grouping include enables cropping or masking, rotation from a specified point, and rotation on multiple axes.

Grouping Toolbar Items
Elements can be dragged in or out of groups by rearranging elements in the Element List.
A Group in the Element List
Duplicating
There are many ways to duplicate an element:
- Hold option while clicking + dragging on an element to quickly duplicate an element.
- Select Edit > Copy, and Edit > Paste.
- Select Edit > Copy, and Edit > Paste with Animations to retain any animations linked to that element on the currently-selected timeline.
- Duplicate the scene by ctrl + clicking on the scene and selecting ‘Duplicate scene’.
Pointer Events
By default, all Hype elements have pointer events set to auto. This means any element will intercept all mouse and touch events for all elements underneath it. To have an element ignore mouse and touch events check ‘Ignore all pointer events’ in the Actions Inspector under the Pointer section.
This is especially useful on group and symbol elements when you don’t want the empty space inside of a group to block events. Setting ‘Ignore all pointer events’ will not propagate to all child elements. For example, a child of a group that is ignoring pointer events will still intercept mouse and touch events. You must set this property on every element that you want to ignore pointer events. Pointer events is not an animatable property.
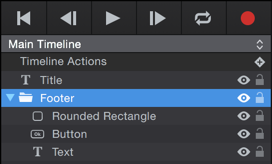
Opacity, Hiding, and Locking Elements
Element Visibility & Locking
Elements locked from the lock button in the element list cannot be selected or moved on the scene, and their properties cannot be changed in the inspector. Hidden elements are not visible on the scene and are also not exported. Multiple elements can be locked or hidden at the same time by selecting multiple elements on the scene or in the Element List and then choosing Arrange > Lock or Arrange > Hide. In the element list, clicking and dragging on the Lock or Visibility icons will also modify their property.
Both individual elements and groups can be locked or hidden. Any adjustment to locking or visibility on a group affects the state of elements within it.

Hidden, Locked, and Unlocked + Visible elements.
display:none on that element; this is an animatable property. Clicking the eye icon on an element in the element list will remove it from the document.
Each element’s visibility and locking buttons support modifier keys for toggling the state of multiple elements. If you ⌘ + click on an element’s visibility or lock button, all other elements will match the clicked element’s state. Option + clicking will change all other elements’ state, so you can easily hide or lock all other elements. Click and drag up or down on the lock or eye icons to toggle their state quickly.
Opacity & Display
To change the opacity, (also known as the transparency) of an element, adjust the opacity slider in the Element inspector. The Display option sets the visibility of the element. When set to ‘Hidden’, the element will not appear on the scene or in export. Use the ‘display’ option during animations to instantly hide an element, and opacity animations to create fades between two opacity values. For more information about the pros and cons of modifying display vs opacity, read this post on the forums.
To adjust the opacity of a color used in your document, adjust the opacity slider in when using the color picker.

An element that becomes hidden in a Timeline
Vector Shapes
Tumult Hype’s Vector shapes tools support the creation of straight and curved lines, freehand lines with the pencil tool, and multi-sided polygons. Also, rectangles, ellipses, and circles may be converted to vector shapes.
Use Tumult Hype’s Vector shape tool to create shapes consisting of points connected by straight or curved lines Easily animate these shapes and define properties like borders and fill colors to create detailed vector graphics in your documents. The points, curves, and lines that make up vector shapes can be easily animated using Tumult Hype’s animation system. Add and remove anchor points, adjust curves and point positions, and smoothly animate these SVG-based objects without touching code.
Vector graphics use the scalable vector graphics (SVG format. SVGs are built as an XML file consisting of lines, paths, stroke, Bézier curves, and much more. This format is output as code, and downloads much quicker than bitmap images.
Tumult Hype provides a user interface for creating SVG objects integrates the format into a powerful animation system. Vector shapes in Tumult Hype are easy to modify and work with: modify points and curves, adjust positioning, resize and scale your shapes directly on Hype’s scene. 
Open and Closed Vector shapes
Vector Shapes Basics
Vector shapes consist of anchor points and control points. Anchor points define the vertices of the shape, and control points modify curves. Each vector shape has a single path. The path optionally has a border (known as the stroke in the SVG format), and an optional border width. Shapes may be either open or closed. Closed shapes form shapes like triangles, while an open shape would represent a rope or line where the start and end points do not connect.
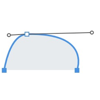
Component parts of a Vector Shape
Creating Vectors
Create a vector shape by choosing the Insert > Vector menu item, by using the Elements toolbar button, or pressing v. Your cursor will change to the pen tool: ![]() . Clicking and dragging will start a curve, and single clicking will create an individual point. To exit vector mode and finish your shape, either click on your initial point to create a close shape, press esc, enter or click ‘Done’ in the Vector Shape inspector. You can optionally set properties like color & border width during vector creation.
. Clicking and dragging will start a curve, and single clicking will create an individual point. To exit vector mode and finish your shape, either click on your initial point to create a close shape, press esc, enter or click ‘Done’ in the Vector Shape inspector. You can optionally set properties like color & border width during vector creation.
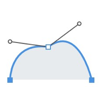
Creating lines, closed shapes, and open shapes.
Creating Straight Lines (Vector Tool)
To draw a line, enter vector mode and click to create a new point. Click again to create the end of your line and press esc or click ‘Done’ in the Vector Shape inspector to exit vector editing mode.
- To create a line constrained to 45° angles, hold shift after creating your initial point. You may also hold shift while adjusting a point to constrain its angle to 45° angles.
- To disable snapping while placing a point, hold ⌘.
- To end your line, press esc or v, or continue clicking on additional points to create additional segments.
- You may also create a line with the pencil tool.
Creating Closed Shapes
Click once to start your shape, again to create an additional point, then click on your initial point to close your shape. When hovering over your initial point, your cursor will change to a closed circle indicating that clicking will ‘close’ the shape: ![]() . When you have either your first or last anchor point selected on a shape, your cursor will be in ‘Add Point’ mode:
. When you have either your first or last anchor point selected on a shape, your cursor will be in ‘Add Point’ mode: ![]() .
.
After closing a shape, your cursor becomes ![]() . This cursor indicates you are in vector edit mode. To exit this mode, press esc, return, or click ‘Done’ in the Vector Shape inspector. When a shape can be closed, a hollow point appears on your cursor
. This cursor indicates you are in vector edit mode. To exit this mode, press esc, return, or click ‘Done’ in the Vector Shape inspector. When a shape can be closed, a hollow point appears on your cursor ![]() . Clicking here closes the shape. To finish editing the shape, press return, esc or press v.
. Clicking here closes the shape. To finish editing the shape, press return, esc or press v.
Creating Curves
To create a curve while adding anchor points in vector editing mode ![]() , click and drag while creating a new anchor point. The distance and angle of your drag defines the slope and angle of the curve.
, click and drag while creating a new anchor point. The distance and angle of your drag defines the slope and angle of the curve.
Creating and modifying a curve
While creating curves, you’ll notice the vector shape tool snaps to objects on the scene and the scene’s midpoints. Hold ⌘ while adjusting curves to disable snapping, or hold shift while adjusting control points to constrain the slope of your curve to 45° increments.
Creating Pencil Lines
 The pencil tool creates a vector shape while clicking and dragging on the scene. After creating a line, you may adjust the generated anchor points and curves with the vector shape tool by double clicking on the line. Before starting your line, you may optionally choose your line smoothness, create a line animation, or close your shape when near the line’s end.
- Adjust the smoothing settings in the Pencil inspector when the pencil tool is selected. Higher values result in smoother lines and fewer anchor points.
- Create a Line Draw animation automatically while creating a line by checking ‘Create Line Draw Animation’. Smoothed lines (shown on right) will contain fewer anchor points and even out any jagged points:

- Create a closed shape when finishing your shape by checking ‘Close path when near line start.’
The pencil tool is ready to draw a new line when the cursor changes to: ![]() . Each line creates a separate vector shape.
. Each line creates a separate vector shape.
With the ‘Create Line Draw animation’ checkbox selected, your line will automatically create an animation in the direction of your line based on the rate factor selected (1x - 10x) selected in the pencil inspector.
A line draw animation
Pencil Line Tutorial
The video below demonstrates different pencil line drawing techniques:
Continuing Lines & Overdrawing Vectors
Using the pencil tool in combination with the vector shape tool is a great way to combine freeform drawing and precise vector creation. You may switch between these tools during by following these steps:
- To switch from Vector mode to Pencil drawing, select the first or last anchor point and enable the pencil (by pressing
p). This will allow you to begin drawing a pencil line from that point. The cursor will change to indicating that drawing a line will add onto the currently-selected path. - Double clicking on any vector shape will enter Vector mode, and if you enable the pencil in this state, you can overwrite the path with your penciled line. The cursor will change to and will clear the current vector data and replace it with a new line.
Creating Straight Lines (Pencil Tool)
Before you create your line, hold shift to draw a horizontal or vertical line while clicking and dragging. You may also create a straight line by switching to the vector tool, clicking once for your first point, and again for your last point. Holding shift will constrain your line to 45° angles.
Anchor Point Properties: Mirrored, Asymmetric, Disconnected, & Corner
There are four anchor point modes. These modes define the shape of the intersection of the path on either side of the anchor point. An anchor point’s mode may be set as corner, mirrored asymmetric or disconnected by selecting the anchor point and choosing a mode in the vector shape inspector.
- A corner anchor point is an anchor point that has no curves at its point, as you would see representing the corners of a triangle.
- A mirrored anchor point has identical curves on each side. This option is selected when double clicking corner points. Click and drag on an anchor point while holding option to use this mode.
- An asymmetric anchor point is the default curve generated when initially drawing and is similar to mirrored as the control points are at the same angle, but one of the control points can be farther from the anchor point resulting in a different slope on that curve. Click and drag on an anchor point while holding option + ⌘ to use this mode.
- A disconnected anchor point is a curve where the control points move independently from each other. Both sides can have a different Bézier curve. To convert a curve to disconnected, hold ⌘ while adjusting a control point.
 Asymmetric | 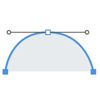 Mirrored |
 Disconnected | 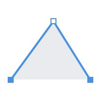 Corner |
Adjusting Points
You can move an individual anchor point by clicking and dragging, or by using the arrow keys. Select multiple points by drag + selecting a series of anchor points, or by holding shift or command while clicking anchor points.
When converting corner anchor point to a curve, the control handles representing the two sides of a curve can be manipulated by adjusting control points. To adjust a point’s behavior, select it and choose a mode in the anchor point section of the Vector Shape inspector:

Converting a point from ‘Corner’ Mode to ‘Mirrored’
When hovering over an editable point, your cursor will change to ![]() , indicating that it can be moved or adjusted. This cursor only appears in Vector Edit mode, entered by double clicking a Vector or once you are within Vector Edit mode (after double clicking on a vector shape), you may edit points by doing any of the following:
, indicating that it can be moved or adjusted. This cursor only appears in Vector Edit mode, entered by double clicking a Vector or once you are within Vector Edit mode (after double clicking on a vector shape), you may edit points by doing any of the following:
- Click and drag on any point to reposition it. You can adjust its position either with your mouse or the arrow keys. Shift + arrow key will adjust its position by 10px increments.
- Click and drag across multiple points to select and reposition multiple points.
- Press delete to remove selected points.
- Holding shift or ⌘ while clicking points will add to your selection. Once multiple points are selected, you may reposition them together.
- If a point does not currently represent a curve, add a curve by holding option while dragging on the point.
- Double click on a point to convert a point from a straight line vertex to a curve (shown in inset image).
Path Options
Line Cap: Sets the shape to be used at the end of open paths when they have a stroke. Butt sets the anchor point to be flush with the end of the stroke, while round creates a round edge to the shape. The square option sets the anchor point half of the width of the stroke inset from the end point.
The Three Line Cap Types
Line Join: Sets the shape of a stroke on a corner point, also known as a vertex.
Three Line Join Types
Miter Limit: Set this value to constrain the size of a miter based on the relationship of border thickness and vertex angle. Read more.
Line Draw & Line Dash
The line draw value for a Vector shape defines the percentage of the stroke around the shape, starting from its initial point. Alternatively, you may choose a dash format for the line, which offers control over the width of the dash, the distance between dashes (line gap), and the starting point of this dashed line (offset). The animation below shows an example line draw animation, line gap, dash, and offset values changing over 5 seconds:
Line Draw
The line draw percentage sets the percentage of the border length on the vector shape. A value of 0% begins at the initial anchor point and a 100% value sets a border on the entire shape.
Line Dash 
The Line Dash defines the length, gap, and offset of dashed borders for your vector shape. To switch from Line Draw to Line Dash, click Line Draw to toggle between the two options.
- Dash: Sets the dash length in pixels.
- Gap: Sets the distance between dashes in pixels.
- Offset: Sets the offset from the start point in pixels.
Background
Vector shapes may have a fill color, gradient, or image as their background. Set fill or gradient color and transparency using the color picker.

No Fill, Color Fill, Gradient Fill, and Image Fill Vector Shapes
Border
The border follows the paths drawn on the vector shape. For open shapes, the fill color may appear as a border on your shape.
Animating Vector Shapes
A vector shape’s animatable properties include its regular element properties such as position, background color, and size, but also includes the entirety of the vector shape information. Modifying anchor points and control points for defining curves results in automatic keyframe generation to smoothly animate these changes. Recording vector shape changes creates path keyframes and morphs the shape from one shape to another. For instructions on animating a vector shapes from one shape to another, visit the Shape Morphing section in the Animation chapter.
Sprite Sheets
Tumult Hype’s sprite sheet tool creates a frame animation on your scene based on a sequence of images, a pre-built sprite sheet, or an animated GIF. Hype will use these source images to create a sprite sheet you may control as regular animation in your scene.
Creating Sprite Sheets
Use any of the following source files to generate a sprite sheet: a numbered (or alphanumeric) sequence of images, a grid of images arranged from top left to bottom right, or an animated GIF.
![]()
Sprite sheet source options: 1) A sequence of images 2) A sprite sheet in a grid or 3) An animated GIF
From a Sequence of Images
Use a sequence of individual images of the same image dimensions by selecting Insert > Sprite Sheet… and select all images. Images will be imported based on their alphanumeric sort. For example, 001.png, 002.png.
- Select Insert > Sprite Sheet…
- Select multiple files in the Finder by clicking the first image, holding shift, then clicking the final image.
- Click Open.
After clicking Open in the file dialogue, the Sprite Sheet is loaded into an editor. The dimensions of the images correspond to the number of rows, columns, and frames in the editor. Adjust the duration, frame rate, or whether the sprite sheet loops in the options. These may be edited later.
![]()
From a Pre-Existing Sprite Sheet
You may import from a pre-existing sprite sheet to import the animation sequence into Hype. A sprite sheet consists of a grid of images arranged with the first image at the top left corner, and the last in the bottom right corner. Each frame within the image should be the same size. ![]() In this example on OpenGameArt.org, smoke swirls over 30 individual frames (shown on the right). Since the original image is a transparent PNG, it will not block anything at a lower layer order in Hype.
In this example on OpenGameArt.org, smoke swirls over 30 individual frames (shown on the right). Since the original image is a transparent PNG, it will not block anything at a lower layer order in Hype.
To create a sprite sheet from a single image, select Insert > Sprite Sheet… and select the image. Modify the rows and columns to match the layout of the sprite sheet, and optionally adjust the margins, spacing, or padding as needed.
From an Animated GIF
When using an animated GIF as your source for a sprite sheet, each individual frame from the GIF will be used as a frame for your sprite sheet. Optionally disable looping or change the number of frames as needed. To create a sprite sheet from an animated GIF, select Insert > Sprite Sheet… and select the image. Frame size and frames per second will be automatically calculated based on the duration and size of the GIF.
Editing Sprite Sheets
After importing a sprite sheet, you may edit it by selecting the Sprite Sheet and clicking Edit Sprite Sheet… in the Element Inspector.
![]()
- Sprites: Set the slice layout of the sprite sheet by setting the number of rows (horizontal) and columns (vertical). This calculates the total number of frames and should add up to the number of images selected in the file picker. If the sprite sheet is prebuilt as a single image, you’ll need to manually line this up to match your individual frames.
- Sheet Margins: If your imported images or sprite sheets have unused image data around the outside margins of the exported sheet, this will help you remove them.
- Sprite Spacing: This adds padding between individual frames and may be useful if your individual frames export with borders.
- Timing: Based on your number of frames set in the Sprites section, you can set the duration or frame rate here. Check ‘Loop’ to have your sequence endlessly repeat.
Sprite Sheet Actions
By default, Sprite Sheets start at 0 seconds on the timeline where they are inserted. To modify this sprite sheet action, double click on the diamond representing the action.
- Start Sprite Sheet
- Pause Sprite Sheet
- Continue Sprite Sheet
- Go to Time in Sprite Sheet, shown in: Minutes, Seconds, Frames (30 frames per second).
![]()
Animations
Tumult Hype uses a powerful keyframe-based animation system to give elements motion and transitions. Its recording functionality makes building animations a snap.
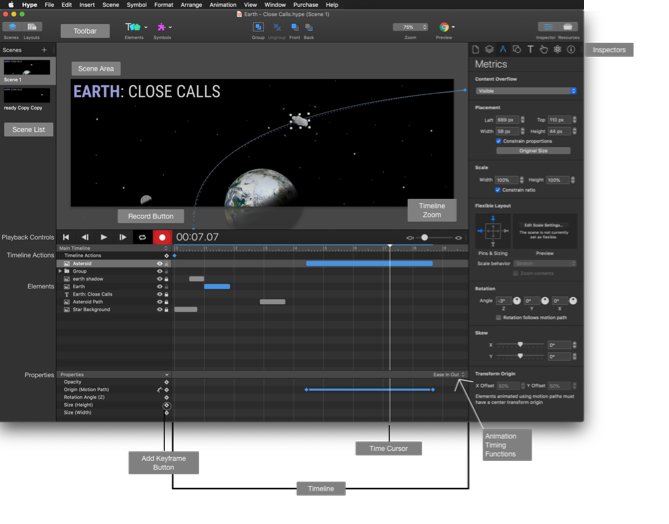
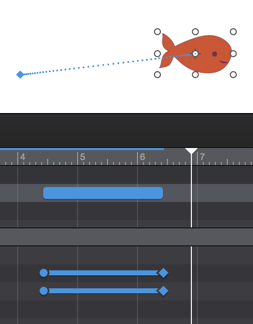
Animation User Interface

- Animation controls (left-to-right): Jump to Start, Previous Frame, Next Frame, Play/Pause, Loop
- Current time indicator; matches time cursor
- Record Button
- Timeline Selector Popup Menu
- Time cursor
- Animatable Property Popup Menu
- Timing Function Popup Menu
- Add Keyframe Buttons
- Time scale zoom slider
- Timeline View with Animation
- Timeline Action
- Motion Path Toggle Button
Keyframes
Keyframes specify the value for a property at a specific point in time, and animations are composed of two keyframes which define the starting and ending values of a property’s animation.
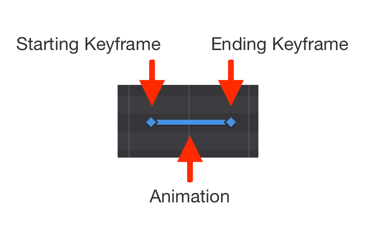
Animation Keyframes
In traditional hand-drawn animation, creating frames is split between two groups of people: keyframe artists and in-betweeners. The keyframe artists would draw the most significant frames, usually where shifts in action would occur. If they were animating a bouncing ball, they might draw two frames: the top of the bounce and when the ball hits the ground. The in-betweener would do the more tedious work of drawing the intermediate frames to bring the ball to life.
You are the keyframe artist when using Tumult Hype. You can specify keyframes for element properties on the timeline and Tumult Hype will automatically generate the in-between frames for you.
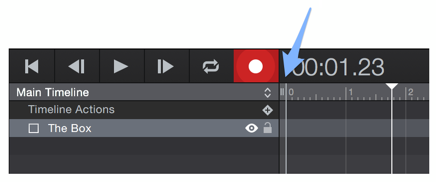
Recording
Recording is an intuitive way to automatically generate keyframes when creating animations. Simply click the Record button, move the time cursor, and manipulate elements on the scene or change properties in the inspector. In response to your actions,Tumult Hype creates the necessary keyframes on the current timeline. Recording eliminates the need to manually insert keyframes.
Create an animation of an element moving over three seconds by following these steps:
- Click the Record button to turn on recording
- Select an element to animate
- Move the time cursor to the right and stop at the 3 second tick mark
- Drag an element to a new location, or resize an element.
Notice a red animation bar was created on the timeline. The red animation bar may be moved to change the start and end time of the animation. Click and drag the beginning or ending point of this bar to adjust an animations' timing.
The Capo
The Capo pairs with Tumult Hype’s recording feature to let you quickly build animations which start and end at arbitrary times without manually inserting keyframes. With the Record button on, you’ll see a small tab — the Capo — appear at the left edge of the time scale area.
The Capo Tab
The position of the Capo sets the starting time for your animation. The Capo and time cursor are typically moved independently from each other, and you can adjust the position of both simultaneously by holding the control button while dragging either.

An Animation Created Using Recording and the Capo. 1) Animation Starting time defined by the Capo. 2) Animation Ending time (Defined by Time Cursor).
Recording and the Capo are incredibly powerful animation tools. With them in your arsenal, you’ll rarely need to manually insert keyframes for individual properties.
Manually Editing Keyframes
Adding Keyframes
Keyframes operate on specific properties. An animation requires two keyframes: a starting keyframe and an ending keyframe. The in-between frames are automatically formed and will smoothly transition the property value from the start to the end.
To add a starting keyframe, select an element in the scene editor. Your selected element will also appear highlighted in the element list below the scene area. In the property list below the element, you can select a specific property that you want to animate. For example, if you wanted an object to fade in, you would select the opacity property. Next, you can move the time cursor to where you want the animation to begin. Click the Add Keyframe button. This will visibly place a keyframe on the timeline. At this point, you’ll set the value of the property you want to animate. For the fade in, you would go to the Element inspector and set the opacity value to 0%.
To add the ending keyframe, move the time cursor to the point on the timeline you’d like the animation to end at. Click the Add Keyframe button again to create a second keyframe on the timeline. Finally, you’ll want to set the property to its ending value. To complete the fade in, set the opacity to 100%. A bar between the keyframes will appear; this indicates the property is animating.

Per-Property Add Keyframe Buttons
By default, clicking a property’s Add Keyframe button adds a keyframe for the associated property at the time cursor’s current time. Option-clicking the Add Keyframe button adds keyframes for all visible properties in the properties list.
Setting Keyframes on Any Property
By default, when you click on an element in the element list the only properties that are shown in the properties list are the opacity, origin, and size. These are the properties you’ll likely be manipulating, but Tumult Hype is capable of animating most properties you can set in the inspector. To manually add keyframes for other properties, you’ll need to add them to the currently selected element’s property list. To do this, click on the Properties pop-down menu and select which property you’d like to animate. Now this property can be selected for adding keyframes.

Animation Keyframes
If you are recording, Tumult Hype automatically adds properties to the properties list as you manipulate elements on the scene or change values in the inspector.
Modifying Properties
For manipulating properties with keyframes, there are two rules to note:
- If the time cursor is on a keyframe for a property and that property is manipulated through the inspector, the keyframe value itself will change.
- If the time cursor is not directly on a keyframe for a property that has keyframes, and the property is changed, then the keyframes will all be offset.

Time Cursor On Keyframe | Time Cursor Off Keyframe
These rules are best illustrated by considering an example involving an animation of an element’s Origin (Left) property. The animation is defined by two keyframes: one placed at the 1 second mark with a value of 10px, and a second at the 2 second mark with a value of 20px. With those keyframes, the animation will start at 1 second and, over a full second, will move the element to the right by 10 pixels until it reaches the ending keyframe’s value of 20px.
With this animation, placing the time cursor at either 1 second or 2 seconds will allow you to modify the value of those two Origin (Left) keyframes; any changes made to the element’s Origin (Left) value when the time cursor is over those keyframes will change the value of those keyframes and thus change the distance the element will move. Conversely, when the time cursor is at any other time on the timeline, changing the element’s Origin (Left) property will change the location of the element itself; the starting and ending points of the animation will change, but the actual animation itself is unchanged.
Manipulating Keyframes
Keyframes support most standard manipulations; multiple keyframes can be selected, dragged to move, copied, and pasted. While keyframes are represented by diamonds in the property area, the duration and span of animations are represented by the bars between keyframes. To the right of the elements are animation overview bars, which represent keyframes as white lines. These bars can be resized and dragged to adjust animations. Just like individual keyframes, multiple animation bars can be selected at once and copied and pasted.

Animation Overview Bar and Keyframe indicators
By default, the playhead, keyframes, and animations snap to second markers and other keyframes when dragged. Disable this behavior by deselecting the Animation > Snap to Seconds or Animation > Snap to Keyframes menu items.
Delete both keyframes and animations by drag selecting them in the timeline view and then pressing Delete. When adjacent keyframes are deleted, the animation between those keyframes is also deleted. Deleting an element-level animation overview bar will delete all associated property animations.
Copying and Pasting Animations
To duplicate an element and its animations, first select the element on the scene or in the element list, then select Edit > Copy, and finally select Edit > Paste with Animations. Keyframes and animations can also be copied from and pasted to the timeline.
Motion Paths
Elements can be animated along complex and arbitrary curves using motion paths. You can create motion paths either by adjusting a regular origin position animation, or by pasting a vector shape’s path onto a pre-existing motion path.
Creating a Motion Path
A motion path is a curved animation between two or more points. Create a motion path by first creating a basic animation between two points.
- Click the Record button to turn on recording.
- Advance the time cursor to your animation’s desired ending time.
- Move the element to the desired ending location.
- Turn off recording by once again clicking the Record button.
- Now that there’s an animation, convert the basic path to a motion path by first clicking on the animation’s path to select it for editing, and then clicking once again to add a motion path control point. Dragging the control point or the control handles alters the curve, and additional control points can be added anywhere on the path by clicking the path.
Alternatively, you can convert an origin (top) and origin (left) animation to a motion path by clicking the ![]() icon in the property list.
icon in the property list.
Creating a Motion Path by clicking on an Animation Path
Motion paths unify Origin (Top) and Origin (Left) properties under one single Origin (Motion Path) property, because the motion path itself controls the top and left position of the element. As a result, Tumult Hype warns you if you attempt to convert a linear animation with different timing functions for Origin (Top) and Origin (Left), because the new motion path can only support one timing function.
Furthermore, converting an element to use motion paths will change all of that element’s animations on all timelines to use motion paths. To preserve standard animations in different timelines, create a copy of your element by selecting your element and choosing Edit > Copy and then choosing Edit > Paste with Animations.
By default, elements move along motion paths without rotating. When the ‘Rotation follows motion path’ option in the Metrics inspector is enabled, elements instead rotate so they’re always perpendicular with respect to their motion path with their right edge forward. If your right edge is not the “front” of the image you may need to rotate your element on the Z axis so that the correct edge is on the right side. For example, if your object is moving from right to left you will likely need to rotate your image by 180 degrees.
Adjusting a Motion Path
- Shape: To adjust a motion path’s curve, click once on the path and then click and drag any control point to change its location, or any control handles to change the nature of the curve.
- Adding and Removing Control Points: Add control points by first selecting a path; once a path is selected, clicking anywhere on the path will add a control point. This cursor indicates a control point will be added when the path is clicked: .
Any control point can be removed by clicking on the control point and then pressing Delete. Because the starting and ending control points define the element’s animation, those can only be deleted by deleting the animation itself as is described in the Manipulating Keyframes section. - Rotation: By default, elements move along motion paths without rotating. When the “Rotation follows motion path” option in the Metrics inspector is enabled, elements instead rotate so they’re always perpendicular with respect to their motion path.
For more precise control over Motion Paths, view available keyboard shortcuts.
Motion Paths & Vector Shapes
A motion path represents points and curves and can be copied for use in a vector shape. Likewise, a vector shape’s path can be copied onto a motion path to replace its path.
To copy a motion path onto a vector shape:
- Select the motion path’s blue animation bar (between its representative keyframes in the animation pane)
- Press ⌘ + c to copy the path.
- Double click on a vector shape to enter vector mode.
- Press ⌘ + v to paste the path onto the vector shape. This replaces the vector shape’s path.
To copy a vector shape’s path onto a motion path:
- Double click on the vector shape to select the vector shape.
- Press ⌘ + c to copy the path.
- Select a motion path and press ⌘ + v to paste the path onto the motion path. This replaces the current motion path.
If the origin animation being replaced is not yet a motion path, you will need to create a motion path by clicking the motion path icon in the animation property area: ![]() .
.
The below tutorial covers motion paths, shows the use of a vector shape for a motion path, and a motion path for a vector shape:
Vector Shape Morphing
A shape morph is an animation of a vector shape element. A morph will animate changes between will work with shapes with the same or different number of anchor points. path change.
- Enter Vector Mode for your Vector Shape by double clicking on it. This exposes the shape’s points and allows the manipulation of point positions, addition of new points, and curve adjustments by modifying curve control points.
- Press the Record Button.
- Advance the playhead.
- Make an adjustment to any anchor point, control point, or number of anchor points.
- A path animation has been automatically created, with the default easing transition ‘Ease in Out.’
Morph Between Two Separate Shapes
Because all anchor points and curves representing a vector shape’s path can be copied into the clipboard, you can use a path animation from one shape to morph another shape into that shape. To morph between two shapes, create two shapes with the vector tool. For information on the Vector tool, visit the Vectors chapter. Below is how to create a shape morph animation:
- Start with two vector shapes. The first shape should be the shape you want to morph, and the second shape should be the shape you are using as the final stage in the morph animation. Once you have your two shapes on the same scene, you can proceed.
- Double click on the shape you’re using as the final stage in your animation, and select Edit > Copy, or ⌘ + c to copy the shape’s point data. Your other shape will animate to this first shape.
- Next, move the playhead to a new time and press the record button.
- Finally, double click on your second element and press ⌘ + v to copy the Bézier path data onto this shape. This generates an animation over your chosen duration.
Once keyframes representing your morph animation have been generated, you may modify the starting or ending keyframes by moving the playhead over the generated keyframes and modifying your element’s vector points. You can create additional morphs from by moving the playhead forward and adjusting your shape’s path or by pasting additional shape information.
Best Match & Direct Anchor Point Matching HYPE PRO ONLY
There are two shape morph algorithms which you can choose in the Vector Shape inspector. The Best Match algorithm will add and remove points as necessary and automatically determine the best anchor points to animate to which location. This is the default, and generally will have better results.
The Direct Anchor Point Matching algorithm means that in Shape Morph animations, the anchor points of the start shape will be mapped directly to that of the end shape, and they will be linearly interpolated for the animation. This method is meant to be used when the number of anchor points is the same between the two shapes and you need better control over what anchor point ends up where. (If there are more/fewer points they will be added to the end point of the shape so the total anchor point count matches.
The video below demonstrates shape morphing:
Modifying Vector Size, Rotation, and Scale
Selecting a vector shape with a single click allows you to resize, rotate, and scale the object. Recording while performing these actions will generate keyframes:
- Use the resize handles to resize an element. Click and drag to adjust.
- To rotate a vector shape, select it, hold ⌘ and drag the shape that appears in the corners of the element.
- Hold ⌘ while clicking and dragging a corner to scale the element. This will have the effect of disconnecting the border width of the object from the actual size. For example, an object with a 2px border scaled to 200% will appear as a 4px border on screen. Adjust scaling in the metrics inspector.
Selecting a vector shape with a double click exposes the shape’s anchor points. Recording while adjusting anchor points or control points and advancing the playhead generates path keyframes.
Line Draw Animations
A line draw animation represents the percentage of the total length around a shape that a border has been drawn. Any vector shape with a border can be used for a line draw animation. The Line Draw percentage value appears in the inspector whenever a vector shape is selected. Vector shapes without a border are not affected by the line draw percentage.
Creating a Line Draw Animation
- Drawing with the pencil tool is the the quickest way to generate a line draw animation. See creating pencil lines for more information.
- For a preexisting vector shape, press record, adjust the point in the timeline by adjusting the playhead, and adjust the line draw animation percentage value.
Morphing between Pencil Drawings
After completing a pencil drawing, you can create a new ‘frame’ of that shape by using the pencil tool again while your previous drawing is selected. Here’s how:
- Create your first pencil-drawing shape.
- After finishing your pencil drawing, double click on your shape and press ‘p’ to activate the pencil again. Your cursor should now look like this image: (icon) Since you want to record the Path change, press the record button. Your next drawing will clear the current drawing and create a new shape.
- You now have a new Path keyframe in the timeline representing your new shape.
Easing & Animation Timing Functions
By default, animations use the Ease In Ease Out timing function. Ease-in-out smooths the beginning and ending movements of an animation so that changes slowly accelerate and then decelerate. To change an animation’s easing, click the animation bar between any two keyframes, then choose a different timing function from the Easing menu on the right side of the Timeline view. You can also double-click any animation bar to reveal an animation pop-up which features the same Easing menu.
Easing is a fundamental property of animating that brings real energy and life to your animations. Read more about how to design and work with easing functions.
Tumult Hype supports the following animation timing functions:
- Instant – The property jumps to the value of the ending keyframe, at the time of the ending keyframe.
- Linear – Constant steady change between the starting and ending keyframe values.
- Ease In – Constantly accelerates from the starting keyframe value towards the ending keyframe value.
- Ease Out – Constantly decelerates from the starting keyframe value towards the ending keyframe value.
- Ease In Ease Out (Default) – Accelerates change during first half of the animation; decelerates change during the second half.
- Bounce – The properties quickly change towards the ending keyframe’s value, then “bounces” off that value twice. Often used for creating natural vertical bouncing animations, by applying this timing function to an animation of an element’s Top property.
- Back - This function slightly overshoots its target and returns.
- Math Equation HYPE PRO ONLY - Write your own function that defines an easing property based on the following variables (floating point numbers):
t- The absolute time in the timeline.start- The time of the initial keyframe.dur- The total duration of the animation.

Live editing a math equation-based easing property
Easily modify the paths representing timing functions in the editor:
Editable Timing Functions
In addition to the 24 timing functions added to Hype 3, Hype Pro lets you create your own timing functions. All of the default timing functions show the Bézier path control points that define their behavior, and adding, deleting, or editing those points creates a new timing function based on the original. You can also create new timing functions from scratch by clicking the plus button in the lower left corner of the popover.
You edit timing functions just as you edit element motion paths:
- Add a Bézier path control point by clicking on the path.
- Click and drag a control point or its corresponding handles to change the curve.
- Click on a point and press delete to remove a control point.
All of the motion path keyboard shortcuts work while editing timing functions.

Custom Timing Function Editor
As you edit a timing function, the animations you have selected will immediately use your new custom function. To save this custom function to use in other animations click Add to list. If you need to update your saved function in the future, simply make your desired edits and click Update. All animations that are using your saved timing function will be updated to use your new version.
Timelines
Timelines contain animations. Each scene has at least one timeline known as the Main Timeline whose playback is started when the scene is first loaded. Scenes can have many timelines, and using actions to start, pause, or continue timelines creates rich and complex documents.
Managing Timelines
There are three ways to create timelines:
Timeline Selector Menu
Timelines can be added via the Timeline Selector pop-down menu by clicking on the menu and choosing the New Timeline command. Newly created timelines are automatically selected for editing.

Timeline Selector Menu
Action Handler Menus
Timelines can be created when choosing Start Timeline, Pause Timeline, Continue Timeline, or Go to Time in Timeline as an action handler. (The Actions chapter has more information about Tumult Hype’s various action handlers.) Choosing one of those actions presents a Timeline pop-up menu, and choosing New Timeline will create a timeline.

Action Handler Menus
Scene Inspector’s Animation Timelines
Timelines can be added in the Scene Inspector’s Animation Timelines section. Click the ‘+’ button to add a new timeline.

Animation Timelines Properties in the Scene Inspector
Timelines can also be removed and modified in the Animation Timelines section. Double-click on a timeline name to rename it, and click the Minus button to delete the selected timeline. To load a timeline, select it and click Show Timeline.
Deleting Timelines
Delete a timeline by selecting it in the Animation Timelines area of the Scene Inspector and clicking the ‘-’ button.
Duplicating Timelines
Duplicate a timeline by selecting it in the Animation Timelines area of the Scene Inspector and clicking the Duplicate button.
Controlling Timeline Playback
Animations on the Main Timeline run when the scene is first loaded. Additional timelines act as containers for animations that use elements in the scene, but are not to be run when first loading a scene. (It is possible to have additional timelines run when a scene is loaded: create an On Scene Load action handler that invokes Play Timeline for one or more alternate timelines.) Switch between different timelines by using the Timeline Selector menu. Timelines can also be controlled by the On Drag action handler at either the scene or element level. This technique is useful for giving users control over “scrubbing” timelines, or for building complex drag animations.

Timeline Selector Menu
Animations on the Main Timeline are started automatically when a scene is loaded. Actions are used to control playback of both the Main Timeline and alternate timelines. Please see the Actions chapter for more information.
Timeline Playback Direction
Timelines may be played either forwards or backwards. By default, a timeline plays forwards and only once. To play a timeline in the opposite direction, select ‘Play in reverse.’ To play a timeline in reverse at the end of its animation, use a timeline action to Continue Timeline and check ‘Play in reverse’ as shown below:

This Timeline Action will reverse the timeline at 4 seconds.
Timelines Playback Example
The document below demonstrates playback of the main timeline, additional timelines, and reversed timelines within Tumult Hype.

Looping Timelines
An easy way to loop timelines is to add a ‘Start Timeline’ Timeline Action at the end of the timeline. If you’d prefer your loop oscillate (play forward and then in reverse) add a ‘Continue Timeline’ action with the ‘Play in reverse’ option checked at the end of the timeline. Make sure you also add a ‘Continue Timeline’ forward action at the beginning of the timeline. This demo document demonstrates oscillating timelines and looped timelines.
Absolute and Relative Keyframes
Timelines contain starting keyframes that are either absolute or relative. By default, all timelines are created with absolute starting keyframes. The difference between absolute and relative starting keyframes is subtle but important. When a timeline has absolute starting keyframes, elements animated by that timeline will have their animated properties set to the values defined by the starting keyframes when those keyframes are triggered, and will then animate to the values defined by their ending keyframes. When a timeline has relative starting keyframes, elements animated by that timeline will use their current values when the starting keyframes are triggered, and will then animate to the values set by their ending keyframes.
This difference makes timelines with absolute starting keyframes useful for effects such as looping. When looping, it’s often desirable to have elements jump back to their starting properties; when building complex animations, it can be handy to use timelines with relative starting keyframes that animate elements from their current state, whatever it may be, rather than forcing elements to a pre-defined initial state.
Making a Timeline Relative or Absolute
Toggle whether a timeline’s first keyframes should be relative by opening the Scene inspector and selecting the Relative checkbox in that timeline’s entry in the Animation Timelines table. Absolute keyframes are always drawn with a diamond, while relative keyframes are drawn as a circle.
Animation Timelines in the Scene Inspector
Because relative keyframes take the element’s property’s current value when the timeline is started, there are some situations where Tumult Hype cannot definitively indicate whether an animation will happen. In the example below, the Move Soccerball timeline is active and uses relative keyframes. Because the Origin (Left) animation has different starting and ending values, Tumult Hype knows that animation will always take place. The Origin (Top) animation, however, has the same starting and ending values. As such, that animation will only happen if the element is currently at a different Origin (Top) value when the timeline is started. Because of this uncertainty, Tumult Hype draws the Origin (Top) animation bar slightly transparent, indicating that the Origin (Top) animation between the starting relative keyframe and ending absolute keyframe may not have any effect on the scene.
Potential Animation With Relative Keyframes
Relative Keyframes Example
Because relative keyframes take into account the position of elements on other timelines, they can be taken advantage of to create smooth animations that animate elements across timelines. (This demo document) shows this technique in action.
Actions
Scenes, timelines, and animations are the foundation of all Tumult Hype documents. Actions link together this foundation and make documents interactive. Actions are triggered five different ways:
- In response to mouse or touch events.
- In response to scene events.
- In response to keyboard events.
- At specific times on a timeline.
- Via JavaScript.
This chapter will discuss the first three triggers, as well as the types of actions and action chaining. Tumult Hype’s JavaScript API is discussed in the JavaScript chapter.
Mouse and Touch Actions
Any element can respond to both mouse and touch actions. Set an action on an element by selecting the element, opening the Actions inspector, and then clicking the Plus button next to any action handler. If Use Touch Events is enabled in the Document inspector, events are mapped to the tap action in parenthesis. The following six actions can be detected:
- Mouse Click (Tap) — A complete click (a mouse down followed by mouse up) has been completed.
- Mouse Down (Touch Start) — Once the pointing device has been depressed on the element.
- Mouse Up (Touch End) — The mouse button has been released after being pressed.
- Mouse Over — The cursor has entered the bounds of the element.
- Mouse Out — The cursor is no longer within the bounds of the element.
- On Drag — A drag has begun on the indicated element.
- Control Element Position — Controls the position of the element when dragged.
- Control Timeline — Horizontally or vertically dragging across the selected element controls playback of the selected timeline. The axis dropdown defines whether a horizontal or vertical drag controls the timeline. The direction dropdown defines whether the indicated timeline plays forwards or backwards. Use the ‘Speed’ setting to define how a gesture translates to playback speed. Select ‘Continue after drag’ to maintain the momentum of the timeline’s playback after releasing.
- For deeper control over dragged elements, see the JavaScript Drag API section of the documentation.

Mouse Pointer, Text Selection & Cursor Options
Cursor Options:  In the Actions inspector, you may optionally set a cursor style when hovering an element. Choose from the cursor styles shown in the image. Note that by default, the cursor will display as the ‘Pointer’ style when an element has an action assigned to it or a link. Allow Text Selection: Disabling ‘Allow Text Selection’ enables a
user-select: none; property on the element, disallowing selection of the text. Ignore All Pointer Events: Elements at the top of the layer order receive touch and mouse actions. To pass clicks or touches through elements, select them, and check ‘Ignore all pointer events’ in the Action inspector.
On Drag Action to Control a Timeline
Most mouse actions translate logically to touch actions. For example, tapping an element invokes that element’s touchstart action. For more information about touch support, please see the Touch & Mobile chapter. By default, a tap on a mobile device will be triggered at the start of a
touchstart event. To change this behavior, disable Use touch Events in the Document inspector.
To correctly trigger mouse actions, elements must not have other elements above them or overlapping with them.
Set an action on a button by selecting the button, activating the Mouse Action inspector, and then clicking the Plus button next to the On Mouse Click action header:

A Mouse Action Set on a Button
Viewport Actions
Viewport actions are commonly used to delay starting an animation until an element is scrolled into view, or to reset an animation when an element is scrolled out of view.
- On Enter Viewport — This element has scrolled vertically into the viewport.
- On Exit Viewport — The element has scrolled vertically out of the viewport.
These actions will fire each time the element scrolls into or out of view. If the element is visible when the page loads, the action will fire immediately after the On Scene Load action.
Scene Actions
Scene actions trigger in response to scene events and are useful for scene-specific interactivity. When transitioning to a different scene, that scene’s timelines will begin playback after any scene transition or transition gesture (such as a swipe or page turn) has completed. The following scene actions can be triggered:
- On Scene Load — Triggered when entering the scene.
- On Scene Unload — Triggered when leaving the scene.
- On Prepare for Display — Triggered before scene transitions but after the scene’s DOM structure has been created.
- On Layout Load - Triggered when the currently-selected layout loads. HYPE PRO ONLY
- On Layout Unload - Triggered when the currently-selected layout unloads. HYPE PRO ONLY
- On Key Press — Triggered when a character key has been pressed and released.
- On Key Down — Triggered when pressing a keyboard key.
- On Key Up — Triggered when a keyboard key has been released.
- On Swipe Left — Triggered when the scene is swiped from right to left.
- On Swipe Right — Triggered when the scene is swiped from left to right.
- On Swipe Left/Right: Page Turn — Selecting this option will transition to the selected scene at the rate of a finger swipe or a mouse click and drag.
- On Swipe Up — Triggered when the scene is swiped from bottom to top.
- On Swipe Down — Triggered when the scene is swiped from top to bottom.
- On Drag — Triggered when the scene area is dragged.
- Control Timeline — Horizontally or vertically dragging across the scene controls playback of the selected timeline.
- For deeper control over dragged elements, see the JavaScript Drag API section of the documentation.
- Custom Behaviors - A Custom Behavior is a reusable set of instructions which can be triggered from an action on the scene. View the Behaviors section for more information. HYPE PRO ONLY
 On Swipe Left/Right: Page Turn — Selecting this option will transition to the selected scene at the rate of a finger swipe or a mouse click and drag.
 Timeline Actions
Timeline actions fire at a certain point in a timeline, and trigger only when your document is exported or previewed. Add a new timeline action at the playhead’s current position by clicking the Plus button in the Timeline Actions gutter, or by double clicking anywhere on the Timeline Actions’ timeline. Existing Timeline Actions can be edited by double clicking on their associated keyframe. For further control over actions beyond Timeline Actions, please see the JavaScript API documentation.

Timeline Actions
Edit an existing Timeline Action by double clicking on its associated keyframe to open the Timeline Action pop-up window:

Timeline Actions Pop-up Window
Example Timeline Actions
Here are a few examples of what Timeline Actions can be used for:
- Looping an animation — To loop an animation, you can set a timeline action to either Start Timeline or Go to Time in Timeline for the same timeline.
- Jumping to a scene or running an alternate timeline — Create interactivity that navigates to specific points in scenes and timelines. You would create multiple animations on one timeline, and use the Pause and Continue actions to move between them.
Download an example document demonstrating Timeline Actions.
Types of Actions
The types of actions possible for scene, mouse, or time-based events are the same. The action menu throughout Tumult Hype provides quick access to eight different actions and one command.
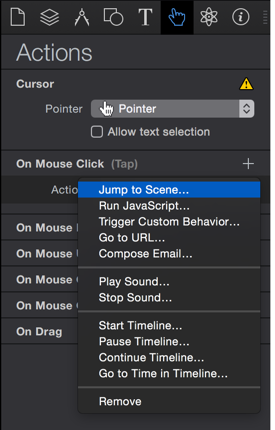
Available Actions
- Jump to Scene — Change to the previous, next, or arbitrarily specified scene, using one of the following seven scene transitions:
- Instant
- Crossfade
- Swap - This transition is only shown in WebKit-based browsers, Firefox, and Internet Explorer 10+
- Page Turn
- Push (Left to Right)
- Push (Right to Left)
- Push (Bottom to Top)
- Push (Top to Bottom)
Download this document to see a demo of all scene transitions. Or view this page on the web.
- Run JavaScript — Invokes a JavaScript function. See the JavaScript chapter to learn more about what’s possible with JavaScript in Tumult Hype.
- Go to URL — Loads a URL.
- Compose Email — Composes an email, with optional subject line and body fields.
- Play Sound — Starts the selected sound.
- Stop Sound — Stops the selected sound.
- Start Timeline — Start playback of any timeline in the current scene.
- Pause Timeline — Pause playback of any timeline in the current scene.
- Continue Timeline — Resume playback of any timeline in the current scene.
- Go to Time in Timeline — Jump to a specified time in any timeline in the current scene.
- Remove — Removes the associated action.
Chaining Actions
More than one action can be triggered in response to an event. For example, a button click could sequentially perform these two actions:
- Go to Time in Timeline
- Continue Timeline
Clicking the Plus button in any action handler’s section appends a new action to the end of the action chain.

Adding Actions
Symbols
Symbols are a powerful tool which let you easily reuse elements, timelines, and animations. Think of symbols as scenes within scenes: symbols contain their own elements, timelines, actions, and behaviors that can be triggered independently from the scene’s. Because editing one instance of a symbol changes all instances, symbols are also useful for sharing identical elements across multiple scenes or at different positions in the same scene.
Symbols can be created either through the Symbol menu or the Symbols toolbar button.
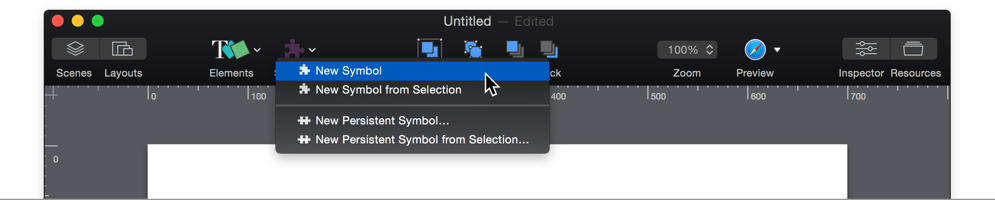
The New Symbol and New Persistent Symbol items create empty symbols ready for you to dive in and edit, while the New Symbol from Selection and New Persistent Symbol from Selection items take your currently selected items and all of their associated timelines, animations, and behaviors and place them in a new symbol.
Standard Symbols
Standard symbols can have multiple instances in a scene, and exist within the scene itself just as normal elements do. Copying and pasting a symbol creates a new instance of the symbol that is identical to the original symbol. In fact, editing any copy of a symbol will edit all instances of that symbol.
Persistent Symbols
Persistent symbols exist outside of scenes at the document level. They are not destroyed when scenes change, and can even be displayed and animated during a scene transition. Because of this each scene can have only one instance of each persistent symbol. Persistent symbols are fantastic for creating things like menus or master elements that shouldn’t reset when scenes are loaded or unloaded and need to always be visible.
Editing Symbols
Edit any symbol by double clicking on the symbol in the scene editor or in the element list. When you enter a symbol for editing, the symbol path bar appears:
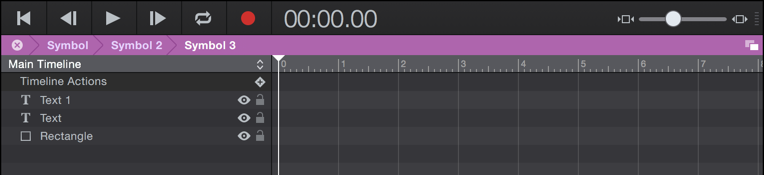
As symbols can themselves contain symbols, you sometimes find yourself diving deep into the hierarchy. The symbol path bar both tells you which symbols you’re editing and helps you navigate the hierarchy. Click on any symbol on the path to jump up to its level and click the Close button on the far left to stop editing all symbols and return back to the scene’s level.
The Symbol menu also has commands with keyboard shortcuts (Option-Command-Up Arrow and Option-Command-Down Arrow) for navigating a symbol’s hierarchy.
Scaling Symbols: Symbols can be scaled like any element. Select your symbol, and hold command while dragging on the symbol’s resize handle. When scaling a standard symbol, it will not affect its scale on other scenes. Scaling a persistent symbol scales it on all scenes. Read more about scaling.
Symbol Inspector
Symbols have their own inspector for settings, timelines, and symbol level action handlers (symbol load, swipe, drag, etc). It is hidden by default, but when you enter a symbol to edit it the Symbol Inspector replaces the Scene Inspector.
Managing Symbols
Just like images, videos, and other resources, symbols are managed in the Resource Library.

By default, deleting the last instance of a symbol in your Document will also remove it from the Resource Library. To change this behavior, select the symbol in the Resource Library and uncheck “Remove when no longer referenced”.
Deleting a symbol from the Resource Library removes all instances of it from the document. When selected, symbols can be duplicated using the Duplicate Symbol button presented at the bottom of the Resource Library. The Symbol menu also has commands for deleting and duplicating symbols.
Playing Symbol Timelines
Just like scenes, symbols can have multiple timelines. There are five ways to kick off a symbol’s timeline.
- Symbol Timeline Actions: When a symbol element is selected, a new property called Symbol Actions appears in the timeline. These work just like timeline actions, but can control timelines inside of the selected symbol. You can use symbol actions to play, pause, go to time, and continue symbol timelines. When you use symbol actions, animations inside of the symbol will play in Hype along with animations outside.
- Action Handlers on the symbol element: When a symbol element is selected, the symbol’s timelines will show up in the element actions (mouse click, mouse over, etc.) in addition to the scene level timelines.
- Behaviors: Behaviors are a great way to control multiple symbols at once. See the behaviors section for more information.
- On Symbol Load action: You can use the On Symbol Load action in the Symbol Inspector to kick off timelines the first time the symbol is shown. This is a great place to start timelines on a persistent symbol.
- Symbol Instance API Functions: Visit the Symbol Instance section.
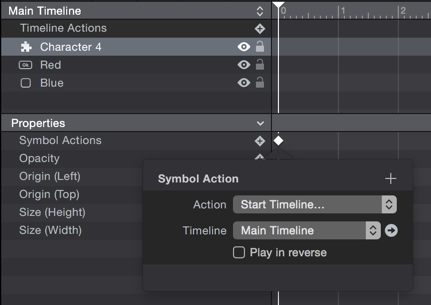

Configuring Persistent Symbols
When you create a persistent symbol, you can choose if you want to add it to all current scenes and layouts. If you choose to add it to all scenes the symbol will automatically be added to any new scenes as well. To disable this behavior uncheck Automatically add to new scenes in the Symbol Inspector.
By default, persistent symbols are shown on top of all other elements during a scene transition. You can show persistent symbols below other elements by going to the Symbol Inspector and unchecking Display on top during scene transitions. This is useful for creating animated backgrounds.
Renaming Symbols
You can rename a symbol by double-clicking its name in the element list or the Resource Library. Changing a symbol’s name will update the name of all instances of that symbol in your document and in the Resource Library.
Importing and Exporting
Symbols can be exported and imported for re-use in other documents via the Symbol > Import Symbol and Symbol > Export Symbol. Do note that symbol changes do not propagate across documents.
Symbols Tutorial
Behaviors
Custom behaviors allow you to create your own action handlers that can be triggered like Hype’s built-in action handlers. Just like Hype’s built-in action handlers, your own behaviors can trigger a series of actions. Behaviors ensure you don’t repeat any work when creating and using complex actions. For example, you might want to simultaneously start three timelines when a scene loads and then later start those same three timelines when the user clicks a button. Before behaviors you would have to set up those three Start Timeline actions both in an On Scene Load and an On Mouse Click action handler. Now, with behaviors, you can create one new behavior that invokes Start Timeline and have the On Scene Load and On Mouse Click action handlers run that behavior. Furthermore, if you decide to change which timelines are run, only need to make changes once for the behavior.
To create a new behavior:
- At the bottom of either the Scene or Action inspector, click Add New Behavior.
- Give the new behavior a unique name.
- Add any number of actions.
Invoke the new behavior using the Trigger Custom Behavior action.
Behaviors are particularly useful when you want to control a Symbol from outside of the symbol, or for example, the Main Timeline of a scene when clicking an object within a symbol. For example: if you have a button (not within a symbol) that you want to run a Symbol’s main timeline when clicked, you can create a custom behavior by following these steps:
- Enter the Symbol (double click on it)
- At the bottom of the ‘Symbol’ inspector, click ‘Add New Behavior’
- Give the Custom Behavior a name
- Select ‘Start Timeline…’ / ‘Main Timeline’ (This action represents the timeline of the current context: the Symbol’s Main Timeline)
- Next, exit the Symbol, select your button, and ‘Trigger Custom Behavior…’ and select that Behavior you created. Likewise, you can make a custom behavior in the main scene and trigger it from within a symbol.
Custom Behaviors Tutorial
Audio & Video
Tumult Hype supports the latest HTML5 video and audio standards, and gives you the tools to create rich multimedia documents. For information on browser support for various audio & media formats, please read Media formats supported by the HTML audio and video elements on MDN.
The Video Element
Tumult Hype embeds video using HTML’s native <video> tag, whenever possible. If the browser doesn’t support HTML5 video, as is the case with Internet Explorer 6 through 8, Hype falls back to the QuickTime plug-in.
When added to the scene, Tumult Hype generates video thumbnails in the timeline for the video element. This provides an approximate position in the video for considering your other animations in the timeline, but your video may not synchronize based on the device viewing the Tumult Hype document.
Please see compatibility notes below for information on playing your video and preview in your target devices frequently to ensure timely playback.

Video Sources (Resource Library)

Video Sources and Options (Element Inspector)
Adding Video
Add video elements by choosing Insert > Video, or by clicking the Insert Elements toolbar button and choosing Video. You can also drag-and-drop videos onto the scene, or copy and paste them from other applications. Tumult Hype supports importing files with .mov, .ogg, .ogv, .webm, .mp4, and .m4v extensions, though only .mov, .mp4, and .m4v files can be viewed from within Tumult Hype.
Video Format Browser Support
Please see this page for information on browser support for the various video formats. In most cases, a single .MP4 file encoded with the h264 video codec will suffice for broad browser support. Video added to Tumult Hype use the <video> tag, which supports multiple sources for one element. Adding a single video in Tumult Hype creates a video group to which other formats may be added. To add additional video formats, select your video and click Add Video Source in the Resource Library, or select your video and add your source in the Element inspector.
To convert videos, we recommend using Handbrake. It is simple, effective, and free. Instructions on how to use this software can be https://handbrake.fr/docs/en/.
Controlling Video
The Element inspector exposes options for the selected video:
- Autoplay — Video will play when it is shown (see compatibility note below).
- Controls — When checked, video controls are shown.
- Inline (iOS) - When checked, the
playsinlineattribute is added, which keeps the video from playing in the iOS video player. - Loop — Video will loop when complete
- Muted (needed for iOS Autoplay) — Audio will not play for the video. If unchecked, a video cannot automatically play inline on iOS.
Autoplaying Video with Audio: In the majority of cases, video will not autoplay if it is not muted. User input is required to play audio and video (if unmuted). Read about Chrome’s Media Engagement Index which defines whether media can autoplay on Chrome.
iOS & Android Browsers: To autoplay video, check ‘Inline (iOS)’ and ‘Muted’. Unmuted video will not play without user interaction. Use Mouse Click actions to play video on iOS when not using the ‘Inline’ setting.
iBooks: Ensure that your video files do not contain spaces or foreign characters in their filenames, and that your video is encoded based on Apple’s recomendations. Learn more here.
For updates on video compatibility, please visit the Tumult Forums.
Video FAQs
- Creating Play & Pause Buttons for Video
- Synchronize Timelines to Video & Audio
- Embedding an external video, embedding YouTube Videos, and removing videos when leaving the scene.
- Placing videos within an iBooks Author Widget
- Stopping a YouTube or Vimeo video when leaving the scene
The Audio Element

Audio Sources (Resource Manager)

Audio played by a Timeline Action
On the newest browsers, Tumult Hype plays audio using the powerful Web Audio API. On less recent browsers, Hype falls back to the standard <audio> tag. On old browsers like Internet Explorer 6 through 8, Hype relies on the QuickTime plug-in.
Adding Audio
To add audio to your project, first create your file formats based on your desired browser compatibility. Most browsers will play the MP3 format. To quickly add multiple audio file formats as a single audio group, use the same filenames. For example, create: whalesounds.mp3 and whalesounds.ogg. Dragging these files into the resource library will create an audio source group called whalesounds. You can also individually add audio formats by selecting the audio source group and adding missing formats.
The Audio group ‘Crowd’ shown in the Resource Library
Audio Format Browser Support
The table below outlines MP3 & Theora audio format support for major desktop and mobile browsers. Please see caniuse.com for the latest information on browser compatibility.
| Browser | MP3 Support | OGG Support |
|---|---|---|
| Chrome | ✓ | ✓ |
| Firefox | Mostly ✓ Windows Vista+ (2006) since Firefox 22.0, Android since Firefox 20.0, Firefox OS since Firefox 15.0, Linux since Firefox 26.0 (relies on GStreamer codecs) and OS X 10.7 (2011) since Firefox 35. | ✓ |
| Safari & Mobile Safari | ✓ | ✖ |
| Internet Explorer | ✓ | ✖ |
| Internet Explorer Edge | ✓ | ✖ |
| Android Browser | ✓ | ✓ |
In most cases, a single MP3 variant of your audio will suffice. One audio source group may contain any combination of MP3 and OGG files. We recommend converting between the various audio formats using Fre:ac. For generating other audio formats, we recommend Audacity.
Controlling Audio
Once an audio source group exists in your document, audio can be played or stopped using scene, mouse/touch, or timeline action handlers. The Play Sound and Stop Sound actions can be invoked by any action handler, and those actions let you choose from any of your document’s audio groups. When playing audio, the Loop option continuously plays the chosen audio group in a loop. For gapless looping audio, we recommend exporting MP3 files using the LAME encoder. The Preload option controls whether the audio group’s files should be downloaded before your Hype animation begins playing. For a list of all available actions, see the Actions chapter. Below are a few examples of how actions can control audio playback:
- Start audio when a scene begins by adding an On Scene Load action handler and then choosing the Play Sound action. You may need to create a Mouse Click action to start your audio at the beginning of a scene on some browsers.
- Start audio after clicking or tapping an element by adding an On Mouse Click (Tap) action handler to the element, and then choosing the Play Sound action.
- Start audio three seconds after the beginning of a timeline by adding a timeline action to the timeline, and have the timeline action invoke Play Sound.
- Stop audio when exiting a scene by adding an On Scene Unload action handler and then choosing the Stop Sound action.
If you are interested in controlling audio with JavaScript, or referencing audio files hosted externally, please read Playing and Controlling Audio with JavaScript.
iOS: Audio will not play on iOS devices without user interaction. Thus, audio played ‘On Scene Load’, ‘On Scene Unload’, or using a timeline action will not play back on iPhones, iPads, or iPod touches. Use Mouse Click actions to play audio on iOS. Please see this forum thread for workarounds.
Google Chrome: Google Chrome only allows audio to play under certain situations. Please read Autoplay Policy Changes.
iBooks Author: Ensure that your audio files do not contain spaces or foreign characters in their filenames.
External Audio & Video (YouTube, Vimeo, SoundCloud)
To embed external media such as a YouTube video or SoundCloud player, use an HTML widget. Select Insert > HTML Widget, and select the Element inspector. In the HTML Widget area, click Edit Code Snippet and paste your embed code in the Inner HTML area. For more information about embedding videos, read our YouTube & Vimeo knowledge base article.
Audio FAQs
- Controlling Audio & Advanced Techniques
- Sync animations to Video & Audio.
- Muting Audio
- Detect when audio has ended
Deleting Media
Audio and video added to your Tumult Hype document appears in the Resource Library. To delete media, select it, and click the Minus button.
Typography
Text is central to almost every document, and Tumult Hype offers powerful tools for styling text. Tumult Hype’s Text inspector contains numerous options for customizing text. Change text size, styling, shadows and spacing. Hype also allows you to choose from a set of Web- or iOS-safe fonts, or to even add Web fonts from Google’s Font Directory, or from your own curated web font collection.
Choosing Fonts
Changing the font for selected text is as simple as clicking a font’s name in the Text inspector. By default, Tumult Hype offers a set of fonts that are considered “Web safe” and work on a broad array of browsers, as well as a set of fonts available on all iOS devices. Furthermore, you can add fonts from the diverse and free set of web fonts offered by Google’s Font Directory. You can even add your own CSS Web fonts should you have your own set of curated fonts.
Select from the Web, iOS, Google, or Custom font family selection menu to choose different fonts.

Font Family Selection
Adding Fonts
In addition to the default fonts available in Hype’s Text inspector, you can add fonts to your document by choosing fonts from Google’s Web Fonts library, by adding code provided by a 3rd party Web font service, or by adding your own @font-face CSS styles.
Adding Fonts From Google’s Font Directory
Google’s Font Directory contains hundreds of royalty free web fonts hosted on Google’s servers. Adding Google Web Fonts to your document is incredibly simple with Tumult Hype:
- Choose ‘Google Fonts…’ from the ‘Add More Fonts…’ popup button in the Typography inspector.
- Choose a font from the list of Google Fonts.
- Choose a font weight (if applicable).
- Click Add Font.
- Select an element and change the font family to the added font.
To use your newly added Google Web Font, select text or an element containing text, and then choose the font from Hype’s font list. You can filter the font list to include just Google Web Fonts by choosing Google Fonts from the filter menu above the font family listing.

Adding a Google Font
iOS: Google Fonts require a network connection. If you check ‘Create offline application cache’ in the document inspector, offline users will receive a network error if they haven’t yet launched your web app. If they have launched the web app, text using Google Fonts will appear in a fallback font.
Third Party Services
Third party services such as Typekit can be added to the Text inspector’s Font Family list by using the Add More Fonts button in the Text inspector. Many third party libraries require a snippet of code to be placed in the <head>…</head> area of your exported .html file. This knowledgebase article illustrates this process for services like Typekit and Font Awesome. The general steps are:
- In the Text inspector, click Add More Fonts.
- From the Source drop down menu, choose Custom CSS.
- Add a descriptive name for your font in the Display Name field.
- In the CSS Font-Family field, add your CSS font-family name. Example:
'Source Sans Pro', Helvetica, sans-serif - Based on instructions from your Web font provider, paste any code required into the Embedded Head HTML field. Make sure that if it is CSS, it is inside of
<style>…</style>tags. - Click Add Font. Your font is now listed in the Text inspector’s Font Family list.
Troubleshooting: If your font fails to display when editing within Tumult Hype, you may need to publish your Typekit ‘kit’, or to add ‘localhost’ to your list of approved domains.
Declaring an @font-face style
If you have your own custom web fonts not hosted on other services, add them to Hype by following these steps:
Prepare your CSS defining your custom font face. Our CSS example below loads a set of Futura Bold font files, and links those files to the font family FuturaTOTBold, with Arial and Helvetica as fallbacks shown on the right. Make sure that you enclose your font family in
<style>…</style>as shown below:<style> @font-face { font-family: 'FuturaTOTBold'; src: url('${resourcesFolderName}/futuratot-bol-webfont.eot?#iefix') format('embedded-opentype'), url('${resourcesFolderName}/futuratot-bol-webfont.woff') format('woff'), url('${resourcesFolderName}/futuratot-bol-webfont.ttf') format('truetype'), url('${resourcesFolderName}/futuratot-bol-webfont.svg#FuturaTOTBold') format('svg'); } </style>For information regarding this CSS, please see this article on Fontspring.
Click the Resource Library toolbar icon and drag-and-drop each of the font files referenced in the CSS into the Resource Library. For the broadest compatibility, font sets should include the following formats:
futuratot-bol-webfont.eot
futuratot-bol-webfont.woff
futuratot-bol-webfont.ttf
futuratot-bol-webfont.svg
In the Text inspector, click Add More Fonts.
From the Source drop down menu, choose Custom CSS.
Add a descriptive name for your font in the Display Name field.
In the CSS Font-Family field, add your CSS font-family name. Font providers set this name, and typically offer fallbacks as well. For our example, the Font-Family name is
'FuturaTOTBold', Helvetica, Arial.Paste the CSS code prepared above into the Embedded Head HTML field.
Click Add Font. Your font is now listed in the Text inspector’s Font Family list.
Copying Fonts
Copying Google Fonts
To copy a Google Font, copy a text element that uses that font into another scene or document. When copying between documents, the Google Font name will appear in the document’s resource library and the text inspector’s ‘Google Fonts’ font menu.
Copying Custom Fonts
To copy custom fonts into another Tumult Hype document:
- Select ‘Edit Head HTML’ in the document inspector and copy any custom @font-face styles used for your font.
- In the other document, select ‘Add Font’ and follow the instructions from this section of the documentation.
Editing & Removing Fonts
Custom fonts and Google Web Fonts added to your document appear in the document’s Resource Library. To edit a custom font, select it in the Resource library and click Edit Font at the bottom.
To remove a font, choose it in the Resource Library and click the Minus button. If you have added font files (e.g. .otf or .ttf files) you should also remove those from the Resource Library.
Physics
Physics introduces a whole new way of animating elements in Hype. Hype Pro offers you control over an element’s physical properties – bounce, friction, air drag, and density – and over the scene’s gravity. Together, those properties enable complex, dynamic animations that would be difficult to create with just a keyframe based animation system.
Due to its interactive and simulated nature, Physics-based animations can only be viewed when previewing or exporting (that is, not within Hype’s scene editor).
Hype’s physics engine is based on Matter.js by Liam Brummitt.
Scene Physics Gravity
Scene Physics Gravity defines the force and angle of gravity in the current scene. Lower numbers equate to a smaller gravity force, and higher numbers increase gravity. The default gravity angle (180°) and force (1.0) simulate regular Earthly gravity. To change the direction of gravity based on a device’s current orientation, enable ‘Control gravity with device tilt’.

Device Tilt
Symbol Physics Gravity
To set the gravity within a symbol, select a symbol and adjust the ‘Symbol Physics Gravity’ properties in the Physics inspector. This change propagates to instances of that symbol and allows you to use multiple gravity settings in a single scene.
Collision Behavior
Static and dynamic elements on the same scene collide and interact with each other. To isolate elements from colliding with other elements, add them to a symbol. Symbols define a new physics space where collisions take place.
Element Physics
By default, new elements have no physics properties applied and are considered inactive. They don’t play any role in Hype’s physics engine. There are two additional element physics states:
- Static - Interacts without Movement: Gravity does not affect static elements. Static elements are useful for creating hard edges through which dynamic elements cannot pass.
- Dynamic - Full Physics Body: Gravity settings for the scene affect dynamic physics bodies on scene load. These elements will collide with other dynamic bodies and static bodies on the same scene.
Physics Properties
- Density: Density is the area divided by the mass. If an element increases in size and stays the same density, its mass will therefore grow.
- Bounce: (Also known as restitution) Higher bounce factors will make for more elastic collisions. A bounce factor over 1.0 will add energy to the collision.
- Friction: determines how two bodies will slide against each other.
- Air Drag: The friction air provides when an object falls. A beach ball would have high air drag and a bowling ball low air drag.
Physics API
Tumult Hype’s physics system is based on the comprehensive JavaScript-based physics library matter.js. Physics throughout Hype leverages this library, and you can use any module listed in the Matter.js documentation by directly interacting with the API. Properties such as Matter.Contact provides access to collision events. The Matter.Constraint function defines a maximum distance (for example chaining two elements together). The downloadable document linked below illustrates a few of these API integrations.
Physics Tips and Tricks
- Physics is a simulation and may run differently depending on various browser and animation conditions.
- To simulate physics from a top-down perspective, set the scene’s gravity to 0. Then use the air drag property as friction for the surface.
- To apply a force to an element, use traditional keyframe animations for the top/left properties. The timing function should generally be linear as if it were a function that eased-out the velocity would decrease and not animate as expected
- To create an invisible edge through which dynamic elements cannot pass, add a rectangle to the scene, make it a ‘static’ element, and then set its opacity to 0.
The demo document below covers the following techniques in Tumult Hype Professional:
- Element Types: Static, Inactive, and Dynamic
- Setting different gravity values on the same scene using Symbols
- Defining dynamic element edges
- Manipulating physics bodies with animations
- Creating top-down physics environments
- Animation easing vs. physics animations
- Creating element containers
- Creating collisions
- Advanced Physics with animations: Using keyframes to change physics properties
- New in 4.0: Leveraging Matter.js API functions including setting gravity, velocity, bounce, and defining distance constraints between two elements
Physics Tutorial Document

Responsive Layouts
Responsive layouts make it easy to make your document look great on every size screen. Hype allows you to create multiple layouts for a single scene which are shown at specific breakpoints. When displayed in a browser Hype will dynamically load the correct layout based on the current width of the device’s viewport.
To test your responsive layouts while previewing, we recommend using Safari’s responsive design mode. To test responsive layouts on an iOS device, use responsive preview mode in Hype Reflect.
Creating New Layouts
There are two ways to create new layouts:
- Reveal the layout selector by clicking the Layouts toolbar button at the top left of the Hype window, then click the + button in the layout selector’s header.
- Click the Add New Layout button in the Scene inspector’s Responsive Layout section.

Targeting the iPad’s Portrait Orientation
The breakpoint width you specify tells Hype to display that layout at that specific width and above. Hype will continue to display that layout as the browser width grows until it hits the next layout’s breakpoint.
When you create a new layout Hype will copy all elements, animations, and timelines from one of your existing layouts which best matches the new breakpoint you created.
Any changes made to elements or animations on one layout will not affect other layouts. Symbols are a great way to share content across multiple layouts.
Adjusting Layouts
Adjusting a layout’s dimensions will by default change the dimensions of all layouts which have the same breakpoint width. (You can see a layout’s breakpoint width in the Scene inspector’s Responsive Layout section.) For example, adjusting the height of the default iPhone layout will change the height of all layouts which also have a breakpoint width of 320px. To modify only the selected layout disable the “Apply to matching layouts” option in the Scene inspector’s Layout Size section.
Deleting Layouts
Delete a layout by Control-clicking on the layout and choosing Delete Layout from the contextual menu.
Renaming Layouts
Rename a layout by Control-clicking on the layout and choosing Rename Layout from the contextual menu, or by double clicking on the layout’s name.
Duplicating Layouts
To copy a layout from one scene to another:
- Select the layout.
- Choose Edit > Copy.
- Switch to the destination scene.
- Choose Edit > Paste.
Advanced Layout Configurations
To see examples of responsive layouts in action, visit the Responsive section on the forums.
For programmatic control over layouts, view Layout Functions.
Embedding within a responsive document
To create an animation for embedding within another website, you will need to think about the mobile theme for that website, and the types of breakpoints already present in your website design. Before building all of your layouts out, embed a test document within your site to ensure that your various layouts are shown when you expect. Safari’s Responsive Design Mode is great for testing breakpoints.
A responsive Tumult Hype document expands to fit the available space of its parent element. If the container where you place your document has a maximum width of 500px, that should be your largest layout’s width. If you are embedding your document in a site with no responsive features, there’s no need to create additional layouts.
Note: Use only ‘width’ scaling to avoid common issues when embedding within another site. If your document scales based on both the width and height, it may not appear when embedded. When using height scaling, your document will fit the available space of the containing element. If there is no height set on that element, your animation might not appear because it will have a height of 0. For help troubleshooting this, please see this thread.
Flexible Layout
Tumult Hype offers a powerful layout system for resizing and scaling documents, allowing Hype animations to respond as the browser’s window or device’s viewport changes size.
Document Scaling
By default, Tumult Hype animations have a fixed width and height, and do not respond to window or viewport size changes. To make your animation responsive to size changes, you must first select the Width and Height Scale checkboxes in Hype’s Element inspector. Enabling these options allows your document to respond to width or height size changes as desired. The Width and Height Scale options are complimented by percentage fields which define how much of the containing window or div the Hype document should fill. The default value is 100%, which means the Hype document will expand or contract to fill the width or height of its container. Reducing this number restricts how the document will expand. For example, setting the value to 50% means the Hype document will only expand to fill half of the width or height of its container.

Document Scale Settings
Element Pinning and Sizing
Enabling document scaling is only the first step for creating a completely responsive document. After deciding how your document should scale, you then need to define how elements in the document should adapt to size changes. This is done by “pinning” elements to edges of the scene, allowing the elements to resize horizontally or vertically, and, for proportionally sized elements like images, controlling how they should scale. Hype’s Metrics inspector offers a Flexible Layout section which contains all of the controls for managing how elements should adapt to document size changes. Please note that this section will be disabled if you have not first set scaling settings in the Document inspector.

Element Scale Settings
Pinning
Pinning an element to an edge instructs that element to move as the edge itself moves. When pinned to non-opposing edges, such as the bottom and right edge, the distance from the element to those edges remains fixed. In other words, an element that is placed 100 pixels away from the right edge and is also pinned to the right edge will change its location as the document resizes so it’s always 100 pixels away from the right edge. When an element is pinned to opposing edges, the element’s location changes so the proportion of the distance from the element’s center to the opposing edges is always preserved. The best example for this case is element centering: an element that is centered between the right and left edges and is also pinned to those edges will always be centered regardless of how the document’s size changes. A more complex example is an element in a 1000px wide document whose center is 200px from the left edge and 800px from the right edge. When this element is pinned to both edges and the document has width scaling enabled, the element’s center will always be positioned so that 20% of the document’s width is between itself and the document’s left edge while 80% of the distance is between itself and the right edge.
Sizing
Element resizing is controlled by the two sizing arrows presented in the Metric inspector’s Flexible Layouts section. By default, both sizing arrows are disabled which means that neither the element’s width nor height will change as the document’s size changes. Enabling either one or both of the arrows allows the element to change its size either horizontally or vertically. Like pinning, an element’s size changes proportionally to the document’s size. Thus, an element whose height is 20% of the document’s height will resize to ensure its height is always 20% of the document’s height.
Scaling Behavior
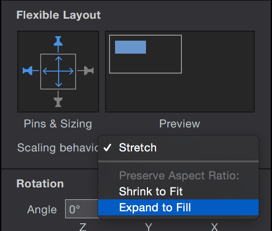
Scaling behavior settings appear when height and width sizing is selected
The scaling behavior control allows you to change how elements should be resized. This control is only enabled when an element is allowed to resize both its width and height. When an element is allowed to resize in both dimensions, the default scaling behavior is to stretch the element. This is ideal in most situations, but there are times — such as when an image is being resized — where an element should not be arbitrarily stretched and instead its proportions should be preserved. To handle those situations, Hype offers two additional scaling behaviors which preserve the element’s aspect ratio: Shrink to Fit and Expand to Fill. When Shrink to Fit is chosen, Hype ensures that the element will never expand outside of its bounding region. Conversely, when Expand to Fill is chosen, Hype will make sure the element always fills its bounding region, even if that means it may spill outside. As an analogy, consider what happens when watching wide-screen content on a TV: viewing that content letterboxed is similar to Shrink to Fit as all of the content is always visible on the TV. Likewise, viewing the same content fullscreen is similar to Expand to Fill, as the video expands to fill the TV even though some content falls off the screen.

Stretch (Distorting)

Shrink to Fit (Will not distort)

Expand to Fill (Will not distort)
Animations
Both standard animations and motion paths take into account the element’s sizing and pinning settings, and adapt to the element’s position and size changes as needed.
Viewport Settings
Documents with a scaling turned on for the height dimension will not display vertical scrollbars. Likewise, documents with a scale percentage set on their width dimension will not display horizontal scrollbars. If small screen sizes conceal parts of your document outside of the viewport, uncheck the ‘height’ scale checkbox. To specifically address issues with hidden content on mobile devices, set the viewport width property of your document to ‘device height’. For more information on the viewport property, read the Touch & Mobile chapter.
Flexible Layouts Example
The document demonstrates scaling and pinning elements using the Flexible Layouts feature:

Hype Reflect

Tumult Hype’s mobile gestures and web app support provide you with amazing tools to create mobile content, and Hype Reflect for iOS allows you to quickly preview your Tumult Hype document on any iOS device. Here’s a quick visual overview.
Connecting to Hype Reflect
Preview your Tumult Hype document in Hype Reflect by following these steps:
- Download Hype Reflect from the iOS App Store.
- Make sure that your Mac and your iOS devices are connected to the same Wi-Fi network.
- In Tumult Hype on your Mac, click the Preview menu in the toolbar and choose your iOS device.
Your current Hype document should appear on your iOS device, in Hype Reflect.

Preview drop-down in Tumult Hype: Available devices highlighted blue
If you close Tumult Hype on your Mac or leave your WiFi network, the preview will close in Hype Reflect.
Mirror Mode
While in Mirror Mode, Hype Reflect instantly mirrors every single change made in Tumult Hype. This makes Mirror Mode a fantastic tool for designing iOS content. Enable Mirror Mode by tapping the  icon.
icon.
Preview Mode
When you initially preview your document, your document is in Preview mode. In this mode, your document behaves almost exactly as if it were viewed in Mobile Safari itself.
Switch between different scenes within Hype Reflect by tapping the Scenes icon in the upper left hand corner and choosing your desired scene. Reload the document by tapping the reload button; this is a quick way to get most recent changes made in Tumult Hype.

Left: Preview, Right: Preview in Responsive Mode
Responsive Preview Mode
Responsive preview mode is a great way to test Responsive Layouts and Flexible Layouts in your document. Tap the responsive preview icon to enter this mode. When selected, device icons appear at the bottom of Hype Reflect for switching to smaller device widths. When selecting smaller devices, drag handles appear on either side of your document. This feature is supported when previewing from Hype Professional on an iPhone 6 or larger. Your device will allow previewing at your current resolution and smaller. Previewing on an iPad is preferable, as a wide array of iOS device widths can be tested.
More Options
While using Hype Reflect on an iPhone or iPod, you may enable the following options by tapping the icons in Hype Reflect’s top toolbar:
- Open in Safari – Opens the current document within Mobile Safari.
- Console – Displays any JavaScript console logs.
- Fullscreen – Simulates a full screen web app. To exit fullscreen, click the icon in the lower left hand corner.
Testing and Previewing
For tutorials on how to preview your document on additional platforms like Chrome on Android, and Internet Explorer running on Windows, read this forum post.
Hype Reflect FAQ
I’m unable to connect to Hype Reflect. What do I do?
- Make sure that your iOS device and your computer are connected to the same WIFI network.
- Restart your iOS device & turn WIFI on your Mac off and on.
- Open System Preferences on your Mac and open the ‘Security and Privacy’ or ‘Security’ area. In the ‘Firewall’ section, click ‘More Options’ and make sure that ‘Block all incoming connections’ is not checked. (View Screenshot).
- Make sure that firewall applications such as Little Snitch do not block connections requested by Tumult Hype. To edit blocked applications, open Little Snitch’s preferences.
- Make sure that devices on your local area network can connect to other devices on your network. Your router should not be blocking connections between local devices; you may need to contact your network administrator to resolve this issue.
If the suggestions above do not work, you can connect to Hype Reflect by creating an ad hoc network between your Mac and your iOS device based on these instructions. Please note this may disrupt your connection to the Internet. Please get in touch if you continue to have issues connecting.
Touch & Mobile
Tumult Hype offers several options for producing touch-friendly interactivity for:
- iBooks Author Widgets
- Animations on the web
- Interactive elements within mobile applications
- Animations accessible from a touch screen
This chapter explores initial configuration options for your document, touch actions available at the scene and element level, and offers tips for optimizing for touch screens.
Document Options
The Document inspector contains basic configuration options for your Hype document that affect how your document appears on mobile devices:
- Document Size – When selecting a document size, choose from many different mobile device sizes in the document size drop down.
- Create offline application cache – When selected, Tumult Hype generates a cache manifest file for resources used in your project. With this option selected, your document, when loaded as a web app, will download and locally save everything needed to ensure the document works even when the device is offline. Notes: Your document will need to be loaded once as a web app to prime the cache. External font services like Google fonts require an Internet connection as they cannot be cached on the device. Read more about this feature here.
- Viewport – Choosing Document Width sets the document’s viewport to match your document’s width. Device Width and Device Height define the exported document’s viewport to match the viewing screen’s width or height. Choosing Don’t Set excludes any viewport tag from your document’s exported content. Learn more about the viewport meta tag.
- Initial Scale 1.0 – Selecting this option adds the “initial-scale=1.0” property to the exported page’s viewport.
- Cover Notches - Adds the property
viewport-fit=coverto theviewportmeta tag to extend the document’s background color to the edge of the iPhone X. Learn more. - Allow user scaling – When selected, users can pinch and zoom to zoom in to and out of your document.
- Use touch events – When selected, actions set in the Actions inspector default to tap events when possible. For example, a Mouse Click will be fired after a Tap without any delay.
- Show tap highlight – When selected, the default tap highlight color appears when tapping elements. Tap highlight does not appear when ‘Use Touch Events’ is selected.
- Home screen web app – This option allows visitors to add your web app to their iOS device’s home screen and choose a color for the status bar. To add the Apple Touch Startup images to your document, click here.
- Status bar – If “Home screen web app” is enabled, allows you to choose the desired appearance for your web app’s status bar.
Scene Touch Actions
- Scene level touch actions — such as swiping and dragging on the scene — can trigger one or more actions. Swipe actions are a great way to introduce mobile device support in your document’s navigation. In addition to swiping up, down, left and right, you may also trigger actions from Drag events. Drag events at the scene level can control the playback of a timeline when dragging horizontally or vertically, or it may optionally trigger JavaScript. OurJavaScript API offers more options for the dragging API.
- Simulate a page turn animation by creating a ‘On Swipe Left’ or ‘On Swipe Right’ > ‘Page Turn’ action in the Scene Inspector. Learn more.
Element Touch Actions
By default, Tumult Hype optimizes events that occur on touch events. For example, a tap on a link in Mobile Safari fires only after a 300ms delay, regardless of the speed of the tap. With Use Touch Events enabled in the document inspector, tap actions fire after the finger has left the surface of the screen. The tables below provide a bit more information on these events and how they behave with or without Use Touch Events.
“Use Touch Events” Enabled
| Action Name | Mouse Event | Touch Event |
| On Mouse Click | Mouse Click | Tap on Element |
| On Mouse Down | Mouse Down | `touchstart` |
| On Mouse Up | Mouse Up | `touchend` |
| On Mouse Over | Hover | n/a |
| On Mouse Out | End Hover | n/a |
| On Drag | Click and Drag | Tap and Drag |
Scrolling & Touch Events: The mouse click event fires after the element has been tapped. It triggers on Touch End but will cancel if a scroll begins before that occurs. If touch events are enabled, a scrolling movement that begins on an element with a Mouse Down event, the action will fire.
“Use Touch Events” Disabled
| Action Name | Mouse Event | Touch Event |
| On Mouse Click | Mouse Click | Emulated Mouse Event +300ms delay |
| On Mouse Down | Mouse Down | Emulated Mouse Event +300ms delay |
| On Mouse Up | Mouse Up | Emulated Mouse Event +300ms delay |
| On Mouse Over | Hover | n/a |
| On Mouse Out | End Hover | n/a |
| On Drag | Click and Drag | Tap and Drag |
When Use Touch Events is disabled, if you begin scrolling on an element with a Mouse Down event, a Mouse Down event will not fire. For more information about touch events and emulated mouse events, please see Safari Web Content Guide: Handling Events.
Testing
- Touch actions work on mobile and desktop browsers, but to really test how a touchable interface behaves, test on the mobile browser and device you’d like to support and host your document from a staging server.
- Hype Reflect is a free companion iOS app that streamlines previewing Hype documents on iOS devices. When Reflect is open on an iOS device, Hype Reflect appears as a preview option alongside Safari, Chrome, and other browsers. When previewing responsive layouts in Hype Pro on an iPad 6 or larger device, Hype Reflect’s responsive design mode lets you simulate difference device sizes. Learn more about Hype Reflect and visit the Previewing Chapter. Use Mobile Safari’s developer tools to profile and test actions, events, and resources from your Mac.
- Note that Hype Reflect also has a console for reading
console.log();events. When designing for touch devices, make sure your tappable elements are the right size for fingers. Read Configuring Web Applications on Apple’s support site for tips on designing for touch screens.
Tips
- Exporting to different platforms and content management systems: Please see our Exporting FAQ.
- Decrease loading times: To improve the performance of your document, optimize your site by reducing preloading and by optimizing images.
- Apple Touch Images and Site Icons: When a web page is added to the home screen of an iOS device, or viewed in a web browser, images may be used to define icons and startup images for various mobile and desktop icons that represent the site. First, add your images to your resource library, and reference them using the
${resourcesFolderName}variable. Use the code snippet below in the<head>…<head>area to load these images. Edit the contents of the<head>…<head>of your exported .html file by selecting Edit HTML Head in the Document Inspector.
<!-- Site Icons -->
<link rel="apple-touch-icon" sizes="180x180" href="${resourcesFolderName}/apple-touch-icon.png">
<link rel="icon" type="image/png" sizes="32x32" href="${resourcesFolderName}/favicon-32x32.png">
<link rel="icon" type="image/png" sizes="16x16" href="${resourcesFolderName}/favicon-16x16.png">
<link rel="shortcut icon" href="${resourcesFolderName}/favicon.ico">

<!-- Shown when the tab is pinned in Desktop Safari -->
<link rel="mask-icon" href="${resourcesFolderName}/safari-pinned-tab.svg" color="#5bbad5">

<!-- Startup Images -->

<link rel="apple-touch-icon" href="${resourcesFolderName}/apple-touch-icon-iphone-60x60.png">
<link rel="apple-touch-icon" sizes="76x76" href="${resourcesFolderName}/apple-touch-icon-ipad-76x76.png">
<link rel="apple-touch-icon" sizes="120x120" href="${resourcesFolderName}/apple-touch-icon-iphone-retina-120x120.png">
<link rel="apple-touch-icon" sizes="152x152" href="${resourcesFolderName}/apple-touch-icon-ipad-retina-152x152.png">
Preview & Export
This chapter covers previewing your Tumult Hype document on local browsers and exporting your document to the web.
Preview in a Browser
By default, your system’s default browser is presented as the icon for the Preview toolbar button, and clicking the button opens your current document in the default browser. Clicking the dropdown menu next to the Preview button displays a list of all common installed browsers, and choosing from any of those browsers will both preview your document in that browser and make that browser the new default for the Preview toolbar button. To preview just the current scene being edited, choose File > Preview in Browser > Preview Current Scene in Browser, or Option-click the Preview toolbar button.
To preview directly on an iOS device, please see the Hype Reflect chapter.
By default, only common browsers will be shown in the Preview menus. You prevent this filtering by disabling the “Only show recommended browsers in preview menu” option in Hype’s preferences.
Available Preview Options
Exporting
Tumult Hype exports documents to HTML5. Exporting is a one-way process; Tumult Hype will not read back any modifications made to the exported code. However, if you need to recreate a .hype document from an export, jump to the document recovery section.
Generated HTML
To generate HTML, choose File > Export as HTML5 > Folder. By default, Tumult Hype will create a folder containing two items:

An .html document
Open this HTML document in your browser to see your document in action. If you need to put your content into a different document, see Embedding in Other HTML Documents.

A resources folder
This folder contains all image, video, and file resources stored in the document, along with these files:
- HYPE-###.full.min.js — The main runtime for Tumult Hype documents. Contains entire runtime including JavaScript required by IE6–8 for compatibility.
- HYPE-###.thin.min.js — The main runtime for Tumult Hype documents used by modern browsers.
- HYPE-###.waypoints.min.js - Included when using Viewport actions.
- documentName_hype_generated_script.js — The document-specific data which defines all scenes, timelines, elements, and animations for the document.
- PIE.htc — An HTML component for Internet Explorer, used in Internet Explorer 6 through 8 to improve browser compatibility. See css3pie.com for more info.
- poster.jpg / png / gif - An optional poster image captured within Hype. View the poster image section for more information.
- blank.gif — A special image which improves transparent GIF rendering in Internet Explorer 6 through 8.
- cache.manifest — Enumerates the document’s resources for offline caching. Only present if the Create Offline Application Cache option is enabled in the Document inspector.
- ####-restorable.plist — Document restoration file which can be used to recover the original Hype document from the exported content. Learn more about recovery in the Document Recovery section later in this chapter.
Export Options
At export time, there are several different options you can toggle:

Export Options
Also save .html file
If this is enabled, it will output the HTML file mentioned above. Disabling this option is useful if you’ve made modifications to the HTML file and do not want it to be overwritten, or if you have a different HTML file you are using instead.
Include text contents for search engines
When enabled, Hype will include all of the text found in your document’s elements in special hidden text elements appended to the HTML file. Those text elements help your document be indexed by Google and other search engines.
Create enclosing folder
When this is enabled, Tumult Hype will create a top-level folder containing the .html file and the *.hyperesources folder. Disable this option if you want Tumult Hype to only write these in the specified folder.
Image Optimization
To help minimize document size, improve compatibility with all browsers, and improve rendering on high resolution “retina” displays, Tumult Hype will by default:
- Convert non-web safe images — any image that is not a PNG, JPEG, GIF, or SVG — to a PNG or JPEG. If the source image has any transparency, Tumult Hype will convert it to a PNG to preserve that transparency. Otherwise the non-web safe image is converted to a JPEG to minimize size.
- Resize images so they’re only as large as is needed for the document. For example, if you use an 18 megapixel 5184px × 3456px image as the background for a 600px × 400px scene, Tumult Hype will resize the image on export and reduce the final download size by several megabytes.
- Create high resolution
_2ximages that will be downloaded by devices with “retina” displays, if the source image is large enough. Automatically generated high resolution images are only downloaded by devices with retina displays, so they don’t affect download times for anyone else. - Convert PNGs without transparency to JPGs if doing so reduces the file size.
- Not convert GIFs or animated PNGs.
The following three scenarios illustrate Tumult Hype’s default image export behavior:
- Given a 200px × 200px JPEG displayed as a 50px × 50px image, Tumult Hype generates a 50px × 50px image during export that is downloaded and displayed to most users. A high resolution 100px × 100px image is also generated, and is provided to users with “retina” displays.
- Given a PDF displayed as a 100px × 100px image, Tumult Hype will convert the first page to a 100px × 100px PNG for standard displays as well as a 200px × 200px PNG for high resolution displays.
- Given a 100px × 100px image JPG named
file@2x.jpgand a 50px × 50px image namedfile.jpg, Tumult Hype will group the two images. The @2x image will be loaded on ‘retina’ screens, and the non-retina image will be loaded on non-retina screens.
Tumult Hype’s automatic image optimization can be disabled by choosing an image in the Resource Library and deselecting the “Automatically optimize when exporting” option. This option should be disabled if you need to access the resource using the ${resourcesFolderName} variable. You may select multiple images in the resource library by clicking the first element in a series, holding shift, and then selecting the last element in the series.
Hosting Your Document on the Web
The quickest way to host your Tumult Hype document on the web is to upload your exported .html file and the .hyperesources folder to your hosting provider. You can then visit the URL of your .html file to load your document.
For a video walkthrough on getting your Tumult Hype document on the web, please see this article.
Embedding in Other HTML Documents
A good starting point for embedding is to set the export option to save the HTML file. The file is relatively bare-bones and contains three critical lines which will actually kick off the document:
<!-- copy these lines to your document: -->

<div id="documentName_hype_container" style="position:relative;overflow:hidden;width:600px;height:400px;">
    <script type="text/javascript" src="documentName.hyperesources/documentName_hype_generated_script.js?56206"></script>
</div>

<!-- end copy -->
These lines can be copied and pasted into other documents; the open/close div tags and one script tag are all you need. They reference the .hyperesources folder, which also needs to be placed at the same level as the HTML file. To open HTML files, you’ll need a HTML editor. Here are a few we recommend. Note: this example uses “documentName” as the exported document’s name, so the lines in other exported documents will be different. Please be certain to replace any instances of “documentName” with the proper document name if you’re copying directly from this example.
Editing Head HTML
To edit the <head>...</head> of your document prior to export, click on ‘Edit HTML Head’ in the Document Inspector. Insert your CSS styles, external JavaScript references or anything else that you might need in the <head> of an HTML document. To modify the font size of this area select Hype > Preferences. For further control over exported HTML, please see Hype Export Scripts.
You may adjust the font and size of the head HTML text by selecting Hype > Preferences.
iBooks
To export your Tumult Hype animation as an iBooks and Dashboard-compatible widget file, choose File > Export > Dashboard/iBooks Author Widget. Tumult Hype offers four pre-defined iBooks document sizes to choose from in the Document inspector, which are useful for creating animations specifically tailored to iBooks.
Insert Dashboard/iBooks Author Widgets into iBooks Author documents by choosing Insert > Widget > HTML from within iBooks Author, or dragging and dropping the exported widget into an open iBooks Author document.
Additional iBooks Features
- The ‘Page Turn’ scene transition allows your readers to navigate from scene to scene by swiping from right to left or left to right. Learn more here.
- Create a custom thumbnail image for your HTML widget by generating a Poster Image.
If you have any additional questions not covered here, please visit the iBooks Author HTML widget support forum. If you’re interested in how a iBooks widget is built, please see our blog post.
OAM Widget
To export your animation as an OAM widget, select this option. This format creates a package you can import into the Wordpress Plugin, InDesign with DPS, Adobe Muse, or Dreamweaver. To avoid issues, do not use foreign characters or spaces in your document name during export.
Dropbox
Unfortunately Dropbox is disabling this service so we have removed this feature from Tumult Hype. For alternatives, please visit this forum thread.
Accessibility Features
Please view the Accessibility chapter for information about building content to support screen readers and assistive devices.
Export as Movie
Tumult Hype supports exporting to Video, Animated GIF, and PNG sequence. Tumult Hype Professional supports exporting to APNG and to a higher resolution video format. Choose File > Export as Movie and choose your preferred format. The export dialog which appears allows you to change the duration, frame rate, and dimensions of the video, GIF, PNG sequence or APNG. Clicking Save creates the appropriate files in the location you choose.
When exporting to these formats, the duration defaults to the time it will take for all animations to finish when previewed. If a loop is detected, the duration will be set to 30 seconds. Physics-based animations do not count in the duration, so manual adjustments may be required to capture all physics simulations. Use timeline and scene actions to extend the recordable portion of your document. For example, create a Timeline Action at the end of the Main Timeline to transition to the next scene. If the animation on your first scene was 5 seconds, and the animation on your second scene was 10 seconds, the default video duration will be 15 seconds.
Export as Video
Note that any audio embedded in your document is not included in your export. Also note that video exporting is only supported on OS X 10.7 “Lion” and later. For information on capturing audio please view this forum post.

Export as Movie Dialog
In Tumult Hype Professional, you may choose the export bitrate & optionally export in the Apple ProRes 422 video format for higher resolution video. HYPE PRO ONLY
Export as Animated GIF
When exporting as animated GIF, please keep in mind that the format only supports 256 colors. GIF file sizes increases as you have more colors, a higher framerate, and long animations.

Export as Animated GIF Dialog
Export as Animated PNG
The APNG format is a full color animated image format that can be looped, representing an unattended playback of the Hype document. Like animated GIF exports, the width, height, duration, framerate, and whether the image is looped can be defined in the export dialog.
Export as PNG Sequence
A PNG sequence export generates individual PNG frames representing an unattended playback of the Hype document. Exports begin with 00000.png and increment for each frame. A 30fps export will generate 30 individual PNG images for each second.
Exporting to Other CMSs and Platforms
Since Tumult Hype documents are built in HTML, Javascript, and CSS, they can be run displayed on a large number of devices. We have covered step-by-step instructions for many platforms in this Exporting FAQ.
Advanced Export
A typical Hype export includes all scenes, layouts, and resources. Advanced Export gives you full control over what Scenes, Layouts, and Resources are included in your export, and provides advanced control for situations where you require small download sizes. Let’s say you’re working on a series of three advertisements:

An example document containing three separate layouts
When you open the Advanced Export window (File > Advanced Export…) you are presented with a list of export slices representing all scenes and layouts in your document. Each slice represents a separate Hype Export complete with its own html file, resources, and Hype JavaScript runtime. For our advertisement example, we can quickly create three separate HTML files from a single HTML document by exporting individual layouts:

The Advanced Export Panel
The options above will create three separate folders, each containing separate HTML documents.
Slice Export Options
Each slice represents a separate exported document. To modify the options for a slice, select it from the slice list on the left hand side and modify the slice options in the box on the right. On the right side, you can select which scenes resources to include. If a resource checkbox is disabled that means it is referenced by an element or animation in one of the selected scenes.
You can add, remove, and duplicate slices by selecting a slice and selecting an option at bottom of the Advanced Export window. Rename slices by double-clicking on the slice name. Slice names define the folder within which document content is exported.
Once you define slice options, save the current options for any new slices by selecting the ‘Default Options’ dropdown at the bottom of the panel.
The following options can be set on a per-slice basis:
- Export Script - Select from the dropdown to use an Export script.
- Create Enclosing Folder – Exports your document into a folder under the document name set during export.
- Also save .html file – Generates an HTML file for your document.
- Include text contents for search engines – Includes the full text of your document within the page for search engines.
- Name as “index.html” (requires enclosing folder) – Creates an index.html file for each slice.
- Inline data file+loader – Instead of generating a JavaScript file with your document, a script will be included directly on the page. The HYPE.js file will be loaded from a regular JS file.
- Support Internet Explorer 6-9 – The Hype JavaScript runtime contains extra code to support as many features as possible on IE 6-9. If you don’t need to support IE 6-9 you can uncheck this option to reduce the export size.
- Runtime Hosting:
- Local Folder: The default export method places required runtime files within the generated resources folder.
- Official CDN: A CDN of Hype’s latest runtime hosted on jsDelivr, and based on a repository managed by Tumult Inc. Learn more.
- Custom External URL: Setting a runtime URL will load runtime files from an external server. Learn more here.
- Create restorable document file: For more information, view Document Recovery. Does not affect final download size.
Managing Custom Slice Configurations
- Creating a configuration: To create a new advanced export configuration, or slice, click the + button at the bottom left-hand corner of the panel.
- Deleting: To remove a slice configuration, select the - button while a slice is selected.
- Default Slices: To save a slice as the default configuration, select your slice, and select the Default Options dropdown.
Exporting Scenes or Layouts Individually
Hype will automatically generate slices for exporting each layout and scene individually. You cannot modify which scenes or layouts are included in these slices, but you can change the other export and resource options. Keep in mind you can always duplicate a slice if you want to modify it.
You can export multiple slices at the same time. Simply check the box next to any slices you wish to export and click “Export Slices”.
Slice File Size
At the bottom of the slice options you can view the estimated export size of the individual slice:
- All Files – The on disk size of all files exported by the slice
- @1x Download – The estimated download size on a modern web browser running on a non-retina display
- @2x Download – The estimated download size on a modern web browser running on a retina display
- IE Download – The download size required for compatibility with Internet Explorer 6-9
Reducing Initial Download
Advanced Export is built for bandwidth-sensitive applications such as advertising network deployments, or deployments for mobile devices. Some deployments limit you based on the size of a zip file uploaded to their network, while others measure the amount of content downloaded by the end user. If you are having issues with deployment to an ad network, please visit the Advertising category in our forums. Below are a few guidelines to export with the lowest possible file size:
- If you don’t require IE 6-9 support, you can save several bytes by unchecking that option during export.
- Uncheck ‘Create restorable document file’ to not export a .plist which can aid in rebuilding a Hype document from an export.
- Select ‘Official CDN’ from the Runtime Hosting option to load the runtime from Tumult’s CDN. Learn more here. - Tumult Hype will automatically optimize your images to ensure a retina version will be served to retina-enabled devices. If you would prefer to bypass that optimization, uncheck ‘Automatically optimize while exporting’ while selecting that image, or multiple images, in your Resource Library.
- Prior to deploying your exported document to a server, drag and drop your resource folder into Imageoptim. This will squeeze additional bytes out of your images.
- Use SVG images whenever possible.
- If you control your server, enable gzip to further compress content.
- Delete any unused scenes, timelines, images, or keyframes.
- Custom font files will typically count against your file size limit; use external font services like Google Fonts if necessary.
External Runtime Hosting
Tumult’s official runtime can be used by selecting ‘Official CDN’ in the Advanced Export option under ‘Runtime Hosting’. To host the Tumult Hype runtime files on a CDN or server of your choosing, you can either duplicate the official Hype CDN, or export a blank document with the complete runtime. To create files required for a CDN you will need to regenerate the runtime files after each Hype update:
- Create a document with a single ‘viewport’ action. This ensures that the ‘waypoints’ JavaScript is included in your document export.
- Select File > Export as HTML5 > Folder
- Delete the
#####-restorable.plistanddocumentname_hype_generated_script.jsfiles from the exported folder. - Upload the entirety of the folder to your server. Your server should now contain:
blank.gif
HYPE-###.full.min.js
HYPE-###.thin.min.js
HYPE-###.waypoints.min.js
PIE.htc
Please note that after every Tumult Hype upgrade, you’ll need to either pull changes from the Hype Runtime repository, or re-export the HYPE-###.full.min.js, HYPE-###.thin.min.js, and HYPE-###.waypoints.min.js files. The files blank.gif and PIE.htc will not change. There are no issues hosting multiple runtime versions in a single folder. For information on leveraging a CDN with an advertising network, please visit the Tumult Forums.
defaults write com.tumult.Hype4 UseScriptIntegrityChecksForExternalURLs -bool YES
This may be the default in a future release.
Document Recovery
By default, Tumult Hype exports a recovery file from which the original Hype document can be recreated. This file is never downloaded by users viewing your document online, so it does not impact download times. Also, the file name is randomized per-document, so that it’s not easy for someone else to download and recreate your source Tumult Hype document.
If you have lost your source Hype document, you can recover it by following these steps:
- Download the exported
documentname.hyperesourcesfolder. - Choose Help > Restore Document from Export and select the
documentname.hyperesourcesfolder. - Choose where to save your recovered document.
The recovery process re-creates your source Hype document based on what was exported. If “Automatically optimize when exporting” is checked for images, the scaled down version will be only recoverable image available. The recovery process is no replacement for a true back up system; please use a back up system like Time Machine to protect your valuable data.
If for some reason you don’t want restorable document data included in your exports, disable this behavior by deselecting the “Create restorable document file when exporting” option in Hype’s General preferences or in the Advanced Export pane.
Additional questions?
If you have any additional questions not covered here, please visit the exporting support forum.
Export Scripts
Export Scripts help automate workflows involving Tumult Hype’s output. A common use case is that Ad networks often need files to be zipped and in a very specific format. Once installed, Export Scripts add an item in the File > Export as HTML menu and extend Tumult Hype’s UI allowing modifications to the outgoing HTML5 content. Export Scripts can be developed by anyone to augment Tumult Hype’s output.
When an export script has been installed, a new entry appears in File > Export as HTML5, Advanced Export, and optionally the Preview toolbar item. Export scripts may also allow values to be input directly within the Hype interface and in the form of custom actions modified within Action panels.
Sample Workflows
- Produce a zip file with clicktag support for delivery to ad networks. Read a blog post about this workflow.
- Post-process images
- Upload exported documents to servers via FTP, SFTP, Amazon S3, or other services
- Insert default JavaScripts into the
<head>HTML or make other HTML modifications - Define asset folder structures (use img, css, js, etc. instead of .hyperesources). See the ‘Organized Assets’ export script.
Installing Export Scripts
Export Scripts must have an extension recognizable as a script (.sh, .py, .rb, etc.), and must have hype-export within their filename. For example: DoubleClickStudio.hype-export.py. Export Scripts are installed by the user in the Application Scripts folder for Hype. This folder is dependent on how the user obtained Hype:
- Tumult Store & Mac App Store:
~/Library/Application Scripts/com.tumult.Hype4/ - Setapp:
~/Library/Application Scripts/com.tumult.hype-setapp/ - Beta:
~/Library/Application Scripts/com.tumult.Beta.Hype4/
Hype’s Export preference pane offers a button for the user to easily go to this folder. If the script successfully meets the above points, it will show up in the list in this pane:

Hype Export Scripts in Preferences
Using Python-Based Export Scripts
Most Export Scripts for Tumult Hype are written in the Python programming language. Unfortunately, Apple has removed Python from macOS 12.3 (“Monterey”). The result is most export scripts will no longer function out-of-the-box.
To keep your Python-based export scripts working without modification, Tumult is providing a custom installation of Python for you to install called the Python Export Script Enabler along with changes in the Hype v4.1.8+ to utilize it.
Download and install the PythonExportScriptEnabler.pkg to continue using Export Scripts.
(Note: this is now included with individual Export Script installations Tumult provides on the Export Script page, so if you recently installed those, you do not need to download the separate package)
Migrating Export Scripts from Previous Versions of Hype
Export Scripts used in previous major versions of Hype (v3) cannot be immediately used in newer major versions (v4). The Mac Sandbox system security prevents this usage as well as automatic migration. Typical Export Script installers will often place them in folders for previous, current, and upcoming versions, so often no migration is required. You may have scripts that were installed a while ago or via a method that did not account for newer versions of Hype; these will need to be moved over manually via the Finder. Here are the steps:
- In the Finder, choose the Go > Go to Folder… menu item
- Enter
~/Library/Application Scripts/com.tumult.Hype2/(for Hype v2-3) - Select all files within the
com.tumult.Hype2folder and choose Edit > Copy menu item - Once again choose the Go > Go to Folder… menu item
- Enter
~/Library/Application Scripts/com.tumult.Hype4/(for Hype v4) - Choose the Edit > Paste menu item to copy the contents
Using Export Scripts
When an Export Script has been installed, you may trigger it by:
Selecting it in the File > Export as HTML5 menu
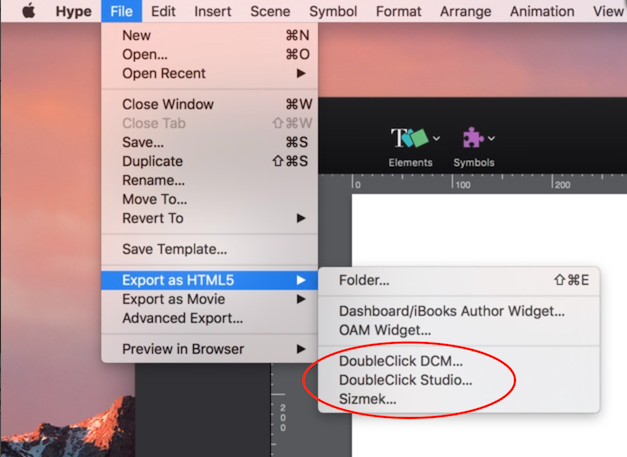
Choosing it during Advanced Export
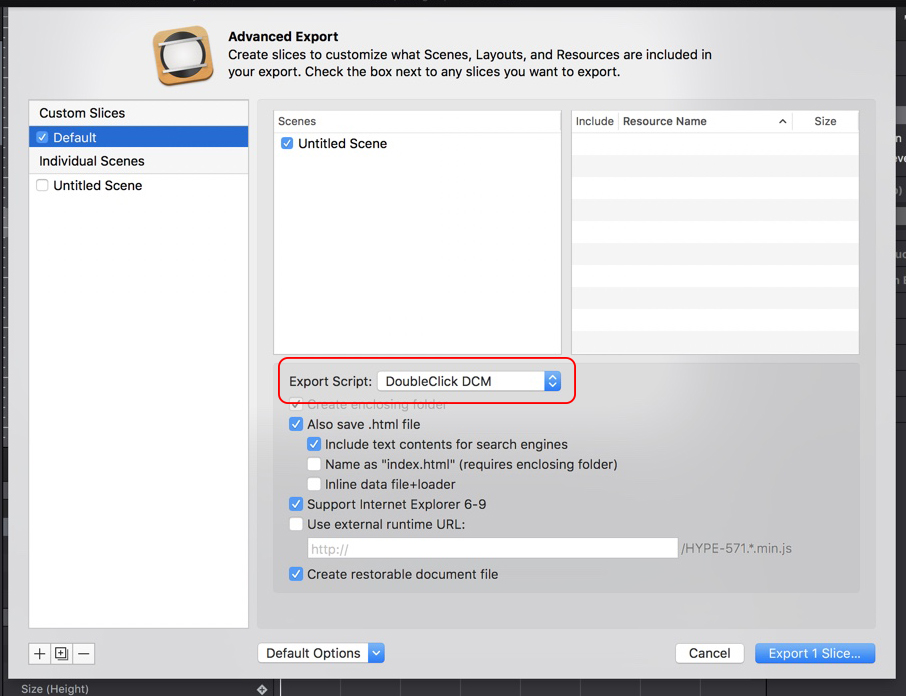
If the script is configured to modify Previews, you can find it in the Preview Toolbar:
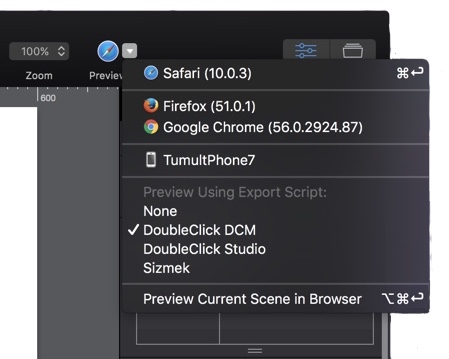
Developing Export Scripts
For more information on building your own Export Scripts, please visit the Hype Export Scripts Github Repository or the ExportScripts tag on the Tumult Hype forums.
Accessibility
In contrast to HTML pages built with static HTML, elements are inserted into the Tumult Hype div based on the current scene, timelines playing, and layouts. Tumult Hype has a few built in features to help your visitors read and interact with your document with the help of screen readers.
This chapter goes point-by-point through the 508 Accessibility checklist on Webaim.org. Additional checklists for web accessibility can be found at wuhcag.com.
(a) A text equivalent for every non-text element shall be provided (e.g., via “alt”, “longdesc”, or in element content).
For image-based content, make sure you add a description in the ‘Alternate Text’ field for that element in the Identity Inspector.
To ensure users making use of screen readers can ‘tab’ to your elements, use the Tab Index value in the identity inspector.

Example: A button with the ‘Alternate Text’ set to ‘Submit Button’, a ‘Tab Index’ value of 6, a Unique element id set to nextscene-button, and a class name of button-lrg will output the following HTML during export:
<div class="HYPE_element button-lrg" id="nextscene-button" title="Next Scene" alt="Submit Button " tabindex="6" role="button" style="...">Next Scene</div>
(b) Equivalent alternatives for any multimedia presentation shall be synchronized with the presentation.
Video hosts like Youtube support Captions, and you can easily use external JavaScript libraries that handle subtitles.
(c)Web pages shall be designed so that all information conveyed with color is also available without color, for example from context or markup.
This is more of a design guideline. Make sure that your text color and element contrast is easy to navigate and read, and consistently guides your visitors to navigate the site.
(d) Documents shall be organized so they are readable without requiring an associated style sheet.
Because Hype documents are dynamic JavaScript, generated as needed based on the scene or timeline, there are not ‘stylesheets’ that we depend on. When exporting a document, Hype optionally exports content suitable for SEO. This content could also be used as the ‘noscript’ text displayed in older screen readers that do not support JavaScript. More info on that technique.
(e) Redundant text links shall be provided for each active region of a server-side image map & (f) Client-side image maps shall be provided instead of server-side image maps except where the regions cannot be defined with an available geometric shape.
Not applicable – Tumult Hype does not use Image Maps.
G & H pertain to HTML tables, which are not a feature in Hype, but you can embed them using the inner HTML of an element.
(i) Frames shall be titled with text that facilitates frame identification and navigation.
To set the Title of your page, edit the field in the Document Inspector.
(j) Pages shall be designed to avoid causing the screen to flicker with a frequency greater than 2 Hz and lower than 55 Hz.
This could happen if your animations show different colors in rapid succession – avoiding this is pretty easy.
(k) A text-only page, with equivalent information or functionality, shall be provided to make a web site comply with the provisions of this part, when compliance cannot be accomplished in any other way. The content of the text-only page shall be updated whenever the primary page changes.
To create a version that is text only, you can make use of the text-based content that Hype outputs. For example, if your scene had a header and small snippet of text Hype would output the following if you have: “Include Text Contents for Search Engines”
<!-- text content for search engines: -->

<div style="display:none">
    <div>My Header Text </div>
    <div>This is element text, for example text that would be inserted in a text box or a rectangle.</div>
</div>

<!-- end text content: -->
If you remove the enclosing div with the <div style="display:none"> div and its closing div, this would be the basis for your ‘text only’ HTML page.
Placing a ‘View Text Only Version’ link near the top of your page (and with a -1 tab index value) will ensure that your visitors accessing your site with a screen reader can quickly get to that version. (It would be linked as a regular HTML page.)
(l) When pages utilize scripting languages to display content, or to create interface elements, the information provided by the script shall be identified with functional text that can be read by assistive technology.
The functional text you set on your elements or buttons should have descriptive text in the ‘Alt’ field (Located in the Identity Inspector).
(m) When a web page requires that an applet, plug-in or other application be present on the client system to interpret page content, the page must provide a link to a plug-in or applet that complies with §1194.21(a)
As long as you use audio or video formats recommended in our documentation, media should work without any additional applets or plugins.
(n) When electronic forms are designed to be completed on-line, the form shall allow people using assistive technology to access the information, field elements, and functionality required for completion and submission of the form, including all directions and cues.
Instead of reinventing the wheel and building forms yourself with HTML / CSS and a server-side language, use a form system like Survey Legend and Google Forms. Here’s information on building input forms in Hype.
(o) A method shall be provided that permits users to skip repetitive navigation links.
This is a design recommendation: let your users get to the meat of the content quickly. Read this page for help.
(p) When a timed response is required, the user shall be alerted and given sufficient time to indicate more time is required.
This is a usability guideline: don’t pressure people into a countdown without a way to prolong the count.
Making Ads
This chapter covers the tools and techniques built into Tumult Hype for building, designing, and deploying advertisements. For a great introduction of how Tumult Hype fits into an ad production workflow, read Visual Ad Creation Workflow with Tumult Hype on our blog.
Please join us in the Advertising category on the Tumult Forums to explore the latest creations from animators, and the most up-to-date techniques for popular ad networks, and make sure to check out banner examples in our gallery for inspiration and downloadable Tumult Hype documents.
Tumult Hype animators have successfully deployed advertisements on many advertising networks, including:
- DoubleClick Campaign Manager
- DoubleClick for Publishers
- DoubleClick Studio
- Google Adwords
- Sizmek
Layouts and Setup
When producing an campaign for multiple banner sizes, you can use a single Tumult Hype document to contain each size. Using either multiple scene sizes or multiple layouts lets you share resources and code within a single Hype document, reducing repetitive work. Each scene or layout can be then exported individually using the Advanced Export feature. Additionally, each individual ‘slice’ exported with this feature can be exported using a Hype Export Script. Additionally, you may generate different poster or fallback images for each slice. Below is a bit of additional detail on how these two features might help you streamline your ad workflow:

Several banner sizes in a single Tumult Hype Document
Advanced Export for Advertisements
An advanced export will ‘slice’ your Hype document into components which export into separate folders:
- Exporting a slice will only export images and resources used in that document. Learn more here.
- Slices contain any poster images generated for that layout or scene. Learn more about Poster Images.
- ‘Head HTML’ is shared across all slices, so you can include any shared CSS or JS code here.
- Apply Export Scripts to each individual ‘slice’ to add post-export manipulations in bulk.
Export Scripts for Advertisements
Export Scripts are triggered during export and can insert code and organize resources for specific ad networks:
- Insert variables defined in the Document Inspector based on different ad exits, click tags and macros.
- Create a single ad and export to a variety of ad networks by choosing a different export script during export.
Ad Optimization
Below are additional features in Tumult Hype that empower creative advertising production and deployment:
With Symbols, you can create a single object or animation and reuse it across all your banner sizes. For example, with a single button converted to a scene:
- Create an ‘onclick’ Mouse Action and replicate it across multiple layouts
- Scale symbols up or down as needed for larger or smaller layouts
- Adjusting the symbol propagates the change wherever the symbol is used.
Tumult Hype automatically minifies exported JavaScript, optimizes images for retina screens, and requires a very small initial download size. Please see this section for additional tips and techniques to reduce the initial download time.
As you create, you may have an upper limit on file size in mind: quickly check the export size by selecting File > Advanced Export, and observing the measured file size at the bottom of the screen for retina, non-retina, and IE 6-8, if applicable.
Besides keeping image sizes as small as possible, hosting your exported documents on an optimized content delivery network that supports GZIP compression will also ensure your viewers download your content as quickly as possible.
Templates
Templates are “freeze dried” Hype documents – opening a Hype template creates a new document based on the opened template. Any document can be saved as a template by choosing File > Save Template. Once created, templates cannot be edited. Thus to change a template, you’ll want to create a new document by opening that template and then save over the old template by choosing File > Save Template.
While only the Professional edition of Hype can create templates, any edition of Hype can create new documents from templates.
Visit the Template Gallery in the forums to check out forum member-created templates.
Resources
Resources are the images, videos, JavaScript functions, and other files that have been added to a Tumult Hype document. Unlike elements, which are unique to each scene, resources are shared across the entire Tumult Hype document. When playing back in a browser, only a single copy of each resource is downloaded and shared that copy across all scenes.
Managing Resources
Resource Library
Tumult Hype’s Resource Library offers control over a document’s resources. Open the Resource library by choosing View > Resource Library or clicking the Resource toolbar button. The Resource Library offers controls for filtering and searching resources, and also provides numerous controls for managing resources.
Adding Resources
Clicking the Resource Library’s Plus button provides a menu from which new files can be added to or new JavaScript functions can be created in the front-most document. Any file can be added to the Resource Library and will be included in the .hyperesources folder upon export. Images and videos in the Resource Library can be added to a scene by dragging them from the Resource Library and dropping them on the scene.
Removing Resources
Clicking the Minus button removes any resources that aren’t actively used by elements in the document’s scenes. Any images and videos that are currently used in the document cannot be deleted until all elements using those resources have first been deleted.
By default, Tumult Hype automatically deletes image and video resources when all elements using those resources have themselves been deleted. To prevent this behavior so that images and videos persist in the document even after all elements using those resources have been deleted, deselect the “Remove when no longer referenced” checkbox.
Updating & Editing Resources
Updating Resources: Every time a file-based resource is added to a Tumult Hype document, Tumult Hype stores a copy of the file in the document and also keeps a link to the original file. Whenever the original file is modified, Tumult Hype automatically prompts to see if the copy stored in the current Tumult Hype document should be updated to match the original file outside of Tumult Hype. Clicking the Refresh button manually updates the file. Sometimes the connection between the original files and Tumult Hype’s copy is broken; this often happens when the Tumult Hype document is moved to a different computer, or if the original source file is saved under a different name. Should this happen, Tumult Hype displays a Choose dialog so you can find the original file, restore the connection, and update the current Tumult Hype document’s copy of the file.
Editing Resources: HYPE PRO ONLY To edit resources in an external application, select an item and click the ‘Edit In’ button at the bottom of the resource library. Alternatively, you can hold ctrl while clicking on an editable resource in the library. This will show all applications that support editing that file type installed on your computer. Saving a resource in an external application will update the resource in your Hype document while your Hype document remains open.

Editing an image in an external application
Replacing Resources
To replace any file-based resource with a different file, click the Replace button. The Choose dialog lets you pick the replacement file. This is a very powerful tool for quickly replacing all copies of an image or video across all scenes in a document.
Resource Groups
Images, videos, and audio resources all create resource groups, where one resource references multiple files. Resource groups are used to collect different file variants which may be used by the resource in different contexts. Audio and video resource groups have place holders for the different file encodings which are required by browsers, and image resource groups offer place holders for standard resolution images and “@2x” images. It’s important to note that adding additional files to a resource group will not adversely affect the document’s download time: browsers will only ever download the single file they need from a resource group, ignoring the other files in the group.
To add additional audio or video sources to a resource group, select the grayed out source in the Resource Library, click the Add Source button, and then choose the appropriate audio, video, or image file. For example, a “video/webm” resource may be added to the Video2 resource group shown on the right. Additional sources can also be dragged onto the Resource Library, and Hype will attempt to add those resources to the correct resource group.
Resource Optimization
Controlling Preloading
By default, Tumult Hype documents preload all image and audio resources before beginning any animation. This is done to ensure viewers always see the document as it appears in Tumult Hype with all images loaded. This behavior can be disabled on a per-image or audio file basis by choosing an image or sound from the resource list and then deselecting the Preload checkbox. Videos are not preloaded so there is no control for this behavior. To turn off preloading for multiple images or audio files, select the ‘images’ or ‘audio’ filter at the top of the resources library, and select the first item, hold shift, and click the last item. You may then uncheck Preload at the bottom of the resource library.
Image Optimization
To help minimize document size, improve compatibility with all browsers, and improve rendering on high resolution “retina” displays, Tumult Hype will optimize images. Please see Image Optimization for more information.
Poster Images
Poster images, also known as a fallback or backup image, are a static image generated from the moment of your choosing in a Hype scene. This image typically represents the first frame of the first scene but you may choose from any scene or time to capture a poster image.
The poster image may be used a fallback or ‘polite load’ image for advertising networks. Tumult Hype will also display this image as a thumbnail when generating OAM widgets for iBooks Author. For browsers with JavaScript turned off, this image will appear in place of your Hype animation within the <noscript> tag.
Capturing a Poster Image
To capture a poster image for a scene or layout, adjust the playhead to a point in your document you want to capture and click Capture Current Scene in the Document Inspector. You may also click the ‘+’ button and ‘Poster Image’ at the bottom of the Resource Library. Next, click Capture. Capturing your first poster image will generate a new group in the Resource Library. You may also select the ‘Add Image…’ button to use an image on your computer.

A Poster Image in the Resources Library
Filename, Format and Size
Adjust the name, file type and size of your poster image for the currently shown scene or layout. A 1x size will export at the exact pixel dimensions of the layout or scene and a 2x size will export at retina resolution.
A poster image with the name poster set to be @1x size in the format jpg will be exported as poster.jpg. This same image set to @2x size will be exported as poster@2x.jpg.
Replacing Poster Images
Clicking Capture at any time will overwrite your poster image for the currently-shown scene or layout. Just like any item in the Resource library, you may click ‘Edit’ to edit the image in an image editor.
Poster Images and Layouts
Each layout size creates an available slot for a poster image. While you may have multiple poster images for different layouts, the poster image exported will be from the largest layout from the first exported scene. If you generate multiple poster images for different layouts, you may export them separately by creating export slices using the Advanced Export tool. If a poster image is present for an exported layout, it will be included in the resource list, and if none is present, the best match will be exported. The poster’s file size will be included in file size calculations at the bottom of the Advanced Export pane.
Removing Poster Images
To delete a poster image, select it and click ‘-’ in the Resource Library.
Advanced Resources
Including CSS and JavaScript in Document <head>
When CSS or JavaScript files are tracked by a document’s Resource Library, Tumult Hype can automatically include references to those files in the document’s header when exporting. This behavior is the default; to disable, choose the CSS or JavaScript file which should not be included in the document’s header and deselect the “Include in document <head>” checkbox.
Referencing Resources in Code
Because resources stored in Tumult Hype documents are exported into an animation’s resources folder, you may reliably refer to them in the document’s <head> or in JavaScript functions created within Tumult Hype using the ${resourcesFolderName} variable.
In a Document’s <head> or an Element’s Inner HTML
Tumult Hype provides a special HTML variable, ${resourcesFolderName}, which always references the resources folder Tumult Hype creates when exporting and previewing a document. Use this variable anywhere a URL path is expected. For example, after adding the file jquery-3.3.1.min.js to your document using the Resource Library, reference that file in your document’s head with:
<script src="${resourcesFolderName}/jquery-3.3.1.min.js">
Similarly, after adding the image globe.png to your document, you could refer to the image in an element’s inner HTML with
<img src="${resourcesFolderName}/globe.png">
Please note that you should deselect ‘Automatically optimize when exporting’ in the resource library to access an image resource’s original file. A file may be optimized and exported under a different name based on image optimization rules.
In JavaScript Functions
Tumult Hype offers a JavaScript API for returning the string value of the document’s resources folder URL: hypeDocument.resourcesFolderURL(). Use this in any JavaScript functions to reliably access the document’s associated resources folder. For example, if the document had an image named logo.png, the image’ path could be constructed in a JavaScript function via
var logoImagePath = hypeDocument.resourcesFolderURL() +"/logo.png";
Referencing a Poster Image
You may reference a poster image in your document by using the Resource folder variable combined with the chosen name of your poster image. For example, <img src="${resourcesFolderName}/poster@2x.jpg">. Note that if your size is set to poster 1x jpg, you would use: ${resourcesFolderName}/poster.jpg.
JavaScript
Using JavaScript
Creating a new JavaScript

JavaScript functions within Tumult Hype are generally run in response to user events. In any action panel, such as the panels found in the Mouse Actions inspector, create a JavaScript function by following these steps:
- Click the Plus button in the action’s header to add a new action.
- Click the Action menu and choose Run JavaScript.
- Click the Function menu and choose New Function.
This will open a new JavaScript Editor tab where custom JavaScript functions can be written. A sample JavaScript function looks like the following:
function untitledFunction(hypeDocument, element, event) {
  alert('Hello World');
 }
You can edit the name of the function by editing the “untitledFunction” portion of the code or by editing the name in the Resource Library. JavaScript function names must not start with a number. Function code can only be inserted between the curly brackets {...}. The portion (hypeDocument, element, event) is required and therefore not editable.
JavaScript Documentation Viewer
The Documentation Viewer below the editing area can be helpful for quickly building JavaScript functions based on API functions. Tumult Hype’s Documentation Viewer provides in-app documentation for all of Tumult Hype’s JavaScript API functions, and also allows functions to be quickly inserted into the JavaScript editor. To insert any function:
- Place the editor’s cursor where you want the function to be inserted.
- Select the JavaScript function you wish to be inserted.
- Click the Insert button
 to the right of the function name.
Functions can also be inserted by dragging-and-dropping them from the functions listing or by double-clicking their row.
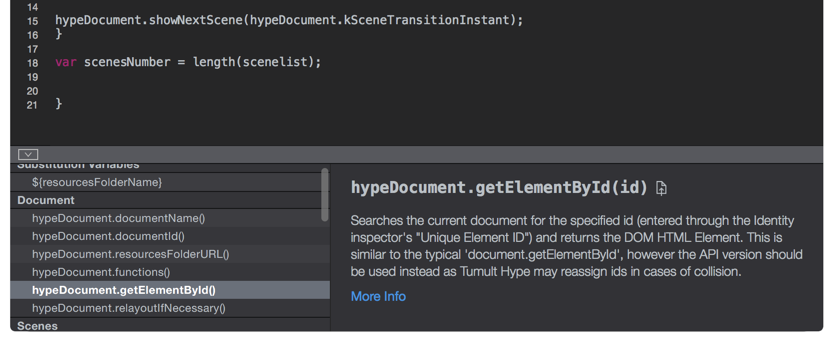
The JavaScript Documentation Viewer
JavaScript Function Lifecycle
Any JavaScript function may be added to the <head>...</head> of the exported HTML document by clicking ‘Edit HTML Head’ in the Document Inspector. Functions included here will trigger before the Hype document has been loaded, so if you rely on the Hype document or scene being loaded, it’s important to use a callback to run the function in response to a HypeDocumentLoad or HypeSceneLoad event.
The below example outlines how to use an external library like jQuery to run a function which modifies Hype elements:
- Load jQuery in the
<head>...</head>of your document. This would involve including a line of code like<script src="https://ajax.googleapis.com/ajax/libs/jquery/1.11.0/jquery.min.js"></script> - Switch to the scene where you’d like to use the jQuery function.
- In the Scene Inspector, go to the ‘On Scene Load’ action item at the bottom, and make a new action. Select Run JavaScript -> New Function.
- Insert your jQuery code.
(Note: If you are modifying position with jQuery or another library, you may need to check ‘Position with CSS Top/Left in the Document inspector)
Functions loaded in the <head> may be useful for instantiating variables, loading external JavaScript libraries, or preparing for a Hype document’s subsequent load. Running your function 'On Scene Load’ is the preferred method, and your function can be called by any number of scenes. To run your function before any scene transitions, but after the DOM structure of the scene has been loaded, run your function ‘On Scene Prepare for Display.’
To dynamically insert functions during the export process, you can use a Hype Export Script.
For additional discussion regarding hypeDocument, please see this page in the Hype Cookbook.
API Functions
Tumult Hype offers many JavaScript APIs to control various aspects of a document. These APIs can be called both by JavaScript functions written within Tumult Hype, and by scripts external to the document.
Document Functions
hypeDocument.documentName()
Returns the name of the document. This value can be used in the global HYPE.documents[documentName].
hypeDocument.documentId()
Returns the id of the container div for the document. This value can be used with document.getElementId() to retrieve the container element itself.
hypeDocument.resourcesFolderURL()
Returns the string value for the document’s resources folder URL. Use this to reference assets added via the Resource Library.
hypeDocument.functions()
Returns an array of all user-defined JavaScript functions in the Tumult Hype Document.
hypeDocument.customData
An object to put any user-defined data associated with the Tumult Hype Document. View a tutorial on adding custom data to the hypeDocument object or recent discussions on the forums.
hypeDocument.getElementById(id)
Searches the current document for the specified id (entered through the Identity inspector’s “Unique Element ID”) and returns the DOM HTML Element. This is similar to the typical document.getElementById, however the API version should be used instead as Tumult Hype may reassign ids in cases of collision.
hypeDocument.getElementProperty(element, propertyName)
Gets a property of an element based on the Hype runtime’s knowledge. The element argument must be a DOM element, generally obtained by the hypeDocument.getElementById() function.
Valid property names (quotes required):
'top'
'left'
'width'
'height'
'rotateZ'
'scaleX'
'scaleY'
'opacity'
'z-index'
'background-image'
Physics property names (Hype Professional):
'physics-engine' - a Matter.js (http://brm.io/matter-js) Engine object
'physics-body' - a Matter.js (http://brm.io/matter-js) Body object
'physics-bounce'
'physics-friction'
'physics-air-drag'
'physics-density'
'physics-body-type' - Can be hypeDocument.kPhysicsBodyTypeDead, hypeDocument.kPhysicsBodyTypeStatic, or hypeDocument.kPhysicsBodyTypeDynamic
hypeDocument.setElementProperty(element, propertyName, value, optionalDuration, optionalTimingFunctionName)
Sets a property of an element in a manner compatible with the Hype runtime. If the optionalDuration is provided, it will perform a transition animation from the current value to the specified value over the specified number of seconds. The default value is 0.
The element argument must be a DOM element, generally obtained by the hypeDocument.getElementById() function.
Valid property names (quotes required):
'top'
'left'
'width'
'height'
'rotateZ'
'scaleX'
'scaleY'
'opacity'
'z-index'
'background-image'
Physics property names (pro only):
'physics-bounce'
'physics-friction'
'physics-air-drag'
'physics-density'
'physics-body-type' - Can be hypeDocument.kPhysicsBodyTypeDead, hypeDocument.kPhysicsBodyTypeStatic, or hypeDocument.kPhysicsBodyTypeDynamic
optionalTimingFunction will default to ‘easeinout’ if not provided. Valid timing function names include (quotes required):
'easeinout'
'easein'
'easeout'
'linear'
To perform an instant transition, the optionalDuration does not need to be set because the value default is 0.
Example: Use the height of element 1 (tower) to match the height of another (tree) using an easeout transition over 2 seconds:
var towerHeight = hypeDocument.getElementProperty(tower, 'height');
hypeDocument.setElementProperty(tree, 'height', towerHeight, 2.0, 'easeout')
You may also use Math functions to define easing properties. Functions follow this structure, where t = time, start is the start moment in seconds, and dur is the duration in seconds:
function (t, start, dur) { /* return percent complete */ }
Variables all represent floating point:
tThe absolute time in the timelinestartis the time of the initial keyframedurthe total duration of the animation
Example: The below example shows a custom timing function and its use within the hypeDocument.setElementProperty function.
function NewTimingFunction (t, start, dur) {
    return Math.cos(t) * Math.sin(t)
}
hypeDocument.setElementProperty(element, 'left', 100, 5.0, NewTimingFunction)
hypeDocument.relayoutIfNecessary()
Explicitly tells the document to relayout all elements and groups for the current scene when using a flexible layout. Use if you have externally changed the bounding size of the main container.
hypeDocument.triggerCustomBehaviorNamed(‘customBehaviorName’)
Informs any elements which have a custom behavior with customBehaviorName to run its actions.
Scene Functions
hypeDocument.sceneNames()
Returns a list of all scenes in the document.
hypeDocument.currentSceneName()
Returns the string value for the currently shown scene.
hypeDocument.currentSceneId()
Returns the id of the container div for the current scene. This value can be used with document.getElementId() to retrieve the container element itself.
hypeDocument.showSceneNamed(sceneName, optionalTransition, optionalDuration)
Changes to the specified scene. If the optionalTransition is not specified it will default to the instant transition. See below for a list of valid transition constants.
The optionalDuration parameter is given in seconds; the default value is 1.1.
Scene names are user-defined and uniqueness is not enforced. If you are going to use this function, be sure that no two scenes in any document have the same name.
hypeDocument.showNextScene(optionalTransition, optionalDuration)
Shows the next scene, based on the order in the scene selector interface. If the optionalTransition is not specified it will default to the instant transition. See below for a list of valid transition constants.
hypeDocument.showPreviousScene(optionalTransition, optionalDuration)
Shows the previous scene, based on the order in the scene selector interface. If the optionalTransition is not specified it will default to the instant transition. See below for a list of valid transition constants.
Layout Functions
hypeDocument.layoutsForSceneNamed(sceneName)
Returns a list of layout info for the given scene. Layout info is given as an object with the following keys:
'name'
'breakpoint'
'width'
'height'
hypeDocument.currentLayoutName()
Returns the string value for the name of the currently shown layout.
hypeDocument.showLayoutNamed(layoutName)
Changes instantly to the specified layout in the current scene. The layout may change back on a resize event, scene change, or relayoutIfNecessary()` call.
In order to force specific layouts, use the HYPE_eventListeners infrastructure to listen to “HypeLayoutRequest” events and return a different layout name from the callback.
Timeline Functions
hypeDocument.startTimelineNamed('timelineName', direction)
Starts the specified timeline at the beginning for the current scene. Note: timelines are user-defined, so they are not enforced to be unique. If you are going to use this function, be sure that no two timelines in any scene have the same name!
Direction to play timeline:
hypeDocument.kDirectionForward
hypeDocument.kDirectionReverse
Note: this function was named hypeDocument.playTimelineNamed(timelineName) in Tumult Hype 1.5 and earlier.
hypeDocument.pauseTimelineNamed('timelineName')
Pauses the specified timeline for the current scene.
hypeDocument.continueTimelineNamed(timelineName, direction, canRestartTimeline)
Continues the specified timeline in the direction specified where it left off for the current scene. Note: timelines are user-defined, so they are not enforced to be unique. If you are going to use this function, be sure that no two timelines in any scene have the same name!
By default, continue will not start the timeline over if it is at the end. To change this behavior, pass true for canRestartTimeline.
Direction to play timeline:
hypeDocument.kDirectionForward
hypeDocument.kDirectionReverse
An example that plays the Main Timeline of the current scene in the forward direction and will start the timeline over if the end has already been reached: hypeDocument.continueTimelineNamed('Main Timeline', hypeDocument.kDirectionForward, true)
hypeDocument.goToTimeInTimelineNamed(timeInSeconds, 'timelineName')
Jumps to a specific time in the specified timeline for the current scene.
.
hypeDocument.currentTimeInTimelineNamed('timelineName')
Returns the current time of the specified timeline in seconds.
hypeDocument.durationForTimelineNamed('timelineName')
Returns the duration of the specified timeline in seconds.
hypeDocument.currentDirectionForTimelineNamed('timelineName')
Returns the playback direction of the specified timeline.
Possible return values:
hypeDocument.kDirectionForward
hypeDocument.kDirectionReverse
This allows you to test the direction a timeline is playing by using conditionals:
if (hypeDocument.currentDirectionForTimelineNamed('Main Timeline') == hypeDocument.kDirectionForward) {
    // Timeline is playing forwards
}
else {
    // Timeline is playing backwards
}
hypeDocument.isPlayingTimelineNamed('timelineName')
Returns true if the timeline is playing and false if it is not.
Timeline names are user-defined and uniqueness is not enforced. If you are going to use these functions, be sure that no two timelines in any scene have the same name.
Symbol Functions
For an explanation of Symbols jump to the Symbols documentation chapter.
hypeDocument.getSymbolInstanceById(id)
Returns the symbolInstance for the symbol with the specified id.
The symbol instance can be used to control timelines in the symbol. See the Symbol Instances section for more information.
hypeDocument.getSymbolInstancesByName(symbolName)
Returns all symbolInstances with the specified name. A symbol’s name can be found in the Symbol Library. The symbol instance can be used to control timelines in the symbol. See the Symbol Instances section for more information.
Symbol Instances
symbolInstance.getSymbolInstancesByName(symbolName)
Returns all symbolInstances with the specified name that are children of symbolInstance.element(). A symbol’s name can be found in the Symbol Library.
symbolInstance.symbolName()
Returns the name of the symbol.
symbolInstance.element()
Returns the element representing the symbol.
symbolInstance.startTimelineNamed(timelineName, direction)
Starts the specified timeline at the beginning for the symbol. Note: timelines are user-defined, so they are not enforced to be unique. If you are going to use this function, be sure that no two timelines in the symbol have the same name!
Direction to play timeline:
hypeDocument.kDirectionForward
hypeDocument.kDirectionReverse
symbolInstance.pauseTimelineNamed(timelineName)
Pauses the specified timeline for the symbol. Note: timelines are user-defined, so they are not enforced to be unique. If you are going to use this function, be sure that no two timelines in the symbol have the same name!
symbolInstance.continueTimelineNamed(timelineName, direction)
Continues the specified timeline where it left off for the symbol. Note: timelines are user-defined, so they are not enforced to be unique. If you are going to use this function, be sure that no two timelines in the symbol have the same name!
Direction to play timeline:
hypeDocument.kDirectionForward
hypeDocument.kDirectionReverse
symbolInstance.goToTimeInTimelineNamed(timeInSeconds, timelineName)
Jumps to a specific time in the specified timeline for the symbol. Note: timelines are user-defined, so they are not enforced to be unique. If you are going to use this function, be sure that no two timelines in the symbol have the same name!
symbolInstance.currentTimeInTimelineNamed(timelineName)
Returns the current time of the specified timeline in seconds.
symbolInstance.durationForTimelineNamed(timelineName)
Returns the duration of the specified timeline in seconds.
symbolInstance.currentDirectionForTimelineNamed(timelineName)
Returns the playback direction of the specified timeline.
hypeDocument.kDirectionForward
hypeDocument.kDirectionReverse
symbolInstance.isPlayingTimelineNamed(timelineName)
Returns true if the timeline is playing and false if it is not.
Explore tips and tricks in the Symbols section of the forums.
Drag Functions
JavaScript functions invoked by the On Drag handler can gather information about the current drag gesture.
event['hypeGesturePhase']
When receiving a callback for the On Drag event with the Run JavaScript… action the event object also offers information about whether the current drag gesture has just started or ended, was canceled, or the coordinates were updated. To get that state, access the hypeGesturePhase property in the event object:
hypeDocument.kHypeGesturePhaseStart
hypeDocument.kHypeGesturePhaseMove
hypeDocument.kHypeGesturePhaseEnd
hypeDocument.kHypeGesturePhaseCancel
event['hypeGestureXPosition']
Returns the current x position of a drag when using the “On Drag” event with the “Run JavaScript…” action.
event['hypeGestureYPosition']
Returns the current y position of a drag when using the “On Drag” event with the “Run JavaScript…” action.
Physics Functions
While many Physics properties can be adjusted by using the Physics Inspector, there are three additional methods to control Physics in Tumult Hype:
- You may retrieve an element’s physics properties by using:
hypeDocument.getElementProperty(element, propertyName) - Set an element’s properties using:
hypeDocument.getElementProperty(element, propertyName). - Directly using the
physics-engineorphysics-bodyproperties exposed in matter.js.
The Physics library used in Tumult Hype leverages the Matter.js engine. For more information about available Physics API functions, please view the Physics section.
API Constants
The only constants exposed are those for scene transitions:
hypeDocument.kSceneTransitionInstant
hypeDocument.kSceneTransitionCrossfade
hypeDocument.kSceneTransitionSwap
hypeDocument.kSceneTransitionPushLeftToRight
hypeDocument.kSceneTransitionPushRightToLeft
hypeDocument.kSceneTransitionPushBottomToTop
hypeDocument.kSceneTransitionPushTopToBottom
Examples
To show a scene named “Yellow” with the Instant transition style, this API function call would be used:
hypeDocument.showSceneNamed(‘Yellow’);
To show a specific scene named “Blue” from the JavaScript editor, using a Push Right to Left transition, and then play a timeline named “Robin” these function calls would be used:
hypeDocument.showSceneNamed('Blue', kSceneTransitionPushRightToLeft);
hypeDocument.playTimelineNamed('Robin');
Invoking API from outside of Tumult Hype
To access the Tumult Hype API from a JavaScript outside of the embedded document, you can use the global Tumult Hype object:
HYPE.documents[documentName]
The document may not be an exact match for the filename. To figure out the value, you can look inside the exported Resources folder for the *_hype_generated_script.js file and find the document’s name there. You can also call the hypeDocument.documentName() function from within a JavaScript action to determine it.
Events
To help external JavaScripts integrate and interact with embedded documents Tumult Hype offers an event callback system, allowing external JavaScript functions to be triggered in response to events in embedded documents. One purpose for an externally invoked event would be to jump between scenes using controls outside of your Tumult Hype document for a slideshow. These are the event types that can receive callbacks:
HypeDocumentLoad- element argument object is the main Hype document container
- if you return
falsethen the initial scene will not be loaded
HypeScenePrepareForDisplay- element argument object is the scene element that will be loaded
HypeSceneLoad- element argument object is the newly transitioned scene element
- if you explicitly return
falsethen any following scene load actions will not be executed
HypeSceneUnload- element argument object is the scene element before transitioning
- if you explicitly return
falsethen any following scene unload actions will not be executed
HypeSymbolLoad- element argument is the symbol’s element
HypeSymbolUnload- element argument is the symbol’s element
HypeResourceLoad- called before an image, video, or audio resource is preloaded or loaded
- event argument contains a
urlfield - if you return a string, that URL is loaded for the file instead
HypeLayoutRequest- Invoked when the container size may need to change, such as a window resize or manual
hypeDocument.relayoutIfNecessary()call - event argument includes
layoutNameandsceneNamefields - element argument is the main Hype document container
- if you return a different layout name, it will transition to that layout
- Invoked when the container size may need to change, such as a window resize or manual
HypeTimelineComplete- event argument includes
timelineNamefield - if you return
falsethen any timeline complete actions will not be run (these are deprecated and no longer shown in Hype’s UI)
- event argument includes
HypeTriggerCustomBehavior- event argument includes
timelineNamefield
- event argument includes
HypeEnterViewport- element argument is the triggering event
HypeExitViewport- element argument is the triggering event
Examples
The following example registers an event to be run after the HypeDocumentLoad event has occurred:
<script>

  function myCallback(hypeDocument, element, event) {
    // display the name of the Hype container and the event called
    alert("id: " + element.id + " type: " + event.type);

    // show the scene named SecondScene
    hypeDocument.showSceneNamed('SecondScene');

    // return false so it does not load the initial scene
    return false;
  }

  if("HYPE_eventListeners" in window === false) {
    window.HYPE_eventListeners = Array();
  }
  window.HYPE_eventListeners.push({"type":"HypeDocumentLoad", "callback":myCallback});

 </script>
The following line in the above JavaScript receives the HypeDocumentLoad event callback:
window.HYPE_eventListeners.push({"type" : "HypeDocumentLoad", "callback" : myCallback});
In the above code, HypeDocumentLoad is the event for which the callback should be triggered, and myCallback is the JavaScript function which should be invoked by the event. This JavaScript can be invoked outside of Tumult Hype, and can potentially be placed within the <head>...</head> of the exported .html file generated by Tumult Hype by clicking on ‘Edit HTML Head’ in the Document Inspector. To see this function in action, download this example file. When previewed in a browser, the code in the document’s head will load the second scene and an additional timeline on that scene.
These buttons make use of Tumult Hype’s JavaScript API constants. The full code for the Push Right to Left button is:
<button type="button" onclick ="HYPE.documents['scenes-transitions'].showSceneNamed('Scene2',HYPE.documents['scenes-transitions'].kSceneTransitionPushRightToLeft);">
   Show Scene 2 (Push Right to Left)
 </button>
Switch to a scene named Red from a document named HypeExample using the Push Right to Left transition:
<a href="#" onclick="HYPE.documents['HypeExample'].showSceneNamed('Red',HYPE.documents['HypeExample'].kSceneTransitionPushRightToLeft);">Go to the Red Scene.</a>
Switch to the next scene in a document named HypeExample using the Crossfade transition:
<a href="#" onclick="HYPE.documents['HypeExample'].showNextScene(HYPE.documents['HypeExample'].kSceneTransitionCrossfade);">Crossfade to next Scene</a>.
JavaScript Forums
The JavaScript category of the Tumult forums contains a wide assortment of code samples and example documents. The Hype Extension Project, for example, covers several powerful functions to extend Tumult Hype’s functionality with the help of the JavaScript API.
Inspectors
Tumult Hype’s ten inspectors provide easy access to document, symbol, scene, element, vector shape, typography, physics, and identity properties.
Inspectors are accessible from the View menu, or by clicking the Inspector toolbar button. Document and Scene inspectors establish rules and settings for the document and scene. The Metrics, Vector Shape, Element, Symbol, Text, Mouse Action, and Identity inspectors become active when selecting one or more elements or symbols. Tumult Hype Pro includes two additional inspectors to modify symbol and physics properties.
Document Inspector

The Document inspector provides many controls for initial document setup.
HTML Page Title – Defines the title of the exported HTML document. By default, the title is the same as the exported file name.
Options
- Show Loading Indicator – Controls the display of a loading indicator. When enabled, the Tumult Hype document will display “Loading…” as the document’s image resources are downloaded and cached. For tips on customizing the preloading screen, please read our support article on Custom Preloaders.
- Make Background Transparent – When selected, scene backgrounds are transparent. Check this box to export transparent animated gifs.
Create offline application cache – When selected, Tumult Hype generates a cache manifest file for resources used in your project. With this option selected, your document, when loaded as a web app, will download and locally save everything needed to ensure the document works even when the device is offline. Note: Your document will need to be loaded once as a web app to prime the cache. Also, Google fonts require an Internet connection as they cannot be cached on the device.
Edit the Head HTML – Clicking this button opens an HTML editor, allowing the editing of the document’s
<head>. Any changes made to the document’s header are represented in Tumult Hype’s scene editor and are also included when the document is exported.
Advanced Options
- Protect from External Styles - When unchecked, elements will not be protected from CSS styles defined outside of your Tumult Hype document.
- Use Webkit Graphics Acceleration – When selected, animations can use the system’s GPU when displayed in Webkit-based browsers, which includes Safari, Mobile Safari, and Chrome. This almost always leads to better animation performance, but some browsers or devices may have problems properly rendering accelerated content. If you see rendering problems, try deselecting this option.
- Position with CSS left/top - When checked, elements animate using CSS’s left & top values. Check this box if you are manipulating element positions directly with JavaScript or with jQuery.
Mobile Options – These options create meta tags and properties in the <head> of the exported .html page. Meta tags appear uneditable in the ‘Head HTML’ area:
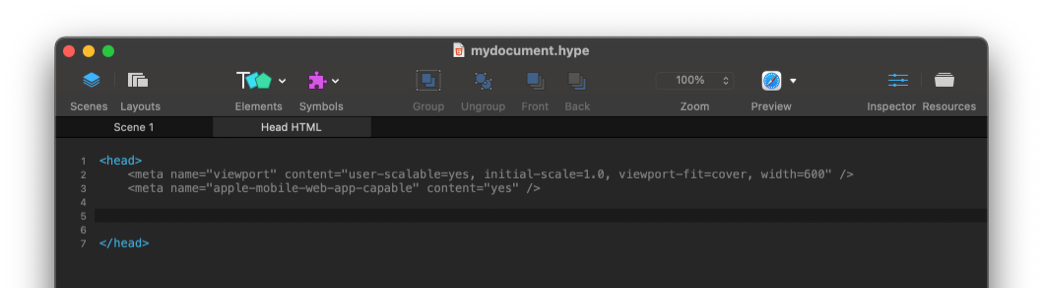
- Viewport – Choosing ‘Document Width’ sets the document’s viewport to match your document’s pixel width. Device Width and Device Height define the exported document’s viewport to match the viewing screen’s width or height. Choosing ‘Don’t Set’ excludes any viewport tag from your document’s exported content. Learn more about the viewport meta tag.
- Initial Scale 1.0 – Selecting this option adds the “initial-scale=1.0” property to the exported page’s viewport.
- Cover Notches - Adds the property
viewport-fit=coverto theviewportmeta tag to extend the document’s background color to the edge of the iPhone X. Learn more. - Allow user scaling – When selected, users can pinch and zoom to zoom in to and out of your document.
- Use touch events – When selected, actions set in the Actions inspector default to tap events when possible. For example, a Mouse Click will be fired after a Tap without any delay.
- Home screen web app – This option allows visitors to add your web app to their iOS device’s home screen and choose a color for the status bar. To add the Apple Touch Startup images to your document, click here.
- Status bar – If “Home screen web app” is enabled, allows you to choose the desired appearance for your web app’s status bar.
Show Browser Compatibility Warnings – Warnings for browsers equal to or older than the selected version will be shown. Changing settings here will not affect document compatibility, only the warnings reported by Tumult Hype. Documents created with Tumult Hype always have the best possible compatibility with all browsers. Use the Advanced Export feature to turn off IE compatibility.
Scene Inspector

Document Size
- Preset Sizes – Contains many commonly used default document sizes for mobile devices, iBooks widgets, IAB default advertising sizes, and publishing platforms.
- Width and Height – Control over the exact width and height of the document, in pixels. The scene size adjusts the size of all scenes unless ‘Apply changes to all scenes’ is unchecked. - Use a percentage-based width or height to use Flexible Layouts
- Scale – Controls whether the document should scale horizontally and/or vertically. When enabled, the controls offer the ability to specify how much of the containing window or div the Hype document should expand to fill. See the Flexible Layout Chapter to learn more.
Responsive Layout
By default, scenes only have one layout that layout is always displayed regardless of the browser’s width. To take advantage of Hype Pro’s responsive layouts, click the Add New Layout button and add layouts as desired. The “Breakpoint width” field is used to control which layout is displayed for a given browser width. Read more about Responsive Layouts.
Breakpoint width - Sets the breakpoint width of the current responsive layout.
Add New Layout… - Adds an additional layout.
Animation Timelines
This area displays the timelines on the current scene, their duration, and toggles whether timelines are relative or absolute. (Learn more about relative and absolute timelines. Add timelines to the current scene by clicking the Plus button; remove them by clicking the Minus button. Rename timelines by double clicking on their name.
- Background – Sets the background color of the current scene. Scene colors set on the first scene sets the background color of the exported .html file.
- Scene Actions – Please see the Actions chapter for more information.
- Custom Behaviors - The “Add new behavior” button creates new custom behaviors.
Symbol Inspector
Hype replaces the Scene inspector with the Symbol inspector when you are actively editing a symbol’s content. Double click a symbol to enter editing mode and display this inspector.

Type
- Standard - Standard symbols can have multiple instances in a scene and exist within the scene itself just as normal elements do.
- Persistent - Persistent symbols can only exist once on a scene and, unlike elements or standard symbols, exist outside of scenes. As such, they are not destroyed when scenes change, and can even be displayed while a scene transition happens.
- Automatically add to new scenes - New scenes will contain the selected persistent symbol when the scene is created.
- Display on top during scene transition: No matter the layer order of the symbol, it will appear above all elements during scene transitions.
Metrics Inspector

The Metrics inspector controls size, content overflow behavior, placement, and rotation properties of selected elements. While rotation, position, and scaling can all be manipulated directly in the scene area with mouse controls, this inspector offers fine tuning and may be more useful during multiple selection.
- Content Overflow – Determines how text and inner elements are displayed when it extends beyond the bounds of the element, and whether a scroll bar should appear.
Placement
- Left, top, Width & Height – Sets the exact height, width, and position for the selected elements.
- Constrain Proportions - Ensures elements scale proportionally when resizing.
- Original Size - Returns element to their original size.
Scale
Scales up or down the selected element(s) or group. This uses CSS’s transform:scale() property.“ Setting negative values in either dimension will flip the element. To scale width or height independently, uncheck Constrain ratio. To reset scale to 100%, click the Original Size button.
Flexible Layout
Selecting and deselecting the pins and scaling arrows define how selected elements should behave as the exported Hype document is resized. For more information, please see the Flexible Layout chapter.
Scaling Behavior – Defines how elements should resize. In particular, offers control over how proportionally sized elements, like images, should be resized to preserve their aspect ratio.
Rotation
Sets the X, Y, and Z rotation angles. At this time only one rotation angle may be selected at one time. Negative values like -180° or values exceeding 360° are accepted. For example, to set a new rotation value for three full rotations clockwise, use 1080°.
- Rotation follows motion path – When selected, element will rotate with the direction of a motion path. Rotation angles may be applied in addition to this setting.
- Transform Origin – Sets the X and Y offset percentages for the selected element’s rotation and scale origin. This setting can also be adjusted by selecting an element, holding command, and adjusting the center point.
Vector Shape Inspector

The Vector Shape inspector controls all options associated with vector shapes such as anchor point properties, path options, background color and border fill properties, line cap, line join, line draw, and line dash for your vector shapes. The inspector appears when editing a vector shape.
Anchor Point
- Left & Top: When selecting a vector point, the Left and Top values define its X and Y coordinates on the scene.
- Mode: When selecting an anchor point, choose from Asymmetric, Mirrored, Disconnected or Corner point modes. Learn more.
Path Options
For more detailed information, view Path Options.
- Line Cap: Defines the shape of vector shape start and end points. Choose from butt, round, or square.
- Line Join: Defines the shape of corner point vertices. Choose from miter, round, or bevel.
- Line Draw: Sets the percentage a vector shape stroke is drawn on a vector element.
Line Dash: Gap (First Property): Sets the length in pixels of individual dash segments. Dash (Second Property): Sets the length in pixels between dashes. Offset (Third Property): The offset in pixels for a dash. A value of 10 sets the dash start 10 pixels behind the start point of the shape.
Background Fill Style – Sets the background style as either an Image, Fill, Gradient, or None.
- Gradients contain two colors (with or without alpha transparency) and may be rotated.
- Images may be scaled to fit the element, repeated horizontally, or repeated vertically.
Border: Set the stroke width for the vector shapes. Click the color picker to choose a border color and optional transparency.
Padding: Sets the padding between the Hype element containing a vector shape and the shape itself.
Pencil Inspector
The Pencil inspector appears when the pencil tool is selected. When double clicking on a penciled line, the vector shape tool inspector appears.
Drawing Options
- Smoothing: Lower values are less smooth and contain fewer control points.
- Create line draw animation: Determines the duration of the line draw animation generated when creating the line.
- Close path when near line start: Optionally create a closed vector shape when finishing a shape near the start of the line.
Path Options, Shape Morph, Background and Border
Please see the Vector Shape Inspector for information on these properties.
Element Inspector

The Element inspector contains stylistic properties for the selected element or elements.
Background Fill Style – Sets the background style as either an Image, Fill, Gradient, or None.
- Gradients contain two colors (with or without alpha transparency) and may be rotated.
- Images may be scaled to fit the element, repeated horizontally, or repeated vertically.
Border – Creates a border with the selected style (None, Solid, Double, Dotted, Dashed, Groove, Ridge, Inset, Outset) around the selected element. The border and radius of an element’s four sides and corners can be set in this panel, as well as the color and style of the border. The padding setting controls the distance between the border and the element.
Visibility – A value of 0% opacity sets selected elements as completely invisible. Note: An element with a 0% opacity will interfere with mouse actions on elements ordered below it in the scene. For an element to respond to mouse actions at a region in the document, it must not be covered by any other element, visible or invisible, at that point.
Display - Toggles the visibility of the selected element(s).
Shadow – There are three different types of shadows you may apply to an element:
- Drop: Drop shadows consider the non-rectangular and transparent portions of the element to create a shadow.
- Box: Creates a box shadow based on the rectangular dimensions of the element.
- Inset Creates a shadow on the inside edges of an element.
Filter Effects
CSS3 filters perform a variety of powerful image rendering effects. Read more about these effects.
Foreground - Setting values on foreground filter effects will modify the element’s blur, sepia, saturation, hue, brightness, or contrast. Backdrop - These properties define how elements underneath the selected element appear. Your element must have a opacity value under 1.0 to perceive these effects. Lower the opacity slider at the bottom of the color picker to add transparency to your element. Note: Supported in iOS 9+ and Safari 9+ - Reflection – This property creates a reflection of the selected element, with optional depth and offset values.
Typography Inspector

The Typography inspector controls text formatting including font selection, colors, alignment, shadows and spacing properties.
By default, all fonts appear in the Font Family selection panel. The iOS font family option lists fonts installed on iOS devices. The Web option lists fonts installed on a majority of web browsers.
- Alignment – The text alignment of the selected elements.
- Font – The Font Family, size and style of the selected elements.
- Add More Fonts: Loads the Google Fonts overlay to select fonts from Google’s Font Directory.
- Text Shadow – Sets a shadow for selected text with specified X, Y, blur radius, and color properties.
- Text Spacing – Letter spacing defines the distance between characters, word spacing defines the distance between words, and line height sets the distance between individual lines.
To add arbitrary HTML or CSS styles to a text element, edit its inner HTML by double clicking it and then clicking on the pencil icon which appears beneath the element.
For more information about Fonts, see the Typography chapter.
Actions Inspector

Pointer
- Cursor - The Cursor setting controls how the user’s cursor should appear when mousing over the selected element. Mouse actions are explained in the Actions chapter of the documentation.
- Allow text selection - Disabling this ensures text in an element cannot be copied.
- Ignore all pointer events - Checking this box ensure that even if an element has be positioned over another element, the element below will receive mouse & touch events.
The actions listed occur based on what element or elements have been selected.
Physics Inspector
The Physics Inspector controls physics properties of the selected elements or scene.

Element Physics
- Inactive - No physics applied: The element will not participate at all in physics. It is not affected by gravity, nor will it interact with other elements.
- Static - Interacts without movement: Gravity does not affect static elements. Static elements are useful for creating hard edges through which dynamic elements cannot pass.
- Dynamic - Full physics body: Gravity settings for the scene affect dynamic physics bodies on scene load. These elements will collide with other dynamic bodies and static bodies on the same scene.
Physics Properties
- Bounce: Controls the elasticity of the element’s collisions. A value of zero means the element is inelastic and will not bounce in a collision; the higher the value, the more the element will bounce.
- Friction: Sets the coefficient of friction for the element. A value of zero means the element will not slow down as it moves through the scene, while a higher value means it will slow more quickly as it moves.
- Density: Changes an element’s mass and thus how the element will affect other elements during a collision. Mass is determined by an element’s size and density. A larger, less dense element can have the same mass as a smaller, more dense element.
- Air Drag: The friction air provides when an object falls. A beach ball would have high air drag and a bowling ball low air drag.
Scene/Symbol Physics Gravity
- Force: Sets the strength of gravity in the scene or symbol. 1.0 is Earth-like.
- Angle: Controls the direction of gravity. The default value of 180° pulls affected elements to the bottom of the scene.
- Control gravity with device tilt: When enabled, the direction of gravity is controlled by the devices orientation angle so that tilting the device will change the direction of gravity.
Identity Inspector
The Identity inspector provides access to metadata for elements and information for screen reading technologies. To learn more about Accessibility options in Hype, read the Accessibility chapter.
- Alternate Text – Sets the alt tag and accessibility title for images and the title tag for divs. Setting this value is useful for accessibility and for displaying tooltips.
- Role- Sets the ‘role’ attribute for the element. Learn more about
role. - Include in keyboard Navigation - Sets the tab index value for the selected element.
- Display Name – Sets the element’s name in the element list.
- Unique Element ID – Sets the element’s ID for accessing the element directly in a custom function or JavaScript. Please see the JavaScript chapter for more details.
- Class Name – Sets a CSS class name for the element.
- Additional HTML Attributes – Add additional HTML attributes to elements, such as:
data-src="value".
Example: A button with the ‘Alternate Text’ set to ‘Submit Button’, a ‘Tab Index’ value of 6, a Unique element id set to nextscene-button, a class name of button-lrg and HTML attributes key:data-src & value:foo will output the following HTML during export:
<div class="HYPE_element button-lrg" id="nextscene-button" data-src="foo" title="Next Scene" alt="Submit Button " tabindex="6" role="button" style="...">Next Scene</div>
HTML Attributes
HTML Attributes are useful for setting custom attributes for any element in Hype.
- Add a
posterattribute on a video to define a custom image shown prior to playback. Select your video, addposteras a ‘key’, and then define an image in your resource library by inserting${resourcesFolderName}/filename.pngas the ‘Value.’ - Use
data-*attributes to be referenced by your own code or other 3rd party frameworks. - Add attributes on HTML Widgets (iframes), such as
allow="camera; microphone"
Preferences
General Preferences

Hype’s General Preferences
- Show browser compatibility warnings before exporting: If checked, choosing a File > Export as HTML5 or File > Advanced Export option will show a list of any browser compatibility issues before presenting the save dialog. These are configured in the Document Inspector.
- Create restorable document file when exporting: If checked, Hype will create a recovery file as part of a typical HTML5 export which can mostly recreate the Hype document later. We do not recommend unchecking this unless in most cases. See Document Recovery for more information.
- Only show recommended browsers in preview menu: Hype maintains a whitelist of browsers to show in the preview toolbar menu item because querying macOS for applications which can handle “http” URLs or “html” files can often result in non-browsers showing up in the list. However new browsers may come out which are not immediately on Hype’s whitelist or there may be applications you want to preview to which Hype would not consider a traditional browser. If this is the case, check this box for the preview menu to show all options available on the system.
- Notify when new updates are available: If checked, on startup Hype will always look for new updates on launch. It is recommended to have this setting checked, otherwise you may be missing critical updates that include bug fixes or new features. (This option is only shown on the Tumult Store version of Hype. The Mac App Store version uses the App Store updating mechanisms which can be configured through the System Preferences)
- Collect anonymous usage data to improve Hype: This setting currently does not do anything; data is not presently transmitted. It is reserved for possible future use to help determine product direction. You can click the ? for details on the collection policy and read Hype’s Privacy Policy.
Interface Preferences

Hype’s Interface Preferences
- User interface theme: Hype can run in light or dark themes. On macOS 10.14 and later, a “System” option is available that uses the respective theme depending on the setting chosen in the System Preferences General Pref Pane.
- Use system accent color: On macOS 10.14 and later, an accent color can be chosen in the System Preferences General Pref Pane. This is used for certain highlights in Hype, but may not always be desired.
- Guide color: The colors used for Guides in the Scene Editor. They are pairs; if the first color is chosen the second color is used for the active state, and vice versa. The third and fourth colors have this same behavior.
Source Editing
- Colors: These change the syntax highlighting as well as text, background, and line highlight colors. Each is tied to a theme, so you can have independent colors on the Dark and Light themes.
- Source editor font: Changes the font and size for all documents. If a document is open, you can see the changes live.
- Line spacing: Changes the distance between lines for all documents. If a document is open, you can see the changes live.
- Tab width: The distance between tab stops, measured in the number of equivalent space characters. If a document is open, you can see the changes live.
- Highlight current line: Lightly colors the background behind the line that has the text cursor. If there is a selection, this is temporarily not drawn in lieu of the selection. The color can be configured via the “Line Highlight” color above.
- Show line numbers in gutter: This will show a number next to each line in the Source Editor. Disabling can sometimes improve performance on large files.
- Preserve indentation: If this setting is checked, the leading whitespace (spaces, tabs) of the previous line will be created as the leading whitespace for a new line.
- Wrap lines: Determines if lines that are wider than the view of the Source Editor should be displayed below, or if unchecked, cause a horizontal scrollbar to appear.
- Show invisible characters: With this checked, the Source Editor will lightly print any characters that represent whitespace or normally non-printed characters in the file. It is useful for finding “gremlins” which might be unexpected data in a file.
Devices Preferences

Hype’s Devices Preferences
Hype can preview your document to iOS devices using the Hype Reflect application. Devices are chosen via the Preview toolbar menu item.
After a device is previewed to, it will stay in the Preview menu, even when the Hype Reflect application is not running. Clear Recently Previewed Devices will reset these choices, so it will then only show active devices.
Exporting Preferences

Hype’s Exporting Preferences
This preferences section shows any installed Export Scripts. Read that chapter for more information.
Keyboard Shortcuts
General
Action | Shortcut |
| Export document as HTML5 | Command–Shift–E |
| Preview document in default browser | Command–Return |
| Preview current scene in default browser | Command–Option–Return |
| Show Resource Library | Command–Shift–L |
| Show Media Browser | Command–Shift–M |
| Show Help menu | Command–Shift–Question Mark (?) |
| Show and Hide the Inspector | Click Inspector in the Toolbar or Command–Shift–I |
| Show and Hide Scenes | Click Scenes in the Toolbar or Command–Shift–J |
| Show and Hide Layouts | Click Layouts in the Toolbar or Command–Shift–K |
| Show and Hide the Colors window | Click Colors in the Toolbar or Command–Shift–C |
| Show and Hide the Toolbar | Command–Option–T |
| Select next tab | Command–Option–Shift–Right Bracket ( ] ) |
| Select previous tab | Command–Option–Shift–Left Bracket ( [ ) |
| Close all tabs | Command–Option–Shift–W |
| Widescreen Layout | Command–Shift–Backslash ( \ ) |
| Focus Element in Scene from Selection in Element List | Tab |
Working With Scenes and Layouts
Action | Shortcut |
| Pan | Spacebar |
| Zoom In | Command–Equals (=) Spacebar–Command–Click |
| Zoom Out | Command–Minus (–) or Spacebar–Option–Click |
| Zoom Actual Size | Command–Zero (0) |
| Center on Scene | Command–Option–Shift–Backslash ( \ ) |
| Show and Hide Layout Grid | Command– ‘ |
| Show and Hide Guides | Command– ; |
| Create new scene | Command–Shift–N |
| Select next scene | Command–Option–Down Arrow |
| Select previous scene | Command–Option–Up Arrow |
| Select next layout | Command–Option–Shift–Down Arrow |
| Select previous layout | Command–Option–Shift–Up Arrow |
| Duplicate scene | Option + Drag a Scene |
| Rename a scene or layout | Press return while the scene/layout is selected |
Working with Elements
Action | Shortcut |
| Insert Text | t |
| Insert Button | b |
| Insert Rectangle | r |
| Insert Rounded Rectangle | u |
| Insert Ellipse | o |
| Start Vector Shape | v |
| Start Pencil drawing | p |
| Select all elements | Command–A |
| Deselect all elements | Command–Shift–A |
| Move selected element by one pixel | Arrow keys |
| Move selected element by 10 pixels | Shift–Arrow keys |
| Add elements to (or remove them from) previously selected elements | Command–click or Shift–click |
| Add range to (or remove it from) previously selected range | Command–drag or Shift–drag |
| Constrain element movement to 45° angles | Shift–drag |
| Resize element | Drag handle |
| Resize element from center | Option–drag handle |
| Constrain aspect ratio when resizing element | Shift–drag handle |
| Constrain aspect ratio when resizing element from center | Shift–Option–drag handle |
| Transform Mode (for Rotate, Scale, Tranform Origin) | Hold down Command |
| Scale element | Command–drag handle | Rotate element | Command–drag handle (outside bounds) |
| Rotate element 45° | Shift–Command–drag handle |
| Turn off alignment guides | Command–drag |
| Duplicate selected element | Command–D or hold down Option and drag |
| Paste with Animations | Command–Option–V |
| Edit Inner HTML | Command–Option–E |
| Send element to the back | Command–Shift–B |
| Send element one layer back | Command–Shift–Option–B |
| Bring element to the front | Command–Shift–F |
| Bring element one layer forward | Command–Shift–Option–F |
| Group | Command–Option–G |
| Ungroup | Command–Shift–G |
| Increase Border Thickness | Right Bracket ( ] ) |
| Decrease Border Thickness | Left Bracket ( [ ) |
Editing Animations
Action | Shortcut |
| Toggle recording | Command–R |
| Set Capo | Ctrl–Command–K |
| Move with Capo along with Playhead | Hold down Control and drag either the Capo or the Playhead |
| Move with Playhead to Next Frame | Command–Control–Right Arrow |
| Move with Playhead to Previous Frame | Command–Control–Left Arrow |
| Move with Playhead Forward 1s | Command–Shift–Control–Right Arrow |
| Move with Playhead Backward 1s | Command–Shift–Control–Left Arrow |
| Zoom In Timeline | Command–Option–Equals (=) |
| Zoom Out Timeline | Command–Option–Minus (–) |
| Play or stop and restart animation | Space |
| Next frame | Command–Right Arrow |
| Previous frame | Command–Left Arrow |
| Forward 1 Second | Command–Shift–Right Arrow |
| Backward 1 Second | Command–Shift–Left Arrow |
| Jump to Start | Command–Shift–Option–Right Arrow |
| Jump to End | Command–Shift–Option–Left Arrow |
| Jump to next keyframe in animation | Command–Up Arrow |
| Jump to previous keyframe in animation | Command–Down Arrow |
| Jump to next keyframe in timeline | Command–Shift–Up Arrow |
| Jump to previous keyframe in timeline | Command–Shift–Down Arrow |
| Restart animation | Home, or Function–Left Arrow |
| Loop playback | Command–L |
| Turn off keyframe and second marker snapping | Command–Drag |
Editing Keyframes
Action | Shortcut |
| Move selected keyframe forward one frame | Right Arrow |
| Move selected keyframe backward one frame | Left Arrow |
| Move selected keyframe forward 1 second | Shift–Right Arrow |
| Move selected keyframe backward 1 second | Shift–Left Arrow |
| Move selected keyframe to next keyframe in animation | Up Arrow |
| Move selected keyframe to previous keyframe in animation | Down Arrow |
| Move selected keyframe to next keyframe in timeline | Shift–Up Arrow |
| Move selected keyframe to previous keyframe in timeline | Shift–Down Arrow |
| Turn off keyframe and second marker snapping | Command–Drag |
Editing Motion Paths and Vector Shapes
Action | Shortcut |
| Enter vector editing mode | Return while vector shape element is selected |
| Exit vector editing mode | Return or Escape |
| Add anchor point | Click on path |
| Remove selected point | Delete |
| Constrain movement of anchor points to 45° angles | Shift–drag anchor point |
| Move selected anchor points | Arrow keys |
| Move selected anchor points by 10 pixels | Shift–Arrow keys |
| Select anchor point | Click anchor point |
| Select multiple anchor points | Drag–select |
| Select or deselect single anchor point preserving existing selection | Command–click control point |
| Select anchor point and all in–between anchor points from existing selection | Shift–click anchor point |
| Toggle corner/curved anchor point | Double–click anchor point |
| Mirrored control points (equidistant from anchor point) | Press option while dragging |
| Disconnected control points (independently moving from anchor point) | Press command while dragging |
| Asymmetric control points (same angle from anchor point) | Press command–option while dragging |
| Constrain movement of control points to 45° angles | Shift–drag control point |
| Draw vertical or horizontal line with Pencil tool | Press Shift down before dragging |
Working With Source Code
Action | Shortcut |
| Indent | Command–Right Bracket ( ] ) |
| Outdent | Command–Left Bracket ( [ ) |
Using the Inspector
Action | Shortcut |
| Show the Document Inspector | Command–1 |
| Show the Scene Inspector | Command–2 |
| Show the Element Inspector | Command–3 |
| Show the Metrics Inspector | Command–4 |
| Show the Text Inspector | Command–5 or Command–T |
| Show the Mouse Action Inspector | Command–6 |
| Show the Physics Inspector | Command–7 (Pro) |
| Show the Identity Inspector | Command–7 (Standard) or Command–8 (Pro) |
Troubleshooting
For general questions about Tumult Hype and pre-purchase questions, please visit our FAQ.
Browser & Document Issues
Browser-Specific Issues
Seeing an issue with your font in Firefox? A performance issue when you preview in Chrome? First, check the developer console of your browser to examine any potential console errors. Here’s how to enable your developer console in Chrome, Safari, and Firefox. For an overview of how to test Tumult Hype documents in multiple browsers, visit this forum post.
Developer consoles in browsers help you identify a number of issues:
- If an image is missing when previewing on the web and you see a ‘404’ error, it likely means that the image has not been uploaded to the server.
- You can identify ‘computed’ css styles to help you identify display issues across browsers. For example, the line-height might appear different on Mobile Safari.
- ‘Undefined’ errors often occur when using a JavaScript variable that has not been defined yet.
In most cases, searching the forums for the error you’re seeing will likely return helpful solutions.
Reporting Bugs in the Application
If you notice issues operating buttons, menus, or are experiencing issues specific to Tumult Hype, please submit a bug report. Including your document and logs will help us find a solution for you quickly and potentially resolve the bug you’re reporting for everyone.
Hosting & Embedding
Please visit the Exporting & Previewing chapter for help getting your document on the web or embedded elsewhere. For a list of guides covering how to embed Tumult Hype documents, visit this Exporting megapost.
Version History
How to Update Tumult Hype
Purchased through the Mac App Store
If you purchased Tumult Hype through the Mac App Store, you can install the latest update by following these steps:
- Open the App Store by going to the Apple menu and selecting App Store
- Click the Updates tab at the top of the App Store window
- Tumult Hype should be listed in the Updates section, and clicking the Update button will install the latest update for free.
If Tumult Hype isn’t listed in the Updates section, it’s either not installed at all or the latest version is already installed. If you are having issues, please try restarting your computer and signing out of the App Store application. Then, sign in again and check the Updates tab.
Purchased through the Tumult Store
If you purchased Tumult Hype through the Tumult Store, you can install the latest update by following these steps:
- Launch Tumult Hype
- Select the Check for Updates menu item under the Hype menu
Learn about purchasing Tumult Hype
Tumult Hype Releases
(Major releases are in bold)
- 4.1.21 - June 21st, 2026
- 4.1.20 - September 22nd, 2025
- 4.1.19 - January 22nd, 2025
- 4.1.18 - May 23rd, 2024
- 4.1.17 - April 22nd, 2024
- 4.1.16 - March 20th, 2024
- 4.1.14 - September 19th, 2023
- 4.1.13 - May 4th, 2023
- 4.1.12 - November 14th, 2022
- 4.1.11 - October 25th, 2022
- 4.1.8 - March 9th, 2022
- 4.1.7 - July 20th, 2021
- 4.1.6 - May 7th, 2021
- 4.1.5 - February 8th, 2021
- 4.1.4 - January 29th, 2021
- 4.1.3 - January 15th, 2021
- 4.1.2 - November 23rd, 2020
- 4.1.1 - November 17th, 2020
- 4.0.7 - July 17th, 2020
- 4.0.6 - July 13th, 2020
- 4.0.5 - May 27th, 2020
- 4.0.3 - December 17th, 2019
- 4.0.2 - October 29th, 2019
- 4.0.1 - July 10th, 2019
- 4.0.0 - June 10th, 2019
- 3.6.10 - October 29th, 2019
- 3.6.9 - July 10th, 2019
- 3.6.8 - March 27th, 2019 (documentation)
- 3.6.7 - May 1st, 2018
- 3.6.6 - April 24th, 2018
- 3.6.5 - April 5th, 2018
- 3.6.4 - April 2nd, 2018
- 3.6.3 - May 9th, 2017
- 3.6.2 - April 5th, 2017
- 3.6.1 - March 2nd, 2017
- 3.6.0 - March 2nd, 2017
- 3.5.5 - November 11th, 2016
- 3.5.4 - November 3rd, 2016
- 3.5.3 - August 2nd, 2016
- 3.5.2 - June 13th, 2016
- 3.5.1 - February 29th, 2016
- 3.5.0 - December 9th, 2015
- 3.0.3 - April 15th, 2015
- 3.0.2 - March 19th, 2015
- 3.0.1 - March 17th, 2015
- 3.0.0 - March 17th, 2015
- 2.5.3 - October 8, 2014 (documentation)
- 2.5.2 - March 26, 2014
- 2.5.1 - February 18, 2014
- 2.5.0 - January 29, 2014
- 2.0.2 - November 14, 2013
- 2.0.1 - September 30, 2013
- 2.0.0 - August 20, 2013
- 1.6.2 - April 9, 2013 (documentation)
- 1.6.1 - February 12, 2013
- 1.6.0 - January 7, 2013
- 1.5.2 - September 20, 2012
- 1.5.1 - May 9, 2012
- 1.5.0 - February 23, 2012
- 1.0.5 - September 1, 2011
- 1.0.4 - August 7, 2011
- 1.0.3 - June 14, 2011
- 1.0.2 - May 31, 2011
- 1.0.1 - May 27, 2011
- 1.0.0 - May 20, 2011
Detailed Release Notes
4.1.21 - June 21st, 2026
- Fixed a Tahoe issue where thumbnail generation would cause a window to briefly appear
- Changed the default GIF encoding engine to use Apple’s built-in encoder
- Added Zen, Helium, and Dia browsers to the preview menu and ignored Puppeteer
4.1.20 - September 22nd, 2025
- Updated icon for macOS 26 Tahoe
- Better support for webp images
- Fixed a crash dragging keyframes
- Fixed a bug where animating opacity could sometimes not render correctly
- Fixed a bug where optimizing images could result in larger sizes
4.1.19 - January 22nd, 2025
- Fixed a browser-based performance issue where excess CPU can be used when looping animations
- Fixed cases of the scene editor not showing changes to/from 0 values and display visibility changes
4.1.18 - May 23rd, 2024
- Fixed a bug where resetting line height to normal would not show properly in the scene editor
4.1.17 - April 22nd, 2024
- Sonoma: Fixed a macOS 14.4 issue where elements may not show changes or render
- Letter and word spacing animations will be smoother
- Fixed issue where exiting a symbol may not apply changes from inspector text fields still being edited
- Possible fix for invalid characters being inserted into a text element when hitting escape in the Inner HTML editor pop over
4.1.16 - March 20th, 2024
- Sonoma: Fixed a macOS 14.4 issue resizing rectangles
4.1.14 - September 19th, 2023
- Added Arc to the browser preview allow list
- Sonoma: fixed some view drawing issues
- Sonoma: fixed guides and grids not showing in some situations
- Fixed a crash when hitting Original Size for a multiple selection
4.1.13 - May 4th, 2023
- Ventura: Worked around a macOS 13.2 issue where adding a lot of videos could lead to an app hang
4.1.12 - November 14th, 2022
- Ventura: Fixed an issue where filter effects might not update
- Monterey: Fixed an issue with the timing function popup window not sizing correctly
4.1.11 - October 25th, 2022
- Ventura: Fixed an issue where renaming scenes would crash in Dark Mode with the Resources Panel open
- Ventura: Fixed an issue where 3D rotated elements would not show perspective
- Ventura: Fixed the Welcome to Hype window not showing video
- Fixed a bug with text elements where fonts may not be able to change with a partial selection
- Fixed issue where inspector properties being actively edited would not be shown in a previewing
- Fixed cases where resource updating could show multiple dialogs and lead to partial document corruption
- Fixed code generation issue where fonts without HTML additions would add extra lines to the document head
- The external style protection CSS updates its definition for the bold tag to be consistent with current browsers
- Fixed a bug where Standard Edition documents would reopen as read-only incorrectly
4.1.8 - March 9th, 2022
- Supports the Python Export Script Enabler to keep export scripts running since Python has been removed from macOS 12.3
- Added JavaScript event notifications for HypeEnterViewport and HypeExitViewport
- Fixed issue where Chrome would warn about navigator.userAgent deprecation
- Fixed a couple typos
4.1.7 - July 20th, 2021
- Monterey: Fixed issue where text could not be edited
- Fixed issue where Additional HTML Attributes may not be applied to iframe
- Fixed in-app documentation typo
4.1.6 - May 7th, 2021
- Worked around Apple macOS 11.3 bug where saving could be significantly slower or potentially not save at all
- Fixed regression where Persistent symbol is not properly placed during scene transitions
- Reduced occurrences of scene having disabled selections and turning mostly gray
- Webp is treated as a grouped resource with retina size options
- Smaller document file sizes
- Fixed issue where switching the system to dark mode does not change the code editor color
- Shaved around 100 bytes from the runtime
- No longer auto-generates HTML DOM IDs with a number as the first character
- Fixed an issue where using a page turn with more than 4 pages may show a partial scene when resizing the window
- Fixed an issue where mouse click/up events fail to work if there are swipe events in scenes with iframes
- Fixed issue where the path to a vector shape might use a nonsensical ID instead of the element DOM ID value
- Fixed issue where
all_document_arguments_by_export_scriptkey in export script info file would repeat document arguments from the export script and not show all - Fixed issue where Vector Shape Morph Path property is labeled as ‘Origin (Motion Path)’ in the properties area
- Gave correct tooltips to the HTML Attribute inspector buttons
- Big Sur: Fixed feedback swoosh sound not playing
4.1.5 - February 8th, 2021
- Fixed regression from 4.1.4 where full screen documents would ping back and forth endlessly
- Export Scripts now can see document arguments from all other export scripts during export
- Export Script document arguments table will remember its column width
4.1.4 - January 29th, 2021
- Line commenting and uncommenting via command-slash in the code editor
- The tab key will indent code when there is a multi-line selection
- Fixed issue where using Sidecar’s ‘Move Window to iPad’ would break selection drawing
- Fixed issue where video export may not start
- Big Sur: Fixed issue where Line Draw vector shape slider was clipped on the left edge
- Added headers to Export Script arguments table so columns can be resized
- Fixed documentation URL for
${resourcesFolderName} - Fixed a bug where non-RGB colors could not be chosen for the syntax highlighter
4.1.3 - January 15th, 2021
- Fixed issue where elements with 3D rotations, filter effects, or reflections would not display on transparent video exports
- Add view to see collected anonymous usage data in data collection policy window
- Added missing localizations (mostly Interface Pref Pane) for German, French, Spanish, Italian, Japanese, and Chinese
- Apple Silicon: Fixed issue where text alignment control for right and center were swapped
- Big Sur: Fixed issue where clipped image scaling would appear choppy in video exports
- Big Sur: tighten up spacing between icon and text in element list
- Big Sur: fixed issue where disclosure triangles are too close to the outline view border in the element list
- Big Sur: fixed the resources info pane for images having checkboxes being clipped
- Big Sur: fixed issue with video inspector checkboxes getting clipped
- Made the disclosure triangle spacing the same between the keyframe and element list
- Fixed issue where Restore Defaults for the Interface Preferences would show invalid ‘System’ option on 10.13 and below
- Fixed issue where Restore Defaults in Interface Preferences did not reset line spacing
- Fixed a few dialog messages that mentioned Whisk instead of Hype
- Improvements to the trial and license flow
- Update copyright strings for 2021, happily leaving 2020 behind
4.1.2 - November 23rd, 2020
- Fixed regression where the update sheet for multiple resources could not be dismissed on macOS 10.10 - 10.12
- Fixed regression where the button state control would not show text in dark theme
- Fixed regression where immutable Head HTML code would not be colored as gray
- Fixed a bug where group expansion state would incorrectly collapse after exiting a symbol
- Big Sur: Fixed an issue where the Scenes toolbar button would not be centered in Standard Edition
- Big Sur: Window toolbar background coloring is now like most other system windows
- Big Sur: Tab bar coloring is improved to match the window color
- Big Sur: Fixed an issue where some toolbar icons would not draw on the 11.1 beta
- Big Sur: Preferences window uses the new macOS preference toolbar style
- Big Sur: Fixed issue where WebView would spam logs
- Big Sur: Fix resources library Capture button having the icon too close to the text
4.1.1 - November 17th, 2020
For more details and tutorial videos, please see What’s New In Tumult Hype 4.1.
- Apple Silicon support to run natively on “M1” Macs
- macOS 11 Bug Sur compatibility
- New App Icon matching the macOS 11 Big Sur style
- Preferences to change source editor colors, line height, tab width, highlighting current line, showing line numbers in the gutter, preserving indentation, wrapping lines, and showing invisible characters
- Updated syntax highlighting to color keywords added in current language versions
- Custom CSS Font editor no longer has a white cursor on a white background in dark theme on macOS 10.14+
- Better synchronize video elements with video exports
- Improve frame capture synchronization with video export so it does not miss frames
- Fixed an issue with Quick Look previews not being generated
- Increased javascript documentation font weight for legibility
- Fixed a small french localization issue in the Add Layout popover window
- Fixed JavaScript documentation formatting in a couple cases
- Fixed issue where the line number would not show up on the last line
- Fixed issue indenting/outdenting from first character in a line
- Fixed indent/outdent not working with undo
- Fixed issue where undo/redo would not syntax highlight
- Removed errant usage of arguments keyword in runtime
- Fixed an issue where the source editor font could be blank in preferences
- Fixed a layout bug when the browser warning popover window shows up from the top
4.0.7 - July 17th, 2020
- Mac App Store-only release identical to other 4.0.6 versions
4.0.6 - July 13th, 2020
- Previews sent to Polypane will use layouts defined in Hype and reuse the same tab
4.0.5 - May 27th, 2020
- Fixed bug with control element position scrolling the page on iPad with iOS 13
- Fixed an issue where external edits might not get picked up (commonly in Photoshop)
- Fix Scaling a Vector Shape resulting in the wrong size
- Fixed issue where a “None” JavaScript would run the previous JavaScript in the action handler list
- Fixed issue where Text Selection can’t be turned back on after unchecking
- Polypane app preview integration
- Fix Xcode 11.0-11.3 crashing if a project has a .hyperesources folder
- Fixed a bug where Vector Shape dash segment value would not update the scene editor
- Fixed a crash when cancelling video export
- Fix a crash in Custom Behaviors when clicking ‘can restart timeline’ checkbox
- Fixed a common crash when using the source editor
- Fixed potential crash when purchasing
- Fix case where documents on Android would never load if there was only one .ogg audio source set to preload
- Fix macOS 10.15 issue where open/save panels would not show in dark theme
- Fixed issue with parent element click/up actions being called when a child click triggers a scene jump on mobile because touch end is always called
- Fixed a bug where Persistent Symbols were reset on going back to a scene via page turn
- Fixed issue where physics engine would not start on a scene if previous scene had a timeline action after jumping to new scene
- Browser preview menu will now show multiple copies with the disk location if the name/version is identical
- Workaround cases where the preview web server may not start if the port is in use
- Improve how Sparkle presents the name of Hype
- Fixed the Get Info Window for ‘Hype Document’ showing it as Chinese
- Tumult Store version cleans up serial numbers so white space (commonly introduced from PDFs) is ignored
- Clear button states will now work with multiple selected elements
- “Show Export Scripts Folder In Finder” button in Export prefs is no longer truncated in different localizations
- Better detection of using the Physics API by examining source code to ensure the Full runtime is used
- Favicon.ico files are no longer optimized when exporting
- Removed an erroneous log from checking ‘Always use convex hull’ if debug physics is on
- Improve Mac App Store version auto-detecting if purchases have been made
- Fixed Mac App Store issue where restoring could report that there was nothing to restore even though there was
- Trial purchase button no longer covers window titlebar buttons on on RTL languages
- Fixed issue where Depth attribute would show if All properties was selected
- “Fix” build issue where Hype was able to run on macOS 10.8 and 10.9 despite minimum requirement set to 10.10
4.0.4 - May 26th, 2020
Not Found.
4.0.3 - December 17th, 2019
- Fixed a bug where video exporting would not show a preview during export
- Support for Blocs app integration with Hype
4.0.2 - October 29th, 2019
- Runtime API for hypeDocument.currentSceneId()
- Scene element is now sent for code-based HypeSceneLoad/HypeSceneUnload events as it is for the javascript functions
- Fixed macOS 10.15 Catalina crash that could stop some documents from opening
- Exports using Motion Paths will again use the thin runtime instead of requiring the full runtime
- Exports use v3’s behavior of selecting the smallest layout to show first to work better with wordpress/embeds
- Fixed issue where swipe handlers could interfere with scrolling on iOS 13 and Android
- Reduce accidental dismissal of the Math Equation Timing Function editor
- Fixed some cases where swap transitions may not work if called via API
- Fixed issue where underlined text could not be removed
- Removed Math Equation from erroneously showing up in the Standard edition of Hype
- Fixed issue where Export Script actions would show up in the Standard edition of Hype
- Clicking on a rotation slider near 0 degrees will use negative numbers instead of jumping to a large angle
- Attempt to fix a crash on quit on macOS 10.15 Catalina
- Additional HTML Attributes table columns are resizable
- Fix bug where popovers would not display when a document window spans two displays
- Fixed bug where text may disappear after editing on macOS 10.12 and below
- Fixed issue where inspector pane title was clipped on macOS 10.10
- Fixed issue where the Done button could not be clicked if the inspector title was at its smaller size
- Mac App Store restore purchases will notify if there’s nothing to restore instead of spin endlessly
- Protect against corrupt z-index values for elements that could result in documents not opening
- Fixed a crash on macOS 10.11 trying to check for upgrade pricing
- Fixed a crash checking for previous versions of the Mac App Store edition of Hype
- Improved cursors showing up correctly
- The Hype application will not show up as an external editor
4.0.1 - July 10th, 2019
- Fixed macOS 10.15 Catalina beta crash on launch
- Fixed issue where double actions could be triggered on Android Chrome
- Fixed issue where text appeared incorrectly selected with common scene editing operations
- Fixed logging error with Custom CSS Fonts that used ${resourcesFolderName}
- Fixed a delay on quit that could occur from video frame loading if multiple documents are open
- Fixed Additional HTML Attributes being applied applied to parent div of iframe
- Fixed issue where color animations may use the wrong color
- Ignore mouse events is now respected for sprite sheets
- Fixed regression where a pause timeline action at the end of a timeline would entirely stop the timeline
- Pencil/Vector mode ends if manually selecting an item in the timeline view
- Fixed issue where Right/control clicks can trigger actions on mouseup
- Fixed issue where converting an Ellipse to a Vector Shape could result in a round rect
- Fixed issue where some files with capitalized extensions could not be added to the scene
- Fixed issue where recording with the playhead preceding keyframes could create an instant timing function
- Open panel now will respect the light/dark theme setting
- Improved Flexible Layout inspector UI with French localization
- Improved purchase and discount flow
4.0.0 - June 10th, 2019
For more details and tutorial videos, please see What’s New In Tumult Hype 4.0.
- Animated Vector Shapes, Polygons, and Vector Pencil Tool
- [PRO] Sprite Sheet/Image Sequence import
- Page Turn transition for smooth scene swiping
- [PRO] Poster/fallback images
- Drop shadows
- Inset Shadows
- Skew transform
- [PRO] Editable additional HTML attributes (like data-*)
- [PRO] External editor support for resources/javascript/head html
- [PRO] JavaScript math equation timing functions
- [PRO] Physics API access
- [PRO] Official CDN support in Advanced Export
- Pan timeline area with spacebar
- Option to use Web Audio API or not
- Close All Tabs keyboard shortcut (command-shift-option-w)
- Deselect All keyboard shortcut (command-shift-a)
- Tab in the element list or scene/layout selector restores focus to scene
- Add 60px padding in timeline view so keyframes at end are easier to work with
- On Prepare For Display (aka DOM loaded) scene action
- Added a “customData” API field initialized to {}
- Hype’s main div now has the “HYPE_document” class name
- Default background, border color, and width can be set when no element is selected
- Square brackets [ ] keyboard shortcut will change border width
- Conversion to HTTPS in any tumult.com URLs (checking for updates, bug reporting, etc)
- Updated Welcome window to include Hype Universe Newsletter and more modern opt-in for email collection
- New Interface Preference Pane with option to use Mojave theme, accent color, and choose among 3 new guide colors
- Added iPhone X/XS, XR/XS Max, Watch 40, 44, iPad Pro 10.5/11, and 4k preset screen sizes
- “Cover Notches” mobile option (viewport-fit=cover)
- Multiple ID assignment and display name choice for ascending or descending numbers
- Choice for ascending or descending multiple display names
- Migration dialog if old/v3 Export Scripts are found
- New Purchase/Upgrade Flow with Free Viewer Mode
- Hype app binary is notarized
- Added Microsoft Edge and Brave browsers to the Preview menu if installed
- Requires macOS 10.10+ to run
- Holding down the option key while choosing a browser in the preview menu will open the current scene/layout
- Fix issue scaling multiple zero width/height elements
- Fix issue where undo menu would not show correct element type
- Retina images added to the scene are done so at their retina resolution and not absolute pixel size
- Documents with Vector Shapes, Motion Paths, Audio, Page Turn, and Swap transitions will now use the Extended HYPE-*.full.min.js runtime
- Using drag to control an element position will work with Flexible Layout
- Only select topmost parents when duplicating groups
- Inline must also be checked for iPhone autoplay videos
- Export Scripts now have a Hype minimum compatibility version
- Fixed issue where physics bodies in grouped with flexible layout could cause a runtime exception
- “Edit” menu in Resource Library has replace, resync, and Edit In External Editor functionality
- Fixed regression where hitting the spacebar after adjusting Border would not play animations correctly
- Changed hit guideline color to magenta to better distinguish between vector shape path
- Better playhead ownership relationship between parents and child symbols
- Fixed issue where white scene thumbnail generator window could appear
- Fixed crashes importing and pasting symbols
- Fixed runtime exception caused by “None” JavaScript actions
- Fixed issue where Export Script may overwrite iframe files if they have a replacement URL
- Exporting a video containing a video should not appear choppy anymore
- Fixed issue consuming event tap system resources
- Updated matter.js to latest v14.2
- Hype can fully use a drop-in Matter.js replacement
- Physics bodies rotate about their center of mass
- Physics bodies are placed correctly in regards to their transforms and transform origins
- Improved interaction between flexible layout and physics bodies
- Moving static bodies does not give residual velocity that would lead to incorrect collisions
- Fixed bug where Animated GIFs would not export if they had a percent sign in their name
- Changed video autoplay warning/label to reflect current browsers
- Set scene size steppers to go up to 100,000
- Allow HTML Widgets to call for full screen access
- Made flexible width/height pressed state images thicker to more easily identify
- Fixed case where the scene or layouts selector may not properly appear when chosen
- Fixed case where the document layout (like timeline view) may open at the wrong sizes/positions
- Fixed some potential source editor bugs
- Fixed crash when deleting a layout while renaming it
- Fixed case where a blank timing function could appear and stay over other application windows
- Groups with overflow:hidden content won’t use child elements to determine scene editor size for scrolling
- Fixed issue where advanced export layouts could potentially be ordered incorrectly
- Fixed issue where pasting an element may position it incorrectly
- Distribute vertically/horizontally within selection is now in context menu
- Fixed bug where a non-selected animation segment could look partially selected
- Fixed crash caused by deleting the HTML page title
- Fixed issue where timeline actions could not be added if a locked element happened to be selected
- Scene editor scrollbars take precedence in clicks
- Scene editor scrollbars better show correct cursors
- Better job of cleaning up the Hype editor DOM when deleting elements
- Fixed issue where the developer news window would open behind document windows
- Fixed a frequent crash related to scene selector dragging
- Fixed case where Foreground/Backdrop filter segment control could be truncated
- Removed errant RotationAngle from properties list
- Fixed case where copying SVGs from Affinity Designer could lead to Hype wanting to update resources incorrectly
- Element creation keyboard shortcuts (r, u, o, b, etc.) will use those letters alternate keyboard layouts
- Fixed possible crash that could occur when closing a document
- Mojave: fixed common crash closing documents
- Do not allow mac system tabs on Hype document windows
- Fixed issue where OAM Export resulted in blank scene
- Improved keyframe pasting behavior so keyframes do not always go at the end of an animation
- Fix issue where physics animations would stutter
- Add duplicate symbol to context menu and symbol toolbar item
- Make Duplicate Symbol menu now works correctly with with multiple selection
- Fix issue where Make Duplicate Symbol menu showed as active when nothing was selected
- Browser compatibility warning versions have increased (ie from IE 8 to 9)
- Support Edge 17+ backdrop filters
- Browser warning for PSDs images since they no longer show in Safari 12+
- Fixed overzealous and incorrect border style warnings
- Removed rejected promise error in autoplaying video/audio in Safari and Chrome
- Fix issue where Cache Manifest contains runtime and document loader even if these are set to be inlined or use External URL
- Shrink hex colors to 3 characters if possible
- Floating point numbers can use too many significant digits in export
- Fix issue where a page with two hype documents may not run if it needs the full hype.js runtime but thin was loaded by the other document
- When making multiple IDs for elements, allow re-using IDs within the selection
- Fixed exception pausing physics timelines when page visibility changes
- Fixed crash in trying to quit when a sheet is shown on a document
- Fixed crash related to missing Inner HTML
- Fixed issue where the FeedbackReporter for Help > Report an Issue… could become stuck in a state without proper key focus
- Do not ask for AddressBook access when reporting an issue
- Fix issue where Monotype font subsetting causes an exception due to unicode characters and cannot export
- Include .hype document path in export script info json file
- Invalid timeline names sent to the Hype API will now error instead of run the Main Timeline
- Sanitize setElementProperty input to the correct format
- Fixed issue where renaming multiple IDs or Display Names to blank would result in a <null> label
- Fix issue where a custom HTML div loader is not centered on document with flexible layout
- Fix issue where an image filename with a ? symbol holds up preloading forever
- Fix issue where scene name in menus were clipped instead of truncated
- Fix issue where scene and Layout selector tooltips do not change
- Opening an incompatible document will look for newer Hype builds and ask to open with them
- Improved resizability of the color popover window
- Mojave: Fixed issue where elements and symbols toolbar icons didn’t draw correctly when disabled or selected
- Fixed macOS 10.14 Mojave issue where elements in the scene editor may not render
- Dark theme is now a Standard feature
- Made light theme the default for macOS 10.13 and below
- Improve cases where the spacebar may not have been used to play/pause correctly
- Fix issue where Export Script exportShouldInlineHypeJS option did not take into account exportExternalRuntimeURL
- Add link in help menu to @hypeapp twitter page
- Don’t allow the Scene/Layout ‘+’ to have focus to avoid spacebar from creating new scenes accidentally
- Remove error log about first responder when opening a hype document to a source editor view
3.6.10 - October 29th, 2019
- Fixed macOS 10.15 Catalina crash that could stop some documents from opening
- Fixed issue where swipe handlers could interfere with scrolling on iOS 13 and Android
- Fixed bug where text may disappear after editing on macOS 10.12 and below
- Improved cursors showing up correctly
3.6.9 - July 10th, 2019
- Fixed macOS 10.15 Catalina beta crash on launch
- Fixed issue where double actions could be triggered on Android Chrome
- Do not allow mac system tabs on Hype document windows
- Fixed issue where OAM Export resulted in blank scene
3.6.8 - March 27th, 2019
- Monotype Fonts library has been removed due to Monotype’s termination of the service. Read more.
- Fixed issue where swipe and touch events would not work correctly on MS Edge
- UI fixes and improvements for macOS 10.14 Mojave
- Fixed macOS 10.14 Mojave issue where the Pro interface could not be rearranged
- Fixed issue where inner HTML scripts would not be executed
- Fixed issue where guides were not properly saved
- Fixed issue where scene thumbnails may not show up
- Fixed issue where timeline view would open at the wrong size on existing documents
- Improved creation of Quick Look thumbnail images
- Fixed issue where clicking the motion path button did not immediately change in the element list
- Better optimization for waypoints runtime file
- Fixed issue where Facebook ads may have incorrect positions for elements
- Fixed issue where some inspector labels were truncated
- Fixed issue where scene selector may not appear if layouts area was enlarged
- Fixed issue where undoing a gradient would result in the gradient not being able to be added again
- Fixed issue where re-opening a document may not restore state for which symbol was entered
- Fixed issue where editing a scene name might end abruptly
- Fixed issue with scene menu selection not drawing a highlight
- Reduce time of rare hang when importing files
- Hype application is notarized
- Fixed several crashes
3.6.7 - May 1st, 2018
- Fixed issue where iOS 11.3 drag actions would also scroll the page
- Chrome no longer warns about passive event listeners
- Fixed issue where the Scene Editor would flash when adding an element
- Fixed macOS 10.13 issue where source editor scroll bar would appear white in dark mode
3.6.6 - April 24th, 2018
- Fixed issue where Chrome 66+ would not play preloaded audio (re-export required!)
- Other bug fixes
3.6.5 - April 5th, 2018
- Fixed issue from 3.6.4 where documents would incorrectly appear in an edited state
3.6.4 - April 2nd, 2018
- Fixed bug where resources could not be duplicated if the Hype document is on an external drive
- Fixed High Sierra bug where scenes are not shown in Advanced Export
- Fixed High Sierra issue where some documents would open with no background color
- Fixed bug with persistent symbols not working in IE9 / 10
- Fixed a crash that occurred on some machines when exporting as APNG
- Fixed issue where part of the scene could overlap the toolbar in fullscreen mode
- SVG images will be shaper when scaling in more cases
- Fixed issue where converting to a dynamic physics body may not start physics animations
- Fixed issue where text shadow inspector would not update even if the values are changing
- Fixed issue where the background gradient angle is updated live
- Fixed an exception trying to load PIE.htc on newer IE versions caused by Unchecking Support IE6-9
- Use HTTPS in any tumult.com URLs (checking for updates, bug reporting, welcome page, etc.)
- Hype will no longer use pre-release versions of WebKit
3.6.3 - May 9th, 2017
- Scenes/Layouts with the same size use the same zoom factor
- Export Script options override choices from Advanced Export
- Performance improvements to manipulating multiple resources in the Resource Library
- Scroll position is better preserved when manipulating Resource Library
- Cancelable GIF and APNG export in the final stage
- Improvements to Layout API in-app documentation
- Remove duplicate IE entries in cache.manifest file
- Fix case where renaming *_hype_generated_script.js in a particular way could fail loading
- Fix issue where actions are triggered twice by a Persistent Symbol in a group
- Fix issue where newly created motion paths in a Symbol could export with an old version of the path
- Fix case where flexible grouped elements within a hidden group may not appear when the group becomes visible
- Resolved issue where editing a Custom CSS font may edit a different font
- Fix issue where Inner HTML could be pasted on Persistent Symbols and break exporting
- Crash fixes
3.6.2 - April 5th, 2017
- Fixes issue with audio not playing on iOS 10.3 (re-export required!)
- Corrects issues exporting Animated GIF and PNGs on older versions of macOS
- Fix issue where Animated GIFs with background transparency could show previous frames
- Tabs will magnify when mousing over
- Dragging multiple assets from the Resources Library won’t create extra copies anymore
- JavaScript API callback for “HypeResourceLoad”
3.6.1 - March 2nd, 2017
- Fix hang for Mac App Store version with Export Scripts
3.6.0 - March 2nd, 2017
- [PRO] Export Scripts extend Hype and improve export-based workflows
- Animated GIF export quality is dramatically improved and file size reduced
- Autoplay and inline video options for iOS 10+
- Multiple selection in Resource Library
- [PRO] Video export bitrate and codec settings
- Removed Dropbox export since they are stopping public web serving
- [PRO] Animated PNG export for iMessage Stickers
- iMessage Sticker default scene sizes
- Distributing app download as .dmg
- Preference to change code editor font and size
- Custom CSS Fonts are now re-editable
- Groups preserve their expansion state when entering/exiting a symbol
- Entering a low opacity or hidden symbol will now reveal it for editing
- Improved accessibility aria tagging, especially for iOS navigation
- Zoom scene editor down to 10%
- Zoom level is per-scene/layout
- Microsoft Edge browser warnings and runtime support
- Asks to replace files with the same name dragged into the Resource Library
- Movie exports remember manually entered time duration
- APIs/callbacks for manipulating Layouts
- JavaScript notifications for HypeSymbolLoad and HypeSymbolUnload events
- JavaScript setter API allows changing background-image
- When adding a new font, the current selected elements will use that font
- Removed WAV slot from audio
- Accessibility tab-index UI is simplified
- Smoother animation (position and scaling) for IE 10+ and Edge
- Simplified group dot drawing
- Elements on top of symbol no longer interfere with selection
- Improved app editing performance on Late 2016 MacBook Pros using P3/Wide gamut color profiles
- Fixed bug where undoing group resize from top or left doesn’t move the children back
- Fixed multiple issues running symbols in reverse
- Fixed issues where symbol state was not properly synced with parent timeline playhead
- Fixed bug where Symbol action that starts a timeline does not respect relative values
- Fixed issue where Custom behavior handlers of a symbol in a persistent symbol stop working on a scene - change
- On Drag to control a timeline will play the last timeline action if dragged to the end
- Better velocity for continuing a timeline after a drag
- Fixed bug where drag to control timeline would not continue properly if the drag was slower than - timeline speed
- In-App feedback attempts to preserve name/email or warn if it is not being sent
- Control/right-clicking will not trigger mouse actions
- Fixed issue where audio would stop working on Chrome when there are more than 6 Hype animations on a page
- Fixed a bug where duplicating scene removes the layout grid on the original scene
- Reduced cases where copying animations could result in duplicate custom timing functions
- Properly copy custom timing functions across documents
- Improved JavaScript runtime performance loading a scene with many nested flexible layout groups
- Improved JavaScript runtime performance when there are a lot of active timelines
- Improved JavaScript runtime frame rate on iOS
- Reduced MSIE 6-9 code not necessary in the thin JavaScript runtime
- Updating mechanism is better at checking in the face of Gatekeeper Path Randomization
- Sierra: Fix double-selection for timing functions
- Sierra: Fix bug where resource library disclosure triangles do not close
- Sierra: Potentially fixed issue causing corrupt video exports
- Drag with Control Element Position offsets appropriately with parent’s Zoom Contents Flexible Layout option
- Fixed issue where an element with scale zoom contents and a non 50%/50% transform origin is off on scene - changes
- Fixed bug where checking create enclosing folder in Advanced Export can clear Use External Runtime URL field
- Zoom Contents checkbox is colored correctly in 10.8 with Pro theme
- OAM Widgets with transparent backgrounds show up that way in Muse’s editor
- Hidden default for disabling color picker as a popover window (useColorPickerPopOver)
- Fixed bug from selecting multiple videos
- Constrain ratio math for scaling handles 0% values better
- Opacity no longer displayed for scene background color
- Fixed issue where moving keyframes with motion paths via arrow keys would jump further than expected amount
- Advanced Export uses the first scene in the slice as the document size instead of the absolute first scene
- Does not write out duplicate iframe html files to reduce export size
- Improved Italian localization for breakpoint
- Fix hang caused by pasting specific elements
- Fixed crashes
3.5.5 - November 11th, 2016
- Fix regression where clicking would not work with drag/swipes and touch events turned off as well as improving scrollability
- Fix crash opening some documents
3.5.4 - November 3rd, 2016
- Fixed iOS 10 issue where drag events would also scroll
- Fixed macOS 10.12 Sierra issue where content would not show in fullscreen mode with dark theme
- Fixed macOS 10.12 Sierra issue with animated GIFs not looping
- Fixed macOS 10.12 Sierra issue of popup menus appearing behind windows in fullscreen mode
- Fixed macOS 10.12 Sierra issue where color popover window would not resize correctly
- Fixed regression where text could not be selected when a locked item was above it
3.5.3 - August 2nd, 2016
- Fixed regression that could result in slower animation performance
- Fixed regression where duplicating a scene would not preserve timelines set for scene actions
- Workaround for Illustrator 2015.3 producing invalid SVGs when copying
- Resource update window is resizable again
- Timeline actions are stripped when duplicating a scene without timelines
- Fix issue where pasting elements with custom timing functions could lead to document corruption
- Javascript is exported correctly if a document has been modified to use CRLF line endings
3.5.2 - June 13th, 2016
- Fixed ‘HypeScratch’ error resulting in removing resources
- Fixed regression where video export time could not be set beyond 5s on non-english languages
- Fixed major crashes
- Improved animation performance
- Fixed issue where iBooks Author or OAM Widgets would not work if they had an ampersand in their name
- Fixed issue with reversed timelines not setting some values at the right time
- Fixed issue where the last property was cut off in Dark theme
- Fixed issue where stacked keyframes would not move with an element’s animation segment
- Fixed issue where dragging an image into a group would not have the correct position
- Updated browser compatibility warning for Firefox and MP3s
- Fixed display issue showing custom timing function in Dark theme
- Removed unnecessary log with custom fonts in non-english localization
- goToTimeInTimelineNamed() API allows for times in between 30fps for smoother programmatic animations
3.5.1 - February 29th, 2016
- Retina @2x image files are now named _2x to be more compatible with ad systems
- Buttons with filter effects on pressed/hover states no longer get stuck
- Fixed regression where buttons with hover states would not show pressed state on iOS
- Fixed issue where Duplicate Scene could remove timeline-based actions on the original scene (also affecting new responsive layouts)
- Fixed issue where audio does not play on mouse down on iOS 9.2
- Fixed issue where document would not open if a symbol had a video starting beyond 0s
- Fixes for issues where documents may not reopen
- Multiple Hype documents on a web page will now trigger waypoints correctly
- Resizing multiple elements within a symbol keeps origin in the correct place
- Fixed issue where fullscreen videos could be offset
- Opening a template from the ‘File > Open…’ menu properly creates an Untitled document
- Numerical fields better support commas for languages that use them instead of periods
- Monotype font variant list is updated correctly after adding fonts from their browse panel
- Removed ‘BackdropFilterEffect’ property from the property list
- Fixed issue where a unicode character could interfere with Monotype exports
- Added CSS reset for box-sizing property
- Hype will not export HYPE.thin.min.js if it will not be used
- Fix a crash when converting elements to a symbol
- Zoom toolbar now works if re-added
- Updated Dropbox logo in Preferences
- Localization improvements
3.5.0 - December 9th, 2015
- [PRO] Waypoint actions for on Viewport Enter/Exit
- [PRO] Hype Reflect 2.0 gains responsive preview and dark theme
- [PRO] Advanced Export for choosing slices to export specific scenes/layouts/resources
- Backdrop Filters (requires Safari 9)
- Monotype fonts
- Scale transformation for elements/symbols
- Flexible Layout can use scale transformation via “Zoom contents” checkbox
- New Flexible Layout mode for proportional position and resize
- Colors with Alpha
- Smoother animations
- 60fps video/png/gif export
- Scaling for video/png/gif export
- Single frame timeline zoom mode (along with further zoom)
- Ability to show/hide elements during animations
- Option to ignore pointer events
- New Media Browser
- Spacebar panning/zooming
- Drag Select for lock/visibility states
- Zoom in/out is now cmd +/- and cmd 0 for actual size
- Command-Option-+,-,0 for zooming timeline
- Added keyboard shortcuts to insert elements
- Added keyboard shortcuts to show/hide guides and grid
- Option-drag duplicates a scene
- Getter/Setter JavaScript API
- Use ‘System Font’ in documents
- iPad Pro and Apple Watch document sizes
- OS X 10.11 El Capitan compatibility fixes
- Continue Timeline action has a “Can restart timeline” option
- Control Timeline on Drag action exposes a speed to run the timeline
- Sequential naming for DOM IDs and Display Names when there’s a multiple selection
- Copying from Illustrator will paste an SVG
- Transform mode when holding down command-key will scale on handles and rotate slightly outside
- Timeline Actions give the symbol instance or scene as the JavaScript element argument
- Mobile retina devices will now load @2x images
- Pasting elements will paste to the nearest selected z-index instead of always on top
- Fix issue where blur wouldn’t animate smoothly
- Default button now has rounded corners
- Fix issue where scene could be loaded twice when having multiple layouts
- Pasting elements will paste into a group
- “Draw scene backgrounds” is now called “Make background transparent” for clarity’s sake
- Removed tap highlight mobile option since it isn’t used by iOS anymore
- Less accidental moves when selecting elements
- Fix issue where setting video/png/gif export framerate would be choppier than it should be
- Pasting a scene pastes it after the currently selected scene
- Context-clicking in the element list better matches the Finder’s behavior
- Fix issue where duplicated elements incorrectly showed “multiple” when the property was the same
- Moved the video property to the top of the list for video elements
- Selecting an element in a group discloses the group
- Improved contrast of visible/locked timeline buttons in dark theme
- Numeric fields should show correct localized number format
- Fix issue where timeline actions would vanish when re-opening a document
- Workaround for issue where Go to URL in a new window would not work on touch start events in iOS 9
- Fix issue where scene may flicker while changing
- Fix issue where spotlight data wasn’t generated
- Fix issue where quicklook previews were not generated
- Fix issue where mp4/png framerates weren’t preserved correctly
- Fix OAM widgets giving an invalid console log
- Fix issue where multiple symbols inside a persistent symbol could prevent exporting
- Fix issue where Safari could hang when switching layouts
- Can now undo relative checkbox for timelines
- Can now undo layout name changes
- Does not allow context clicking in property list
- Dropbox Preference Pane localization improvement
- Duplicating symbols from the menu adds the duplicate to the scene
- Scene selector width is preserved when changing to code tabs
- Fix issue where jumping to element from a browser compatibility warning inside a symbol didn’t work
- Fix issue where keyboard shortcuts to change tabs would not work
- Better protection against broken system fonts
- Dropped support for Firefox 3.5
- Improved tap event recognition
- Persist search field text after dragging from the resource library
- Persistent symbols should not be able to be created inside of symbols
- Fixed issue where hover on state could be stuck if button was in a persistent symbol
- New elements are created within the current group just above a the selected element
- Dramatically reduced memory growth when exporting Video/Animated GIF/PNGs
- Fixed crash when exporting video
- Option dragging to make new elements preserves their relative z-ordering
- Do not apply empty CSS Filters for performance benefit
- Actions referring to Symbol timelines inside of Persistent symbols only work on the first scene
- Timeline actions at frame 0 in a symbol now fire if timeline is triggered by symbol action
- Changing reflection properties now shows browser compatibility warnings
- Starting a timeline will automatically play time 0 instead of wait a tick
- Fixed a bug where video export might not play timelines correctly
- Fixed issue where timecode couldn’t show minutes 100-999 properly
- Fixed issue where custom behaviors could be lost if changing the action before ending a rename
- Fixed issue where physics body type could show the wrong value with a multiple selection
- Inspector popup buttons handle multiple selection better
- Flexible Layout now works on text elements with unmodified width/height
- Padding and border are properly considered for Flexible Layout proportionality
- Fixed issue where SVGs imported via Background inspector would not have correct original size
- Fixed issue where symbol unload actions wouldn’t be called
- Automatic image optimization now takes image background repeating into account
- Popup menu for adding fonts in Typography inspector
- Possible workaround for rare case of documents failing to open
- Unique element ids are preserved on symbol export/import
- Fix issue where adding a layout would remove link between timeline actions and timelines triggered
- Actions preserve symbol timelines when copying across documents
- Timeline actions inside persistent symbols now return the correct element
- Decimal fields work better on localizations with commas
- Fixed issue where popovers could dismiss too easily with a magic mouse
- New symbols from a selection are placed at an appropriate z-index
- Fixed issue where text could not be selected when dragging backwards
- Fixed issue where elements in flexible layout would be wrong if parent was previously hidden
- Hype no longer has Mobile Safari scene sizes (device sizes only instead)
- Fixed issue with hover state not returning on IE
- Fixed issue where audio would not play first time on IE6-8
- Workaround for audio not firing on touches on iOS 9
- Scene thumbnails now load when opening a template file
- Fixed issue where filter effects could look different when within a group
- Fixed issue where go to time in timeline would not play a later animation
- Timescale numbers will draw more than 3 digits
- Fixed issue where Resource Library could draw incorrectly when reopening a document
- Selecting multiple elements with different scaling behaviors now shows blank in the popup
- Crash fixes
- Many other bug fixes and enhancements
3.0.3 - April 15th, 2015
- PNG Sequence Export
- New About Window
- Symbols API documentation now shows up for Pro
- Fix regression where custom CSS position:fixed would not work correctly
- Updated JavaScript API documentation
- Fixed rare issue where Hype could always complain about Resources missing on launch
- Fixed issue where Pro upgrade window could show up unnecessarily
- Show iPads correctly in preview menu
- Fix issue where gradients could appear wrong in Hype’s scene editor
- Fix bug where layouts wouldn’t change if on layout unload had a start timeline:none action
- Forums Help menu goes to our new forums
- Fix JS Exception when re-laying out document on IE without physics
- Fix issue where video export might halt trying to jump to the next scene
- Animating a body to dynamic type will wake it up
- Do not show scale width/height in properties list
- Move and default cursors can now be set in Italian
- Fix issue where viewport in Hype scene editor would change while playing
- Fix top crashers
3.0.2 - March 19th, 2015
- Fix issue where Mac App Store Pro Upgrade IAP would not keep dark theme as default
- Do not show ‘Convert to Symbol’ context menu on standard version
- Fix a common crash closing a document and editing another
3.0.1 - March 17th, 2015
- Fixed issue with Mac App Store Pro Upgrade IAP that could brick Hype
3.0 - March 17, 2015
- Hype Professional In App Upgrade
- [PRO] Responsive Layouts
- [PRO] Physics
- [PRO] Symbols for creating reusable elements
- [PRO] Persistent Symbols for master content
- [PRO] Dark interface theme
- [PRO] Editable timing functions
- [PRO] Grid system
- [PRO] Rearrangeable interface
- [PRO] Templates
- [PRO] Custom Behaviors
- [PRO] OAM widget export
- Complete UI refresh for Yosemite
- 24 new timing functions
- Scenes can have independent sizes
- Accessibility keyboard navigation improvements
- Scale multiple selected elements together proportionately
- Improved timeline management (duplicate and rearrange)
- Timeline area in the inspector can now be dragged to be made larger
- Ability to set CSS class on elements
- Document option to disable CSS Reset (protect from external styles) for easier class name usage
- Zoom magnification has higher powers
- Added iPhone 6 and 6 Plus document sizes to presets
- CSS Filter effects will now work on Firefox 35+
- Keyboard shortcut for Edit Element’s Inner HTML
- Added 25 frames per second option to video/gif export
- Timeline zoom icons now go to the extreme zoom points
- Tooltips for visibility, locking, motion paths, add keyframe/timeline actions
- Renamed Hype runtime files to HYPE-(version).thin.min.js
- Reduce crashes when moving the Hype.app while running
- Better reduce flash when loading exported widget in iBooks Author
- Hide “On Any Timeline Complete” action handler unless the document already has an any timeline complete action
- Pressing escape will dismiss popover windows
- Dribbble default document sizes
- Better grouping for device scene sizes
- Color picker is now a popover
- Fixed issue where incorrect item may be selected after moving to front/back
- Animation performance improvements on exported documents
- Made animation segments/bars easier to hit with the mouse
- Better scene thumbnail generation
- Fixed issue where timeline action popover could be drawn off the screen
- Better resizing of popover windows
- Popovers animate smoother
- Visibility toggle now occurs on mouse down
- Fixed iOS 8 issue where videos would not play after returning to the scene they were on
- ‘Rename Scene’ menu item
- Fix for touch events on Microsoft Surface
- Correctly close stylesheet and statusbar tags in export HTML
- Properly serve CSS files as stylesheets for previews
- Updated dropbox logo and preference pane
- Use non-prefixed CSS transforms in Runtime for modern browsers
- Fixed issue where calling our timeline API before a scene has loaded should not produce an error
- IBeam cursor for timecode view to show it is editable
- Highlight playback control arrows when using keyboard shortcuts
- Audio in opera now uses HTML5 <audio> tag so mp3s will work
- Increased time allowed to send files via feedback reporter
- Many localization improvements
- Mailing list window waits to prompt for contacts access
- Updates to mailing list window interface
- Updated browser compatibility warnings
- Fix long-standing issue where mouse out doesn’t work when page is scrolled
- Significantly improved motion path performance
- Fixed issue where PNGs with unicode filenames would not appear in IE6-8
- Fixed issue where automatic optimization might choose too small a size
- Better resize cursors for popovers
- Fixed issue where images could not be replaced with SVGs
- Fixed issue where drag select might miss keyframes
- Improved scrolling performance in large documents
- Requires OS X 10.8 and later
2.5.3 - October 8, 2014
- Workaround for animations not showing properly in Chrome 37
- OS X 10.10 Yosemite Fixes
- Resolved issue where Animated GIF exporting could show Built with Hype watermark
- Using timeline actions to pause and continue no longer results in a jump
- Fix rulers flickering on Retina displays
- Welcome screen Getting Started video will play in the window again
2.5.2 - March 26, 2014
- Play once option for Animated GIF exports (no looping)
- Improved proportional scaling behavior
- Fixed an issue where auto-optimized images may have wrong colors and look incorrect with CSS filter effects
- ‘Attach all documents’ button in feedback reporter
- Fixed regression where ${resourcesFolderName} would not work with HTML Widgets
- Better identification of SVG sizes when importing
- Fixed issue where some audio files would hold up document loading in Chrome
- Fixed issue where navigating back in Safari may not relayout a flexible page
- Fixed a crash when exporting some documents as Video/Animated GIF
- Partial fix for box shadows looking different in Hype vs. Safari
- Localization tweaks
2.5.1 - February 18, 2014
- Transparent animated GIF exporting (by unchecking Make Background Transparent)
- Fix issue where videos/iframes were incorrectly positioned in IE6-8
- Border controls will now work in non-english localizations
- On Swipe Right handler now exists in Italian localization
- Export to video/animated GIF preview now displays in non-english localizations
- Fix issue where swipe handlers could interfere with clicking on inner HTML content
- API Change: event.type field for Swipes changed from HypeSwipeAction to HypeSwipeUpAction, HypeSwipeDownAction, HypeSwipeLeftAction, HypeSwipeRightAction
- Fixed frequent crashers
- Center guides don’t disappear anymore when rotating
- Dragging action is now ended properly when ended outside of iFrame
- Fixed timing function menu localization when animations with multiple timing functions are selected
- Fixed issue where some animations do not play during the continue after drag control timeline
- Change ‘Constrain Proportions’ to something sensible in German
- Improved duration calculation for video/animated GIFs
- Fixed issue where images/video/audio with the same name would be grouped together in the Resource Library
- Fixed JavaScript error when swipe is cancelled
- More intelligent about starting a timeline at the start to prevent infinite loops
- Workaround for a Firefox bug where images could fade in and be slightly blurry then sharpen
2.5.0 - January 29, 2014
For more details, visit What’s New in 2.5
- Flexible layouts
- Video and animated GIF export (OS X 10.7+ required for video)
- Spanish, French, German, Chinese, Italian, and Japanese Localizations
- Anchor point for rotation
- Reverse timeline playback
- Scene transition duration control
- Rotate 3D axes individually
- Timeline playhead snapping
- Capo now snaps on the timeline
- Move selected keyframes using the arrow keys
- Go to next/previous keyframe menu item and keyboard shortcuts
- Automatic optimization of images (resizing and compression)
- Slots for Retina images in the Resource Library
- JavaScript APIs for setting/getting timeline direction, getting the current time, getting a timeline’s playback state, getting a timeline’s duration, setting a scene transition’s duration, reversing playback, and relaying out a document
- Pixel positions displayed when moving guides
- Distribute Within Selection menu item
- More clear indication of when recording
- Group single objects
- Timeline actions are always shown
- Linen texture begone!
- Exporting creates a restorable document file which can be loaded from the Help menu
- Document inspector control to edit HTML page title
- Added a preset document size for Tumblr
- Viewport initial-scale=1.0 option
- Changed viewport options
- A drag action is no longer cancelled if a second finger touches the screen
- Changing relative timelines will mark the document as dirty
- Deleting a completely blank scene does not warn about deletion
- Opens scene selector when pasting scene
- Fixed an errant audio warning when having wav and mp3 sources
- Fixed 2.0.1 regression where you can only type one character at a time in the Resource Library search field
- Selection box does not display if selection drag starts on a locked element
- Scene size takes into account 3D rotated elements
- Scene now allows selection of elements which were animated beyond the scene bounds
- Fixed issue in IE where background images could be sized wrong with padding
- Fixed issue where padding would inset background images
- Adding a border no longer offsets element
- Feedback Reporter supports large files
- Feedback Reporter attempts to resend on failure
- Fixed issue where rotation selection handle could show up when it isn’t supposed to
- Fixed issue where playhead could be in wrong position when retiming animation
- Can now move guides while editing text
- Changing a scene name immediately changes the window title
- Fixed issue where adding media to a group in the resource library would not be reflected in the inspector
- Update files dialog cannot be resized too small
- Motion paths always show animation segments even if they start/stop at the same spot
- Improved export checkbox spacing
- Prevents a ‘Control Position’ drag from moving elements off the scene
- Videos will now always be added and autoplayed on the main timeline
- Fixed issue with animating blurs jiggling
- Can now get HypeSwipeAction event types in JavaScript
- Tapping on a scene with a drag will no longer cause the drag to be fired
- Alphabetically sorts the JavaScripts in the Run JavaScript action popup
- Tweaked look of timeline action bar
- Fixed bug where hit area for motion path targets was too large when zoomed in
- Improved audio context resource usage by our runtime
- Fixed UI inconsistency of preview drop-down menu not acting like a dropdown
- “Clear Recently Previewed Devices” is disabled if there were none
- Reveal in Resource Library works better when there are groups
- Fixed issue where elements below a hidden group weren’t selectable
- Fixed bug where tabbing out of the document size settings wouldn’t show the “px” or “%” indicator
- Fixed bug where editing the timecode view could change the color of an element
- Fix crash when exporting a document with SVGs
- Fix crash when reverting document
- Dragging in a PDF now works correctly, and will be automatically optimized
- Smoother rotation animations within Hype
- Fixed issue where Inner HTML might display differently in Hype than in Exports
- Using Command-Control-K to set Capo will turn on recording if it was off
- Hardening against Resource Library corruption
- Fixed bug where clicks in Chrome on Windows 8.1 would not register
- Removed Retina versions of document size defaults since we better support Retina images
- Fix some top crashes
- Buttons with drag handlers will now exit the pressed state
- Resource Library does not allow opening in external editor when using the Quick Look feature
- Rotation now works correctly in IE 9
- Fixed issue where a warning would incorrectly appear when making a motion path
- Go to time will now more aggressively set properties from the timeline
- Fixed regression where
${resourcesFolderName} was not being substituted in JavaScript - Fixed an issue where log file could grow too large - Fixed bug where audio would not play in Chrome 32+
2.0.2 - November 14, 2013
- Fix audio not working on Firefox 25
- Workaround for issue where iBooks would crash with audio by using HTML5 audio instead of the Web Audio API
- Fix issue where a non-preloaded audio would require two taps to play on iOS
- Fix issue where audio would not play in an epub in iBooks on iOS
- Rotation follows motion path now works on IE6-8
- If “Draw scene backgrounds” is unchecked it will not set a document background color
- Fix issue where scene does not fully transition out on scene unload
- Fix an issue where Go to Time in Timeline may not work correctly
- Fix issue where scrolling won’t work if a mouse event is set
- Does not show incorrect browser warning when having wav and mp3
- Fix error when uploading documents via Feedback Reporter on 10.9
2.0.1 - September 30, 2013
- Fixed crashes
- Cache manifest will now work when resources have spaces in their filename
- Fixed bug where timelines would not run on scene unload
- Fix exception when using custom fonts with IE 6-8
- Typekit fonts will now preview within Hype if “localhost” is set on the kit as a valid server
- Fixed bug where fonts would be duplicated when reverting document
- Quick Look preview properly shows multiple scenes
- Fixed bug where elements would not move and rotate along path in Safari 5.1
- Fixed bug where text alignment could be wrong in new text boxes
- Fixed issue where QuickTime videos would not play in Chrome
- Some motion paths animate more smoothly
- Timelines triggered in the kHypeGesturePhaseEnd can animate properties from the drag timeline
- Fixed HTML Widget positioning on Safari 6.1 and 7
- Fixed a bug where videos with autoplay might not play at the right time
- No longer draws non-animating segments in the timeline when motion paths are active
- Documentation viewer has the right URL for gestures
- Fixed issue where edited text would jump to the bottom when adding a font
- Fixed regression where SVGs could not be replaced with SVGs in the Resource Library
- Fixed bug where scrolling would be off after expanding a group in the timeline view
- Fixed bug where play sound timeline action would be pre-populated with last action
- Fixed issue reverting with certain head HTML
- Editing Head HTML now marks a document as dirty
- Reverting Head HTML now works correctly
- Fixed bug where selection halo may be incorrect when using motion paths
- Fixed bug when scrollbars may not appear correctly when toggling system display preference
- Fixed typo mentioning “Hype Preview” instead of “Hype Reflect”
- Disable “Use touch events” in the document inspector when no documents are active
- Better undo menu naming for motion path operations
2.0.0 - August 20, 2013
For more details and a tutorial video, please see What’s New In Tumult Hype 2.0.
- Instant previews to iOS with Hype Reflect
- Audio actions
- Curved Motion Paths
- Google Fonts and custom web fonts
- Scene-level Swipe left/right/up/down events
- Element and scene-level drag events
- Touch and tap handlers joined with mouse action handlers
- iOS web app support
- Option to hide iOS location bar on page load
- Option to prevent iOS tap highlighting
- Support for offline web content using cache manifest file
- Preview toolbar button now offers a list of all browsers and devices running Hype Reflect
- Search engine support with option to export text contents
- Added two new shapes — circle and rounded rectangle
- Renamed “Box” to Rectangle for consistency
- Quick Look support
- Full Screen support
- Spotlight support
- Introduced a new JavaScript API to get the id of the exported document’s container div:
hypeDocument.documentId() - Double clicking a function’s or variable’s row in the documentation viewer inserts the function or variable
- Added a View > Center on Scene command, to quickly center Tumult Hype’s scene editor on the scene itself
- Better rotation control in Metrics inspector which now handles counter-clockwise rotation in addition to clockwise.
- Multiple elements can now be rotated in the scene editor by selecting multiple elements and command-dragging on a selected element’s corner resize handle
- Support for Opera 15
- Browser compatibility data has been updated for the latest browsers
- iOS 5’s Safari is now the minimum browser for Mobile Safari warnings
- By default, only common browsers will be shown as choices in preview menus; this behavior can be toggled by a new “Only show recommended browsers in preview menu” option in Tumult Hype’s preferences
- Scene transitions have been completely rewritten; the new system avoids gaps in Push transitions and all transitions are now more consistent across browsers
- Unlicensed copies of Tumult Hype 2.0 warn about upgrading when opening 1.x documents
- Anonymous usage reporting has been enabled; data is only submitted if the user has explicitly agreed
- Tumult Hype 2’s “bundle identifier” has been changed from
com.tumult.Hypetocom.tumult.Hype2 - Fixed many common crashes
- Resolved issue where YouTube videos would not display properly or work with iBooks Author documents
- Insulates custom JavaScript so if there are errors it won’t interfere with the timeline
- Pressing Enter while completing kanji no longer clears the text in inner HTML editor
- Transparent PNGs now work on IE 6, and no longer render incorrectly on IE 7
- Custom keyboard shortcuts broken on Lion when sandboxed (must quit and relaunch for custom keyboard shortcut changes to be noticed)
- The Brightness CSS Filter now works properly in Chrome
- Fixed bug where CSS3 Filter Effect Brightness could be applied incorrectly when using Safari Seed
- Guide creator dialog is incorrectly sized on first open
- Now scrolls to the appropriate item after choosing Reveal in Resource Library
- Animated GIFs now animate in documents that have been exported to Dropbox
- CSS Filter Effect controls have been moved to the bottom of the Element inspector
- The Media Browser is better behaved with multiple spaces, and with Full Screen
- Warn that TIFF and PSD images don’t render in most browsers
- No longer incorrectly warn that iBooks doesn’t support CSS Filters
- No longer incorrectly warn about video incompatibilities for image elements
- Video warnings now have a correct category warning
- Mouse events work properly in IE 9 when the document is in “quirks mode”
- Opacity is now animated under IE 9 when the document is in “quirks mode”
- Fixed an issue where setting and unsetting the blur CSS Filter Effect would cause images to remain blurry
- Buttons without a fill, with no background image, or with a transparent fill color now behave properly on IE 6 through IE 8
- No longer incorrectly warn about SVG incompatibility with IE 9
- Prevent videos from being replaced with images, and vice versa
- Fixed a case where a text element’s background color would be drawn outside of the element’s bounds
- Fixed a case where non-left aligned text elements could resize incorrectly on their first edit
- Fixed a case where the element rotation cursor may be shown at inappropriate times
- Fix assorted cases where text elements’ content could appear differently in the scene editor vs. the previewed or exported document.
- Fix case where replacing an image would not update proportion constraints for proper resizing.
- Fix possible crash when opening certain malformed documents.
- Fix case where documents with more than 99 HTML widgets would not properly export HTML widgets after the 99th.
- Ensure selected element lock state does not interfere with timeline or scene actions.
- Harden the scene editor against margin and border style changes in document head.
- Underline menu item state incorrectly and behavior broken if Text inspector active.
- Fixed launch-time logs seen on 10.6
- Fixed an issue where iFrames could be incorrectly exported
- Fixed an issue where images pasted into a document would have their size reported as 0b in the Resource Library
- Fixed an issue where new text boxes could display the wrong font in Internet Explorer 8
- Absolute timelines with one keyframe now apply keyframe’s value changes
- Improve document state restoration behavior
- Text background gradients now appear in Safari and Chrome
- Fix issue for rotated gradients in IE 10
- Better check for and warn about possible permissions errors when exporting while sandboxed
- Fix for buttons not showing pressed state on mobile devices
- Export errors correctly propagated when exporting fails
- Support scene scrolling when dragging or resizing an element past visible scene bounds when full screened
- Many other small improvements, bug fixes, and polish
1.6.2 - April 9, 2013
- Developer News window for critical information
- Fixed regression where black outline can appear around PNGs in IE7-8
- Gradients in IE 10 will be rotated properly
- Workaround for Mac App Sandboxing bug of keyboard shortcuts not working on Mac OS X 10.7
- Resolved issue with Mac OS X 10.7-10.7.2 where resources may not behave correctly
- Warn when hitting Mac App Sandboxing bug that appears as a permissions error
- Prompt to update when opening a document created with a newer version of Tumult Hype
- Fix a crasher when opening documents
- Mouse events work properly in IE 9 when the document is in “quirks mode”
- Opacity is now animated under IE 9 when the document is in “quirks mode”
1.6.1 - February 12, 2013
- Changed “.resources” export folder name to “.hyperesources” to prevent problems displaying on older Microsoft IIS web servers (such as those used by GoDaddy)
- Fixed bug where Chrome or Safari may not animate or show trails when elements have a blur
- Fixed crash when playing and moving animation at the same time
- Fixed regression where Go To URL would open inside of iframes
- Command-clicking to rotate will now work when zoomed out
- Resolved crash on older versions of Mac OS X 10.7
- Fixed issue where some users could not preview in Chrome
- Does not show window outline when using multiple desktops/mission control
- Fixed regression where Go To URL would not work on IE9 and Opera in some cases
- Deleted resources will not be exported
- Edit Head HTML button is properly disabled when there are no open documents
- Workaround sandboxing issue where we may not always know preview browser versions
- Undoing/redoing “Include in document <head>” displays code in head correctly
- Fixed issue iPhone Simulator would not work for previews
- Workaround iBooks Author bug where videos would not display if they contain certain characters
- Fixed bug where Resource Library may appear blank
- Fixed issue where a final timeline action may not always get triggered
- Stacks of keyframes now draws relative keyframes properly rounded
- JavaScript documentation updates
1.6.0 - January 7, 2013
For more details and a tutorial video, please see What’s New In Tumult Hype 1.6.
- Support for CSS Filter Effects (requires Safari 6 to be installed)
- Resource Library for managing images, videos, functions, and document assets
- Capo: create arbitrary animation start times
- Layout guides to a scene in bulk, defining either a distance between or a number of guides
- Retina artwork and icons in the application
- Tumult Hype is now Sandboxed
- New actions to pause, continue, and jump to specific times
- Timeline Actions which can be triggered at any point on the timeline
- Action chaining to make sophisticated flows
- The document’s HTML <head> contents can now be modified
- Preloading of images can now be toggled via the Resource Library
- Support for IE10 3D transforms and gradients
- More iOS-supported fonts in the font panel
- Timelines can now be set to have absolute or relative initial keyframes
- Absolute keyframes, rather than relative keyframes, are now the default for new timelines
- Reduce HYPE.js size to 38.08 KB (279 bytes less than 1.5.2!)
- API Documentation Viewer for Javascript and <head> editors
- Syntax highlighting for Javascript and CSS within HTML
- JavaScript APIs for starting, pausing, and continuing timelines, as well as jumping to a specific time on a timeline
- JavaScript API for invoking custom JavaScript functions written in Tumult Hype
- JavaScript API for getting the URL of the document’s associated resources folder
- Added event.timelineName property to the On Animation Complete javascript callback to determine which was completed
- External scripts can now register for callbacks on HypeDocumentLoad / HypeSceneLoad / HypeSceneUnload /HypeTimelineComplete events
- Identical Tumult Hype documents can now be loaded in the same HTML page
- Find/Replace support for Tumult Hype’s JavaScript editor
- Indent/Outdent keyboard shortcuts for JavaScript editing
- Browser warnings are now defined by a minimum version number or ‘none’, rather than discrete checkboxes, per browser
- Rotate elements on their z-axis by command clicking on a corner resize point and dragging
- With multiple elements selected, resizing one will proportionally resize all other selected elements
- Option to enable/disable webkit graphics acceleration in Document Inspector
- Generates iBooks Author/Dashboard widget thumbnail from the current scene and time
- Generates retina @2x thumbnails for iBooks Author/Dashboard widgets
- Browser compatibility warnings for iBooks 3
- Show and hide user created guides
- Command-clicking lock/visibility will toggle all, option-clicking will toggle others
- Previews are now handled via a built-in server, rather than via exported files
- During editing, text elements now respect the selected text’s justification when resizing (e.g. right justified text will cause the text element to resize from the left)
- Pressing the Escape key while editing an element will end editing
- Keyframes can now be stacked, when animations overlap on the timeline and represents an instant transition
- Multiple animations or keyframes can be selected via shift clicking
- Way to have extended trials
- “Play Timeline” action has been renamed to “Start Timeline”
- “On Animation Complete” has been renamed to “On Timeline Complete”
- “Use Vertical Layout” has been renamed to “Widescreen Layout”
- Document resource folder name is now “documentName”.resources rather than “documentName”_Resources
- Show Guides menu item is now in the Arrange > Guides submenu
- Arrange > Align menu items have been renamed and rearranged for clarity
- Added document sizes for iPad 3 and iPhone 5
- Does not have the “Build with Hype” watermark enabled by default
- The “Built With Hype” now opens https://tumult.com/hype/ in a new browser window
- Fixed nasty bug where resources might go missing
- IE 10 and other current browser compatibility updates
- Aliases to images and videos are now resolved to the source file when added to a document
- Animation segments in the element list can now be resized such that all associated animations are reversed
- Changes made in the inspector are now applied before changing scenes
- Documents with a ‘.’ in their name will now preview with the correct name
- Documents with a space at the end of their file name can now be uploaded to Dropbox
- Duplicating an element nested in a group will create the new element in the same group
- Elements with invalid origins or sizes will no longer prevent documents from being edited
- Elements with zero width and/or height are better handled
- Fixed a case where the selected element may not be highlighted in the element list
- Fixed issue causing text elements to wrap when being edited near the scene bounds
- Fixed issue where button states could be displayed incorrectly
- Fixed issue where guides would always be locked even if no guides are present, preventing any new guides from being added
- Fixed issue where identically named timelines would prevent any timeline other than the first such named timeline from being edited
- Fixed issue where moving elements into or out of groups could lead to incorrect z-ordering
- Fixed issue where playing the main timeline on scene load could lead to issues when transitioning to other scenes
- Fixed issue where pressing the spacebar while editing an HTML Widget would play or pause playback rather than insert a space
- Fixed issue where scene would not properly update if an edited element’s text scrolled past the bottom of the visible window
- Fixed issue where the Format > Font > Bigger/Smaller might not have any effect
- Fixed issue where videos could be incorrectly positioned on IE 8 and earlier
- Fixed issues where Inspector could take focus, losing changes to text elements, or preventing keyboard commands (such as playing and pausing using the space bar) from being honored by the scene editor
- Fixed some cases where images would flicker after a scene change on Chrome and Safari 6
- Fixed some cases where the scene border would be drawn incorrectly after launching Tumult Hype
- Generate Dashboard and iBooks Author Widget thumbnails at the correct pixel size
- Tumult Hype quits more quickly
- Shows reflections during scene transitions
- Scene selector will no longer have focus after a change has been made
- Fix issue where the scene would redraw/flicker when recording animations
- Properly preserve nesting when making groups
- Fixed issue where pasted text would wrongly resize together
- Does not allow elements/groups in hidden groups to be selected
- Fixed bug where undo would not work correctly when moving keyframes
- Trebuchet MS will now display in Firefox and IE
- Do not allow timing functions to change on locked elements
- Properly sandbox margin-left for li in CSS Reset
- IE6-8 video elements (using quicktime plugin) will pause on scene unload
- Fixed several crashers
- Does not warn about text-shadow for IE10 as it supports it
- Fixed bug where grouped elements will look bad on Retina macs within Tumult Hype
- Fixed bug where ‘open in window’ would not work on iOS webapps
- Fix bug where animations can be resized to a time less than zero
- Command-clicking on links will now open in a new tab for some browsers
- Correctly use iBooks Author document sizes
- Better warning for iOS 6 autoplaying
- Improved guideline hit detection and snapping for cases when many guides are close together
- Improved timeline resize behavior when moving keyframes or animation segments at the end of the timeline
- It’s now possible to undo the deletion of video elements with multiple sources
- Line height can now always be modified, even if the element already has multiple line heights defined
- Made element resize handles easier to click and drag
- Many issues around dragging multiple animations and/or keyframes have been resolved
- New documents respect ruler visibility changes made with earlier documents
- Pasting content when a button is in a state other than “Normal” now works properly
- Popovers are now dismissed when their associated document window is closed
- Removing all guides will now remove guides that covered each other
- Resizing proportionally constrained elements past scene bounds no longer causes erratic element movement
- Text Spacing can now be set back to “Auto” after having been set to a different value
- Text shadow offsets can now have negative values
- The loop button’s state is now properly preserved after changing scenes
- The playhead will now remain visible when moved with keyboard shortcuts, even if it moves beyond the timeline’s current visible bounds
- When resizing an element nested in a group, resize guides are now drawn correctly
- Many top crashes have been fixed
1.5.2 - September 20, 2012
- Mountain Lion minor fixes
- Command-clicking lock/visibility will toggle all, option-clicking will toggle others
- Added event.timelineName property to the On Animation Complete javascript callback to determine which was completed
- Workaround for issue where Chrome and now Safari 6 images would flicker when using Dropbox
- Improved element placement on IE6-8
- Fixed issues where z-index may be incorrect inside groups
- Improved scrolling on iOS for the HTML Widget
- Fixed top crasher that could occur when closing documents with videos
- Fixed an 1.5.0 regression where button states might display incorrectly
- Fixed an issue where a crash could occur when resizing the document
- Updated to latest Dropbox SDK which handles /public folder deprecation
- Properly generates thumbnail images on Retina Macs for iBooks Author
- Hang reporting mechanism
- Better focus behavior for the inspector
- Quits faster
- Fixes issue where sometimes the spacebar could not be used to pause
- Better handles adding alias files
- Keyboard shortcuts for moving playhead will also scroll the view when necessary
- Improved ability to resize/move animations near the end of the timeline
- Fixed issue where duplicating an element in a group would make the duplicate outside the group
- Fixed issue where playing the main timeline on scene load could lead to wonkiness when transitioning to other scenes
- Does not show the iframe border in IE7-8
1.5.1 - May 9, 2012
- Copy/Paste Scenes
- Option-clicking the keyframe button will add keyframes for every visible property on selected elements
- Attachments can now be added to feedback reporter
- Fixed issue where rotated elements would not show up correctly in IE
- Restored v1.0.x’s rotateY(0deg) trick for performance improvements
- Fixed issue where scenes might not be able to be duplicated
- Animations in groups are now pasted correctly
- Fixed bug where overlapping elements might not be able to move
- Fixed issue where 0px by 0px elements (like audio) would eat mouse selection
- Faster loading on IE9 for documents with lots of images
- Fixed issue where jQuery could interfere with Tumult Hype animations
- Reverting will correctly revert open JavaScripts
- Fixed issue where scrollbars could not be dragged when ruler is visible
- Resolved issue where locked guides would not allow elements to be moved
- Fixed issue where double-clicking rulers would change the document layout
- Locking disallows mouse action manipulation
- Fixed issue where swap transitions would show elements outside of scene
- Fixed issue where missing fonts could lead to not being able to edit Javascript/InnerHTML
1.5.0 - February 23, 2012
For more details and a tutorial video, please see What’s New In Tumult Hype 1.5.
- Redesigned animation interface separating element and keyframe editing
- Grouping
- Scene zooming
- Element locking and visibility toggles
- Improved Lion support (Versions, Autosave, Scrolling)
- ‘Export as HTML5 > Dashboard/iBooks Author Widget’
- Rulers
- Custom Guidelines
- “Paste with Animations” for element copying
- Bounce and instant animation timing functions
- Insert “HTML Widget” for arbitrary code/script execution
- Exported Javascript is significantly smaller (generally 1/3 the size of 1.0.5; a minimal document only requires 41 KB download)
- New app icon
- Can change window layout to have vertical timelines on the right
- Accurate motion paths when selecting elements
- Hex color picker
- Compose email action
- Context menus throughout the application
- Improved selection behavior so selections made in the element list are preserved
- 3D support for Firefox 10
- Updated supported browser list/warnings
- Selection colors better show which view is active
- Relative element spacing and sizing snapping
- Editable Timecode/Go to Time (command-shift-t)
- Ability to set your own ids on elements
- Custom javascript functions now get the triggering event
- Easier to adjust items at the end of a timeline
- Document default sizes for mobile banner ads, iPhone retina displays, and iBooks Author Widgets
- Playhead does not cover timeline (ticks reversed)
- Malformed javascript no longer kills the page
- hypeDocument.getElementById() API added
- Can run <script> if there’s no source in innerHTML
- Top-level HYPE object is now versioned to avoid conflicts
- Adopted window.requestAnimationFrame for better browser performance
- Push and Crossfade scene transitions for more browsers
- Context menu item to refresh inner html content
- Rearranged menu items (preview is now in the File menu)
- New keyboard shortcuts for exporting, animation navigation
- Fixed issue where Save/Save As would not work complaining “File exists”
- Worked around IE issue where IE6 would report “Stack Overflow on Line 0”
- Worked around Safari issue where rotated elements would not be animated correctly
- Worked around Safari issue where full screen videos would not display properly
- Fix issue where background color for elements may be unable to be changed
- Fixed issue where the color picker’s colors would not match
- Removed CSS3 Transitions and forced hardware compositing
- Resource tracking is better about notifying for changes on launch
- Fixed bug where the spacebar would sometimes stop working for playing
- Worked around IE issue where it doesn’t always capture mouse events when background fill style is none
- Fixed issue where videos could appear blank
- Less renaming (Image-1, Image-2) of resources
- Fixed console warnings in Firefox about parentElement
- If an image is changed outside of Tumult Hype and then adopted, the “original size” value is now updated
- Scene duplication will add a scene after the currently selected scene
- Fix issue where mouseout events could happen from the wrong scene
- Original width/height now update when choosing a new background image
- Properly updates element position when changing timing functions
- Workaround potential issue where timecode view font can’t load
- Fixed bug where element may not rotate in exported version if rotation animation was copied to the element
- Fixed bug where playTimeline() API would not work on scene load
- Disable Mac OS X’s automatic text substitutions
- Fixed graphics glitch when scrolling javascript on Lion
- Fixed issues with scene thumbnail drawing
- Fixed issue where Inner HTML editor may disappear
- Fixed issue where animation configuration might not be displayed on screen
- Fixed issue where deleting the last bracket in a function would not let you add it back
- Fixed issue where content was not completely sandboxed from rest of page in Firefox
- Fixed issue where button may not show accurately on different timelines
- Fixed issue where a text shadow of 0px 0px was still showing a small shadow
- Fixed issue where changing scenes during a scene change could lead to the wrong/blank scene
- Fixed issue where items could be randomly selected after deleting elements
- Fixed bug where animation popover would be in the wrong place after a scroll
- Fixed data loss where changing a timeline would discard inner html edits
- Fixed issue where export warning dialog window could be improperly sized
- Fixed issue where editing javascript did not reflect in the document being modified
- Fixed issue where editing the animation timing function did not reflect in the document being modified
- Improved timeline execution performance
- Fixed issue where feedback reporter dialog would be on top of other application windows
- Fixed feedback reporter window sizing issues
- Fixed bug where text spacing controls would show fractions
- Fixed element placement
- Removed print toolbar button
- Fixed bug where the preference pane may be highlighting the wrong view
- Fix issue where saving a document while editing inner html would not result in the inner html being saved
- Many performance improvements
- Fixed other crashers
1.0.5 - September 1, 2011
- Fixed 1.0.4 regression where key action handlers could cause the document to be blank on export
- More Lion Fixes
- Resolved issue where video elements could appear blank on launch
- Fixed issue where border stroke colors might not be set properly
- Fixed bug where dragging and dropping in the element list could result in the wrong z-index
- Better support for special characters in resources
1.0.4 - August 7, 2011
- 14-day full trial support
- Non Mac App Store purchasing option
- Radial snapping when holding the shift key while dragging
- Fixed color picker glitches for background color with HSV/CMYK/different profiles
- Copy/Pasting preserves z-ordering of elements
- Fix some cases where resources aren’t being deleted
- Fix issue where button images could get stuck in the hover state for IE
- Fixed issue where rotation would be offset in IE 6-8
- Fixed issue where video would sometimes not play on IE 6-8
- Duplicating a scene will duplicate scene actions
- Force utilizing hardware acceleration
- Setting an image in the element inspector will unset the background color
- Faster performance and less jittering when playing back with large elements
- Lion fixes
- Open URL action now will break out of iframes
- Performance improvements when opening/previewing large documents
- Fixed issue where element editor could be shown over JavaScripts
- Fix issue where X or Y rotations could cause Z rotations in Firefox
- Do not allow interaction with iframes in the scene editor
- Fixed crasher when playing or changing scenes and closing the document
- Shows warnings for scene actions
- Fixed issue where changing shadow color could also change text color
- Workaround for all text not being selected when entering edit mode with Safari 5.1
- Updated to latest iMedia Browser Framework
- Resolved issue where HYPE.js could be loaded multiple times
- Removed border from iframe CSS reset
- HYPE.documents properly lists all Tumult Hype embeds on the page
- Fixed issue where keypress handlers would not be removed
- Re-initialize dropbox sheet for each export
- Fix issue where documents would not save if a timeline was undone
- Fixed Lion scroller issue
- Fix issue where public API doesn’t expose kSceneTransitionPushRightToLeft
- CSS Resets background-color appropriately
- Does not allow editing before “function” in javascripts
- Faster export time if warnings are turned off
- Many other misc. fixes
1.0.3 - June 14, 2011
- Implemented Revert to Saved
- Fixed issue where buttons could not be clicked on their text
- Fixed issue with images not working in iframes for IE/Firefox only
- PNGs in IE look much better
- Fixed crash/hang when trying to look for resources on unreachable servers
- Fixed issue where some characters could cause parse errors for the JSON
- Fixed issue where negative widths/heights could cause animation to behave unexpectedly
- Fixed issue not being able to duplicate scenes from an older version
- Fixed issue where timelines could not run at scene load/unload time
- Fixed issue where Dreamweaver could kill Tumult Hype’s output
- If text is 100% opaque, don’t use alpha filter so it looks better in IE
- Remove shadow and reflection if not actually used
- Remove mouse actions if not actually used
- Fix video on next big cat
1.0.2 - May 31, 2011
- Show “Built with Hype” can additionally be found in general preferences
- Fixed regression saving when duplicating scenes without animations
- Fixed issues with the next big cat
- Fixed color picker issue where colors won’t apply
- Fixed crash on close for the feedback reporter
- Other misc. fixes
1.0.1 - May 27, 2011
- Easier separation between HTML and Resources (you only need to edit the script tag’s src in the HTML)
- Fixed issue where the preview/export could be blank
- Fixed issue with deleting duplicated scenes using buttons
- Fixed issue preventing Tumult Hype documents from being embedded in iframes
- Fixed text shadows not always showing up for buttons
1.0.0 - May 20, 2011
- Initial Release